background image

Waterproof Drones - The HexH2O and QuadH2O professional waterproof drones

Waterproof Multirotors
https://www.quadh2o.com

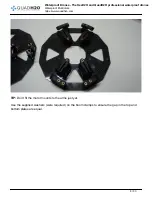
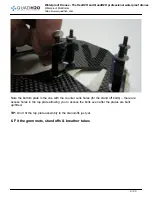
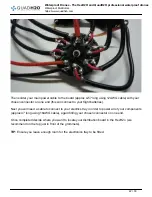
TIP: Insert the corner bolt (pictured) prior to fixing the motor to the carbon plate as it will be covered
by the motor cables once fitted.

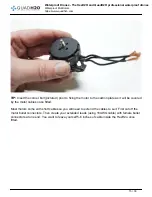
Most motors come with short cables so you will need to extend the cables to suit. First cut off the
motor bullet connectors. Then create your extended leads (using 18AWG cable) with female bullet
connectors at one end. You want to leave yourself 5-6 inches of cable inside the HexH2o once
fitted.

                            15 / 30

Summary of Contents for HexH2O

Page 1: ...to build the HexH2o in whichever way you wish Our tutorial is in no way a definitive guide however it is recommended it s followed as closely as possible in order to obtain the most from your purchas...

Page 2: ...ips Perspex viewing dome and rear hatch with retaining clips and seal 7 x Black Anodized ESC heat sinks frame holes pre cut Carbon top and bottom plates stand offs 6 x Carbon Fibre 16mm arms 6 x Light...

Page 3: ...f Drones The HexH2O and QuadH2O professional waterproof drones Waterproof Multirotors https www quadh2o com 2 Tools for the job Below is an overview of the recommended tools required to build your Qua...

Page 4: ...solder Heat shrink various sizes Quick drying 5min Epoxy Marine grade sealant Sikaflex 291i recommended Hot glue gun Cables for wiring harness and extending motor cables Bullet connectors 18 female 3...

Page 5: ...r suitable water container Carefully lower the front of the HexH2o into the water just enough to ensure the dome is submerged and check to ensure its water tight If water does come through check the f...

Page 6: ...Adding a small amount of silicone grease to the seals will help to retain a water tight seal 4 Fitting the foam buoyancy aids Using the provided velcro fit the buoyancy aids to either side of the hul...

Page 7: ...proof Multirotors https www quadh2o com Using the provided components build up the top and bottom carbon plates arms and mounting clamps You will note that the arms have holes pre drilled at the ends...

Page 8: ...fessional waterproof drones Waterproof Multirotors https www quadh2o com TIP Don t fit the motor mounts to the arms just yet Use the supplied washers were required on the boom clamps to ensure the gap...

Page 9: ...m Note the bottom plate is the one with the counter sunk holes for the stand off bolts there are access holes in the top plate allowing you to access the bolts even after the plates are built up fitte...

Page 10: ...es in the top of the hull then fit the 2 remaining smaller grommets into the pre cut breather tube holes see picture Now fit the provided breather tubes through the breather tube grommets leave approx...

Page 11: ...plied 20mm top plate stand offs to the HexH2o ensuring you fit one 2mm washer supplied on either side of the HexH2o body bolt washer HexH2o washer stand off don t forget thread lock Finally fit your t...

Page 12: ...www quadh2o com Next mount the base of GPS holder the smaller half to the top plate using some of the 3M pads that comes with your Naza GPS as pictured do not cover any top plate screws or the stand...

Page 13: ...terproof Drones The HexH2O and QuadH2O professional waterproof drones Waterproof Multirotors https www quadh2o com Using the provided DJI 3M tape mount the GPS unit to the inside of the GPS mount 13 3...

Page 14: ...the top half of the GPS unit in place effectively sealing the Naza GPS inside the holder Run the GPS cable through the pre drilled slotted hole in the top of the HexH2o frame then using the supplied...

Page 15: ...tor to the carbon plate as it will be covered by the motor cables once fitted Most motors come with short cables so you will need to extend the cables to suit First cut off the motor bullet connectors...

Page 16: ...2O professional waterproof drones Waterproof Multirotors https www quadh2o com Feed the cables through the motor grommets from the inside of the HexH2o out then run them down the arm leaving the ends...

Page 17: ...ount and slide the motor mount onto the arm and fix in placer using the provided bolts Each arm has pre drilled holes at each end one end specifically fits the motor mounts whilst the other end is for...

Page 18: ...hull and fit your motor mount to the arm and then your motor motor mount carbon top plate to the motor mount don t forget thread lock 9 Video Transmitter SMA Lead If you are using a video transmitter...

Page 19: ...ofessional waterproof drones Waterproof Multirotors https www quadh2o com We then use a SMA cable which connects to the antenna on the outside of the HexH2o Once fitted ensure you seal the area from t...

Page 20: ...erproof Drones The HexH2O and QuadH2O professional waterproof drones Waterproof Multirotors https www quadh2o com TIP Ensure you pick a location for the Antenna that does not foul the folding arms 20...

Page 21: ...ight seal Effectively sealing everything that comes through the HexH2O body 10 ESC s and distribution board First thing to do it mount the heat sinks to the ESC s using a heat sink as a template caref...

Page 22: ...is will connect to your flight batteries Next you will need a cable to connect to your electrics tray in order to power all of your components approx 4 long using 16AWG cable again fitting your chosen...

Page 23: ...screw the distribution board to the stand off using the supplied bolt Now its time to fit the ESC s in place apply a generous amount of Marine grade sealant around the base of the heat sink then care...

Page 24: ...ave provided a location mount for the NAZA don t forget the tray sits at the top of the HexH2o so you must mount the Naza upside down on the board see pic Screw the fan in place as per the picture Mou...

Page 25: ...Waterproof Drones The HexH2O and QuadH2O professional waterproof drones Waterproof Multirotors https www quadh2o com TIP Ensure nothing is in the way of the gimbal 25 30...

Page 26: ...al but it enables you to view the LED status without having any reflections being picked up by your GoPro Decide where you want to mount the LED carefully drill a 4 5mm hole in the frame use masking t...

Page 27: ...of Multirotors https www quadh2o com Finally fix the LED unit over the stand off using some of the provided velcro Using Velcro means you can easily remove it should you need to plug the Naza into the...

Page 28: ...Waterproof Drones The HexH2O and QuadH2O professional waterproof drones Waterproof Multirotors https www quadh2o com TIP Ensure the area is water tight 28 30...

Page 29: ...attery etc and go have a fly Note at this stage you just want to ensure everything is set up correctly first and do a couple of test configuration flights OVER LAND Only attempt to fly over water once...

Page 30: ...Waterproof Drones The HexH2O and QuadH2O professional waterproof drones Waterproof Multirotors https www quadh2o com Powered by TCPDF www tcpdf org 30 30...

Reviews: