background image

User Guide

IS-460

Franking machine

Summary of Contents for IS-460

Page 1: ...User Guide IS 460 Franking machine ...

Page 2: ...ings Details 64 3 8 Advanced Operations 79 4 Money Operations 81 4 1 Overview 83 4 2 Managing Credit 84 4 3 Unlocking the PSD Postal Inspection 87 5 Managing Accounts and Assigning Rights 89 5 1 Accounting and Assigning Rights Overview 91 5 2 Selecting an Account Mode 93 5 3 Guidelines to Setup an Account 94 5 4 Selecting an Account Mode 99 5 5 Managing Accounts 100 5 6 Managing Operators 112 5 7 ...

Page 3: ...Management 188 9 Options and Updates 189 9 1 Options and Updates Process 191 9 2 Using the Mailbox 192 9 3 Managing Options 194 9 4 Managing Slogan 196 9 5 Managing ERAs 198 9 6 Managing Postal Rates 200 9 7 Managing Prepaid Imprints PPI 202 9 8 Updating System Software 204 10 Maintaining your Mailing System 207 10 1 Maintaining the Ink Cartridge 209 10 2 Filling and Adjusting the Feeder Sealer 21...

Page 4: ...cautions and environ mental recommendations to operate your equipment in the best possible conditions 1 1 What you will find in this Manual 3 1 2 Safety Requirements 5 How to Disconnect your Mailing System 9 1 Read this First DELTA3_UK book Page 1 Lundi 29 octobre 2012 6 29 18 ...

Page 5: ...Read this First 2 1 DELTA3_UK book Page 2 Lundi 29 octobre 2012 6 29 18 ...

Page 6: ... a user or set up accounts and control access to the Mailing System as the supervisor Section 6 Reports How you can generate and print out reports for the Mailing System usage credit usage account usage etc Section 7 Online Services Using your Mailing System to access Online Services and connect your sys tem for upgrades Section 8 Configuring your Mailing System All the specifications of your Mail...

Page 7: ...dicates that you have to log in as the supervi sor using the supervisor PIN to perform the procedure Post age functions of the Mailing System are not accessible in this mode Acronym Description ALD Automatic Label Dispenser Credit Postage amount available ERA External Return Address ID IDentification LAN Local Area Network link between computers MAS Mail Accounting Software allows you to remotely ...

Page 8: ... over sharp edges Avoid using outlets controlled by wall switches or shared by other equipment Make sure there is no strain on the power supply cord 1 2 Safety Requirements THIS SYSTEM MUST BE GROUNDED Only connect the power plug to an outlet provided with a pro tective ground contact To reduce the risk of fire use only the power cord supplied with the Mailing System Do not use ground adaptors Do ...

Page 9: ... environmental pro tection by consulting your retailer internet site or by contacting him He will inform you of the collection and treatment processes of these machines CE compliance Products presented in this guide are conform to requirements of directives number 73 23 CEE and 89 336 CEE This is a class A product Operation of this equipment in a resi dential area is likely to cause harmful interf...

Page 10: ...g System When removing jammed material avoid using too much force to prevent personal injury and damaging components When lifting covers wait for all parts to stop moving before placing hands near the feeder path or printhead To prevent overheating do not block the ventilation openings or try to stop the power supply fans Do not remove bolted covers as they enclose potentially hazardous parts that...

Page 11: ...e additional precautions below Avoid using your system during an electrical storm as there may be a risk of elec trical shock from lightning Do not install telephone jacks or LAN connectors in a wet location Disconnect the telephone or LAN cable from the wall before moving your system To prevent damage to equipment do not confuse telephone jacks that connect to the modem and LAN connectors that ar...

Page 12: ... System to OFF Mode p 25 2 Unplug the power cord from the wall outlet 3 Unplug the LAN cable and the telephone cord from their sockets as they may still be energized Only unplug the power cord when the Mailing System is in OFF mode or Sleep mode to avoid keeping the ink cartridge in an unprotected position where the ink may dry out and become unusable DELTA3_UK book Page 9 Lundi 29 octobre 2012 6 ...

Page 13: ...Read this First 10 1 DELTA3_UK book Page 10 Lundi 29 octobre 2012 6 29 18 ...

Page 14: ...stem Layout 13 2 2 Accessories 16 2 3 Control Panel Features 17 2 4 Connections 20 2 5 Power Management 24 How to Turn the Mailing System to Sleep Mode 24 How to Turn the Mailing System to OFF Mode 25 2 Meet Your Mailing System DELTA3_UK book Page 11 Lundi 29 octobre 2012 6 29 18 ...

Page 15: ...Meet Your Mailing System 12 2 DELTA3_UK book Page 12 Lundi 29 octobre 2012 6 29 18 ...

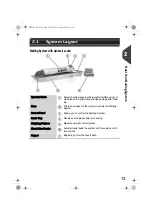
Page 16: ...fter feed ing Base Prints envelopes or labels and controls the Mailing System Control Panel Allows you to control the Mailing System Catch Tray Receives mail pieces after processing Weighing Platform Measures weight of mail pieces Mixed Size Feeder Automatically feeds the system with envelopes of dif ferent sizes Hopper Beginning of mail transport path DELTA3_UK book Page 13 Lundi 29 octobre 2012 ...

Page 17: ...er Contains labels to be printed User Guide Receptacle Stores this User Guide Label Storage Use this slot to store labels horizontally Jam Release Handle Allows you to remove jammed envelopes or labels Mixed Size Feeder Automatically feeds the system with envelopes of dif ferent sizes Side Guide Holds large envelopes in place for feeding DELTA3_UK book Page 14 Lundi 29 octobre 2012 6 29 18 ...

Page 18: ...utomatically seals mail when the function is acti vated Cover Lift by front side to open Ink Cartridge Prints the postal imprint on envelopes Postal Security Device PSD Postage meter Stores postage credit and tracks post age usage DELTA3_UK book Page 15 Lundi 29 octobre 2012 6 29 18 ...

Page 19: ...elated reports Barcode Scanner option This scanner is used to identify accounts through barcodes to scan tracking numbers on mails and send them to postal server 2 2 Accessories For more information about compatible printers that can connect to your mailing system please contact technical support DELTA3_UK book Page 16 Lundi 29 octobre 2012 6 29 18 ...

Page 20: ... that the Mailing System will print a label Mailbox Indicates unread messages in message box Postage Indicates the amount to be printed on the envelope Print Offset Indicates the printing offset status stamp position shift ing for thick envelopes Rate and Services Indicates the current rate and services selected Remaining credit Displays credit available for postage Reset item counter Resets the i...

Page 21: ...u ration Accesses stamp selection and stamp set up screens Weighing Mode Opens the weighing mode selection menu Standard Weighing Differential Weighing Manual weight entry KEYPAD Alphanumeric Keys Allows the entry of alpha or numeric values accounts or other set up information Press a key several times to display all possible characters Clear Reset Rate Clears keypad entries or from the home scree...

Page 22: ...ssing keys several times in a row Key Alpha numeric Custom text Modem settings 1 1 1 1 2 2ABCabc 2 2ABC 3 3DEFdef DEF3 3D 4 4GHIghi GHI4 4 5 5JKLjkl JKL5 5 6 6MNOmno MNO6 6 7 7PQRSpqrs PQRS7 7 8 8TUVtuv TUV8 8 9 9WXYZwxyz WXYZ9 9W 0 0 0 0 C Clear function Clear function Clear function DELTA3_UK book Page 19 Lundi 29 octobre 2012 6 29 18 ...

Page 23: ... printer or other USB memory key 2 4 Connections Power Connector To wall socket or feeder COM4 Future use COM2 3 To Weighing Platform s COM1 To mixed size feeder or dynamic scale LAN Port To customer services and or software applications on a PC option USB Ports To modem memory device or printer DELTA3_UK book Page 20 Lundi 29 octobre 2012 6 29 18 ...

Page 24: ...Meet Your Mailing System 21 2 COM1 To the Mixed Size Feeder COM2 To the Mailing System Base DELTA3_UK book Page 21 Lundi 29 octobre 2012 6 29 18 ...

Page 25: ...ase connection COM2 3 Base to Weighing Platform s connection LAN Port To customer services and or accounting software on a PC optional USB Modem To Telephone Cable Telephone Cable To wall socket analog telephone line Wall Socket Power Source DELTA3_UK book Page 22 Lundi 29 octobre 2012 6 29 18 ...

Page 26: ... to Dynamic Scale COM2 COM2 3 base Base COM2 or COM3 to Weighing Platform LAN Port To customer services and or accounting software on a PC optional USB Modem To Telephone Cable Telephone Cable To Wall Socket Analog Telephone Line Wall Socket Power Source COM1 dynamic scale Feeder to dynamic scale DELTA3_UK book Page 23 Lundi 29 octobre 2012 6 29 18 ...

Page 27: ...e Mailing System to Sleep mode manually How to Turn the Mailing System to Sleep Mode How to Turn the Mailing System to Sleep Mode 1 Press at the top right corner of the control panel The light located next to the key indicates Green the Mailing System is awake and ready for use Amber the Mailing System is in Sleep mode 2 5 Power Management The System can only use the LAN if the LAN cable is connec...

Page 28: ... the Mailing System to OFF Mode 1 Turn your system to Sleep Mode see How to Turn the Mailing System to Sleep Mode p 24 2 Be sure that the light located next to the key at the top right corner of the control panel is Amber meaning that the Mailing System is in Sleep mode 3 Turn Off your Mailing System The circle or O indicates the system is OFF DELTA3_UK book Page 25 Lundi 29 octobre 2012 6 29 18 ...

Page 29: ...Meet Your Mailing System 26 2 DELTA3_UK book Page 26 Lundi 29 octobre 2012 6 29 18 ...

Page 30: ...I Mail Settings 52 How to Process PPI Mail Running Mail 54 3 5 Printing Received for Incoming Mail 59 How to Process Incoming Mail Settings 60 How to Process Received Mail Running Mail 61 3 6 Running No Printing Mail 62 How to Process Mail without Printing Settings 62 How to Process Mail without Printing Running Mail 63 3 7 Settings Details 64 How to Change Accounts 64 How to Select a Rate 65 How ...

Page 31: ...Processing Mail 28 3 How to Fill the Automatic Label Dispenser 80 DELTA3_UK book Page 28 Lundi 29 octobre 2012 6 29 18 ...

Page 32: ...ll use Home Screen and Configuration Menu Each type of stamp is associated to A specific Home Screen that displays current stamp configuration weight postage A specific Imprint Configuration Menu that allows you to set stamp parameters 3 1 Choosing a Type of Stamp To directly gain access to the Configuration Menu of the Type of stamp press Shortcut Key on the Control Panel Your system has six Shor...

Page 33: ... Stamp options Applying postage to outgoing mail Standard p 39 Rate Weight Date format ERA optional Slogan optional Print offset optional Sealing on or off Enter the postage amount manually Manual Amount Entry Slogan ERA Slogans Amount Sending Prepaid mail PPI p 52 Pre paid imprint ERA optional Slogan optional Print offset optional Sealing optional Printing Received or the date on incoming mail Re...

Page 34: ...ration involves Sorting mail by type and task to make processing faster p 32 Logging into the system to start a work session p 33 Selecting the Type of stamp that corresponds to your mail p 35 Checking additional issues concerning your Mailing System ink level credit p 36 3 2 Preparing and Starting your Work Session DELTA3_UK book Page 31 Lundi 29 octobre 2012 6 29 18 ...

Page 35: ...at follows 1 Mail Type See table p 30 Outgoing mail with different postage types Standard postage Pre paid mail Incoming mail Mail to seal only or count 2 Separate envelopes into two groups those that require sealing and those that do not 3 Accounts to allocate costs to only if you have to select an account at log in see p 64 4 Rates to apply and services to add 5 Physical characteristics Separate...

Page 36: ...ystem may be open You may have to enter a PIN code You may have to select an account Your work session ends when the system returns to a Sleep mode How to Log in and Start a Work Session How to Log in andStarta Work Session To log in as a user 1 Press to wake up the system The system may display one of the following screens Home Screen Standard Login Screen Account Screen DELTA3_UK book Page 33 Lu...

Page 37: ... Additional information To change allocating accounts when a session is already opened see Changing the Current Account p 64 To choose security level for accounts and access control as the Supervisor see Managing Accounts and Assigning Rights p 89 How to Turn the Mailing System to Sleep Mode p 24 Find your account quicker instead of using up and down arrows type the account number or use a barcode...

Page 38: ... Stamp Once you are logged in as user 1 Either The Customize stamp screen is displayed 2 Select Stamp type The Type of stamp screen is displayed 3 Select the type of stamp in the list and press OK The Customize stamp screen is updated and displays the menu items that allow you to modify the stamp options 4 Press to return to the home screen Press or Press and type 1 Customize stamp DELTA3_UK book ...

Page 39: ...illed if installed For sealing while printing the envelopes See How to Fill the Sealer Bottle p 216 Is the Weighing Platform properly zeroed or tared Before laying envelope s on the weighing plat form your home screen should display 0 g If _ g is displayed perform a rezero of the WP See How to Rezero the Weighing Platform p 172 Are labels in place in the ALD if you plan to print on tape See How to...

Page 40: ...ieces 1 Arrange the mail pieces according to their size the largest heaviest letters beneath 2 Fan the envelopes to separate them 3 Bevel the edge of the stack 4 Place the envelopes in the hopper their upper edge resting against the rear guide 0 Ensure that all the en velopes are stacked along the rear guide from largest to smallest 5 Adjust the side guide for large envelopes To adjust the guide p...

Page 41: ...g of the Feeder Use this setting if several thin envelopes pass at one time through the feeder or if thick envelopes are blocked at the entrance of the mail path 1 Open Feeder Cover 2 Change lever position 0 1 for thin envelopes 2 for thick envelopes 3 Close the Feeder Cover DELTA3_UK book Page 38 Lundi 29 octobre 2012 6 29 18 ...

Page 42: ...ting the Postage The procedure below outlines steps in a recommended sequence to process your mail As mail requirements differ from day to day some of the settings may not be nec essary or their order may vary You must begin with selecting the Type of stamp to gain access to the additional options and be able to run your mail standard is default 3 3 Processing Standard Mail Make sure you have alre...

Page 43: ...mode Press to access the Customize stamp screen To change the type of stamp select Stamp type and then select Standard in the Type of stamp screen For more details see How to Change the Current Type of Stamp p 35 Additionally you can configure stamp elements from the Customize stamp screen as follows Check or change the Slogan selection Select Slogan and then select a Slogan or None in the Slogan ...

Page 44: ...te For more details see How to Change the Date p 73 Press to return to the home screen 3 Select a rate and add services Press to open the Rate selection screen Type a rate number to select a rate or display new rate options Select Rate History to choose a recently selected rate Select Rate wizard to choose rate options in lists For more details see Selecting a Rate p 65 To select an option in the ...

Page 45: ...s 1 Move the stamp away from the envelope edge for thick en velopes see How to Move the Stamp Print Offset p 76 2 Close envelopes using the feeder sealer see Using the Sealing Function p 78 You are now ready to print Additional information If the WP automatic selection is activated see Weighing Platform Automatic Selection p 170 you can change from the home screen the weighing mode to Standard Wei...

Page 46: ...stage amount is updated 2 Press The system motors start running 3 Withdraw the envelope from the WP and insert it into the mail path against the rear guide wall with the side to be printed facing upwards 4 The Mailing System prints postage and the mail piece or label is sent to the catch tray If you need to change the current account before applying post age on account enabled configurations see H...

Page 47: ...f the stack The Mailing System displays weight and postage on the home screen and starts motors automatically 3 To print the stamp insert the mail piece into the base against the rear guide wall with the side to be printed facing upwards 4 The Mailing System applies postage and the mail piece or label is sent to the catch tray 5 Repeat the previous step for each piece of mail To quit the process a...

Page 48: ...ach piece of mail To quit the process at any time press When you remove the last object from the Weighing Platform the Mailing System will ask if you want to print it You can answer Yes or No If you inadvertently remove more than one item from the WP replace removed items on WP before weight stabilization to avoid printing label about 1 5 seconds When you remove the last object from the Weighing P...

Page 49: ...atch Mode 1 Place the mail pieces stack you want to process on the hopper For more details see Using the Feeder p 37 2 Press to start processing the set of mail pieces The system weighs the first mail piece and asks you to confirm the postage amount before applying it to all the mail pieces 3 Press OK to confirm The base prints the stamps and sends the set of mail pieces to the catch tray When sea...

Page 50: ...o the catch tray To print several identical labels 1 Press and enter the number of labels Make sure the labels are available in the label dispenser see Filling the Label Dispenser p 80 2 Press to print the labels If a mail piece is bigger than mail path maximum thickness see Mail Specifications p 235 press to print a label The label is printed at once When sealer is activated collect the mail stac...

Page 51: ...stage Amount Manually Settings Required settings 1 Make sure you are on the home screen of the Normal type of imprint The home screen indicates weight postage and currently se lected rate as illustrated below 2 Check or change the type of imprint Press and type 1 to access the Imprint screen The type of imprint is indicated on line 2 of the screen Make sure you have already completed the preparati...

Page 52: ...Slogan Select a Slogan or None in the Select slogan screen For more details see How to Add or Cancel a Slogan on the Stamp p 75 To add or change the ERA Select ERA Slogans Select an ERA or None in the ERA Slogans screen For more details see How to Add or Cancel an ERA on the Stamp p 74 4 Add or change the amount manually Select Amount The Manual Amount Entry screen appears Enter the desired amount...

Page 53: ...advance to print the current date For more details see How to Change the Date p 73 Press or to return to the home screen The Manual Homescreen appears You are now ready to print When you are in the manual amount entry mode you can modify the amount by typing the amount with the keypad You can reset the value by pressing C DELTA3_UK book Page 50 Lundi 29 octobre 2012 6 29 18 ...

Page 54: ... Mail The postage amount is displayed on the home screen To print postage directly on mail pieces 1 Insert the mail piece or a label tape into the mail path against the rear guide wall with the side to be printed facing upwards The side that you want to print on should be facing upwards If a mail piece is bigger than mail path maximum thickness see Mail Specifications p 235 you may print on a labe...

Page 55: ...ry or their order may vary You must begin by the type of stamp selection step to gain access to the corre sponding parameters and be able to run mail How to Process PPI Mail Settings How to Process PPI Mail Settings Required settings 1 Check that you are in the PPI type of stamp If not see section Selecting the Type of Stamp p 35 The type of stamp is indicated at the top of the home screen 3 4 Pri...

Page 56: ...le if installed to save time see Choosing a Weighing Type p 68 To change the current weighing mode press and select a weighing type in the Weighing type screen For more details see How to Change the Weighing Type p 70 You can also apply the optional setting s You can add an ERA or a Slogan to the stamp shift the imprint position on envelopes with a steep edge print offset or activate sealing to cl...

Page 57: ...tart running 3 Withdraw the envelope from the WP and insert it into the mail path against the rear guide wall side to be printed facing upwards 4 The Mailing System applies postage and the mail piece or label is sent to the catch tray To set the stamp quickly consider using imprint memories The imprint memories store stamp characteristics together with rates and if active accounts See Using Imprin...

Page 58: ...cally 3 To print the stamp insert the mail piece into the base against the rear guide wall side to be printed facing upwards 4 The Mailing System applies postage and the mail piece or label is sent to the catch tray 5 Repeat the previous step of each piece of mail To quit the process at any time press If mail piece is bigger than mail path maximum thickness see Mail Specifications p 235 press befo...

Page 59: ...omatically 3 Repeat the previous step of each piece of mail To quit the process at any time press If you inadvertently remove more than one item from the WP replace removed items on WP before weight stabilization to avoid printing label about 1 5 seconds When you remove the last object from the WP the Mailing Sys tem asks if you want to print it You can answer Yes or No This allows you to use a ma...

Page 60: ... batch mode mode 1 Place the mail pieces stack you want to process on the hopper For more details see Using the Feeder p 37 2 Press to start processing the set of mail pieces The system weighs the first mail piece and asks you to confirm the postage amount before applying it to all the mail pieces 3 Press OK to confirm The base prints the stamps and sends the set of mail pieces to the catch tray W...

Page 61: ...entical labels 1 Press and enter the number of labels Make sure the labels are available in the label dispenser see Filling the Label Dispenser p 80 2 Press to print the labels If mail piece is bigger than mail path maximum thickness see Mail Specifications p 235 press before you press to print a label The label is printed at once If mail piece is bigger than mail path maximum thickness see Mail S...

Page 62: ...stamp see Choosing a Type of Stamp p 29 Set Up Requirements The procedure below outlines steps required to stamp incoming mail You must begin with selecting the Type of stamp to gain access to the corresponding parameters and be able to run mail 3 5 Printing Received for Incoming Mail Make sure you have completed the preparation steps mentioned in Preparing and Starting your Work Session p 31 DELT...

Page 63: ... select Stamp type and then select Received in the Type of stamp screen For more details see How to Change the Current Type of Stamp p 35 Additionally you can Activate or deactivate printing the date Activate or deactivate printing Received Select the option to change The buttons indicate the current status of the options The screen indicates the current status of the options Press to return to th...

Page 64: ... have completed the steps in How to Process Incoming Mail Settings p 60 How to Process Received Mail Running Mail How to Process Received Mail Running Mail On the Received home screen 1 Press System motors start running 2 Insert the mail piece into the mail path against the rear guide wall side to be printed facing upwards The Mailing System applies the imprint and the mail piece is sent to the ca...

Page 65: ... process mail You must begin with selecting the Type of stamp to gain access to the corresponding parameters and be able to run mail How to Process Mail without Printing Settings How to Process Mail without Printing Settings Main setting 1 Make sure you are on the home screen of the No printing type of stamp The type of stamp is indicated at the top of the home screen as illustrated 3 6 Running No...

Page 66: ...g you must turn the sealer lever on see Using the Sealing Function p 78 You are now ready to process mail Running Mail How to Process Mail without Printing Running Mail How to Process Mail without Printing Running Mail 1 Press System motors start running 2 Insert the mail piece s into the mail path against the rear guide wall side to be printed facing upwards see How to Use the Feeder p 37 To sele...

Page 67: ...o change accounts 1 As a user The list of accounts that are available is displayed 2 Select the account you want to use and press OK 3 Press to return to the home screen The current account number is displayed Additional information 3 7 Settings Details Press and type 5 or select the path Account A barcode scanner can be used for One Click entry of accounts into your Mailing System DELTA3_UK book ...

Page 68: ... tination format services in complete lists of options Using a list of the last 10 selected rates from the rate history How to Select a Rate How to Select a Rate To select a rate 1 Either The Rate Selection screen is displayed 2 On that screen you can Press one of the rate buttons 1 to 9 or type the number to select the rate or display rate options Press Other selections and then Rate History to s...

Page 69: ...nstructions on screen and once you have chosen the rate and services press OK to validate your selection Postage displayed on the screen is zero as long as the weight is not known zero DELTA3_UK book Page 66 Lundi 29 octobre 2012 6 29 18 ...

Page 70: ... PPI To select a PPI 1 As a user and then select PPI number The Select PPI screen is displayed 2 To select a PPI on that screen you can Type the PPI number Select the PPI using the arrows 3 Press OK to validate your selection and return to the Imprint screen When selecting the PPI type of stamp a default PPI is automati cally selected Press on the keyboard DELTA3_UK book Page 67 Lundi 29 octobre 2...

Page 71: ...amic Scale For weighing Select method Items one by one Standard Weighing Dynamic Weighing Items having different weights stacked on the Weighing Platform Differential Weighing Items exceeding the mail path size specifications Standard Weighing Differential Weighing Automatic Label or Manual Weight Entry Items having different weights stacked on the Feeder Platform Dynamic Weighing Items having the...

Page 72: ...removed from the tray Differential Weighing Automatic Label optional This mode is identical to Differential Weighing except that the system automat ically prints the postage on labels Dynamic Weighing In this mode you place all the items at the Feeder Entrance whatever their size within the system limits The system automatically assesses the weight and size of each item and applies postage as each...

Page 73: ...e Weighing Type To change the weighing type from the home screen 1 Either The Weighing mode screen is displayed 2 Select the weighing type Press or Press and type 2 2 or select the path Job settings Weighing type The options actually displayed in the screen depend on the weighing devices that are connected to your Mailing System and on features that are activated If you select the option Different...

Page 74: ...Weight Manually To enter the weight manually from the home screen you must first select the postal class 1 Either The Weighing mode screen is displayed 2 Select Manual weight entry The Manual weight entry screen is displayed 3 Enter the weight in g and press OK to validate 4 Press to return to the home screen The home screen displays the Manual Weight Entry icon and the weight entered Press or Pre...

Page 75: ...e recorded ERA to the left of the stamp Moving the stamp away from the right edge of the envelope See also How to Change the Current Type of Stamp p 35 Type of Process and Type of Stamp p 30 Navigating in the Stamp Settings When you have selected the Type of stamp To access the configuration menu of the Type of stamp press To return to the Type of stamp home screen press DELTA3_UK book Page 72 Lun...

Page 76: ...ollows To choose another day select the corresponding item in the list The icon indicates the current selection 4 Press OK to apply changes and return to the configuration menu You can set the date advance feature from supervisor mode to change at a fixed time This is useful if you process mail after the last mail pickup for the day This ensures that the proper date of mailing is printed for the n...

Page 77: ...6 How to Add or Cancel an ERA on the Stamp How to Add or Cancel an ERA on the Stamp To add an ERA to the stamp or to cancel the ERA 1 Either 2 Select ERA The Select ERA screen is displayed 3 Select the desired ERA in the list or None for printing no ERA The icon indicates the current selection The Customize stamp screen is displayed with updated pa rameters home screen Press or Press and type 1 or...

Page 78: ...he Select Slogan screen is displayed 3 Select the slogan in the list or select None for printing no slogan The icon indicates the current selection Press or Press and type 1 or select the path Built stamp imprint Royal Mail requires blue ink to be used when franking letters eligi ble for the Business Mail discount using BM slogan DELTA3_UK book Page 75 Lundi 29 octobre 2012 6 29 18 ...

Page 79: ...th rounded edges How to Move the Stamp Print Offset HowtoMovethe Stamp Print Offset To add an offset to the stamp position 1 As a user The Print position setting screen is displayed 2 Select the offset and press OK to validate Press and type 2 1 or select the path Job settings Print position DELTA3_UK book Page 76 Lundi 29 octobre 2012 6 29 18 ...

Page 80: ... How to Use an Imprint Memory To use an imprint memory 1 Either The imprint memories list is displayed 2 Select an imprint memory in the list 3 Press OK to validate your selection The imprint memory zone Mem of the home screen displays the current imprint memory name If your mail requires different settings then the imprint memories are the solution all your settings are stored in a single memory ...

Page 81: ...rvisor setting How to Set the Default Sealing Mode p 185 How to Turn the Sealer On Off How to Turn the Sealer On Off To turn sealing on off 1 On the control panel 2 Select the switch on the screen to set sealing on or off and then press OK See also To adjust sealing dampness see How to Adjust the Sealing Water Flow p 216 Do not insert envelopes already sealed in the feeder when seal ing is ON the ...

Page 82: ... pieces items and postage value since the last counter reset How to Reset Batch Counters How to Reset Batch Counters To reset a Counter 1 On the Homescreen display The counter is reset or 1 As a user 2 Select the counter you wish to reset and press OK 3 8 Advanced Operations To produce reports associated to counters see Reports p 121 Press the Reset counter button Press and type 2 6 or select the ...

Page 83: ...the Automatic Label Dispenser To fill the Label Dispenser 1 Stack the labels and insert them in the dispenser face to print on the right hand side and peel off tab on the top 2 Push the block of labels down until you feel the label click into position DELTA3_UK book Page 80 Lundi 29 octobre 2012 6 29 18 ...

Page 84: ...tage operations 4 1 Overview 83 4 2 Managing Credit 84 How to Check the PSD Meter Credit 84 How to Add Credit to the PSD Meter 85 4 3 Unlocking the PSD Postal Inspection 87 How to Unlock the PSD 87 How to Check the Date of the Next Call 87 4 Money Operations DELTA3_UK book Page 81 Lundi 29 octobre 2012 6 29 18 ...

Page 85: ...Money Operations 82 4 DELTA3_UK book Page 82 Lundi 29 octobre 2012 6 29 18 ...

Page 86: ...available credit in the PSD Add credit to the PSD The crediting operations trigger a connection of the Mailing System to Postal Services through the telephone line or internet connection Tracking Credit You can generate reports on the use of your postage credit as all Mailing operations involving your postage are recorded by the Mailing System To generate reports see Reports p 121 4 1 Overview Che...

Page 87: ...see Control Panel Features p 17 You can also use the procedure below How to Check the PSD Meter Credit How to Check the PSD Meter Credit To check available credit 1 Either The Credit Menu is displayed 2 Select the menu path Credit used Credit available The screen displays your postage credit as shown below Ascending credit used Descending credit available 4 2 Managing Credit Press or Press and typ...

Page 88: ...SD Meter To add credit to the PSD 1 Either 2 Select Add Credit or type 2 3 If the system asks for a PIN code enter the code using the keypad and press OK The Credit Screen is displayed By default the system displays the value of the previous transaction 4 Enter the amount of postage to add using the keypad use C to clear a digit press C twice to clear the field Press or Press and type 7 or select ...

Page 89: ...count balance 6 You can open the Credit Used Credit Available screen to check your account balance once the transaction is complete see How to Check the PSD Meter Credit p 84 See also As supervisor you can set the Mailing System to ask for a PIN code for crediting see How to Set Cancel a Credit PIN Code p 168 In the case of a communication error the amount previously entered cannot be changed Chec...

Page 90: ... to the Postal Services If the audit is successful the system displays a successful message If the audit fails the system displays a failure message ex plaining the cause of the error Try to correct the cause and retry How to Check the Date of the Next Call How to Check the Date of the Next Call To display the date of the next server call 1 Either The date of the next call is displayed on the scre...

Page 91: ...Money Operations 88 4 DELTA3_UK book Page 88 Lundi 29 octobre 2012 6 29 18 ...

Page 92: ...bgroup 104 How to Activate Deactivate a Group 105 How to Delete a Group or a Subgroup 105 How to Create an Account 106 How to View Edit Account Information 108 How to Activate Deactivate an Account 109 How to Delete an Account 109 How to Export an Account List 110 How to Import Accounts 111 5 6 Managing Operators 112 How to Create an Operator 113 How to Modify an Existing Operator 114 How to Assig...

Page 93: ...Managing Accounts and Assigning Rights 90 5 DELTA3_UK book Page 90 Lundi 29 octobre 2012 6 29 18 ...

Page 94: ...ng System is a convenient way to monitor track and control postage expenses by for example associating accounts to departments in your organization Marketing Sales etc or to different companies if the Mailing System is shared When the Accounts Function is activated the currently selected account is charged each time the user applies postage to mail Reports can be generated for each account or grou...

Page 95: ... protect the system and restrict the usage of your credit The different access control policies you can implement as the supervisor are No PIN code unlimited access Unique System PIN Code Single PIN code for all users Personal PIN Codes users enter their PIN code to access the system In this mode the operators use only the accounts you allow them to access DELTA3_UK book Page 92 Lundi 29 octobre 2...

Page 96: ...ontrol Function No Yes Accounts Function No No account No account with access control Yes Accounts Accounts with access control Remote Account Man agement Account mode Function Action required to access the system No Account No postage tracking No access control Unlimited access to the sys tem No Account with Access Control No postage tracking Protects access to the system Type a PIN code shared b...

Page 97: ...s to the system self service type This is the default mode in your Mailing System Implementing No account Follow the procedure How to Display and Change the Account Mode p 99 and select the No Account mode No Account Management Menu In No account mode No other setting is necessary for the No Account mode 5 3 Guidelines to Setup an Account DELTA3_UK book Page 94 Lundi 29 octobre 2012 6 29 18 ...

Page 98: ...ode p 99 and select the No account with access control mode 2 Enter the 4 digit shared PIN code the users will have to enter at log in No Account with Access Control Management Menu In No Account with access control mode the menu allows you to change the shared PIN code How to Change a Shared PIN Code How to Change a Shared PIN Code 1 As the supervisor see How to Log in as Supervisor p 160 The PIN...

Page 99: ...e the Account Mode p 99 and select the Accounts Mode 2 Create accounts as indicated in How to Create an Account p 106 Accounts Mode Management Menu In Accounts Mode the menu allows you to manage your accounts See also To add modify or delete accounts see Managing Accounts p 100 If only one account is available the Mailing System automatically selects it at start up When you activate the Accounts M...

Page 100: ... How to Create an Account p 106 4 Create the PIN codes you wish to implement see How to Create an Operator p 113 At the same time assign groups subgroups or accounts to the operators Accounts with Access Control Management Menu In Accounts with Access Control mode The menu allows you to manage the Accounts and the account structure and the Operators If only one account is available the Mailing Sys...

Page 101: ...application should be setup by an authorized technician Implementing Remote account management To implement the Remote account Management Feature 1 Connect the PC to the Mailing System and start the Account Management Appli cation on the PC see the diagram in Connectors p 20 and the PC application user guide 2 On the Mailing System activate the mode Remote Account Management see How to Display and...

Page 102: ... with the current Account Mode shown 2 Select another Account mode 3 Press OK to confirm 4 If required enter the PIN code and press OK The Mailing System then confirms that the Account Mode has been changed 5 4 Selecting an Account Mode Press and type 5 1 or select the path Account Management Account Mode Selection If you have selected the Remote account management Mode a connection process to the...

Page 103: ...s The groups and subgroups Simplify the management of the accounts Allow you to issue consolidated reports on group activity as groups and sub groups total in reports the consumptions of the accounts they include see Account Data p 134 Accounts can be created at 3 levels in the root in a group or in a subgroup By default the machine proposes to create the accounts in the Root 5 5 Managing Accounts...

Page 104: ... Number of the account Two accounts cannot have the same number An account number cannot be modified after the account is created However the account can be deleted Name 32 Alphanumeric Characters Name of the account Two accounts cannot have the same name Status Active Inactive Only active accounts are visible to users Folder Name of a group subgroup or Root The group that contains the account may...

Page 105: ...lable when the Advanced Reporting option is activated See Budget and Sur charge Preferences p 118 Setting Format Description Name 32 Alphanumeric characters Name that you will use when assigning Groups or Subgroups of Accounts to Operators This name has to be unique Status Active Inactive If a Group is not active the corresponding Accounts are not visible Users cannot select these Accounts Folder ...

Page 106: ... p 160 The Account list screen is displayed 2 Select Add Acct Group 3 Select Add Group or type 2 The Add group window appears 4 Enter the Group Name by using the keypad 5 Select the Group Status active or inactive The screen then displays the current status of the Group you have selected 6 To put the current Group into a Subgroup select the Folder button select a group in the list and press OK Pre...

Page 107: ...list screen is displayed 2 Select the Group use the double arrows to scroll through the list A Group that is not in the list is probably a Subgroup select its Parent Group press Edit Del and then select View content to display the content of the Group Select the Subgroup in the list 3 Press OK Edit Del The Group management Screen is displayed 4 Select Edit Modify or type 1 5 Change the settings as...

Page 108: ... the current status active or inactive and press OK 3 On the Group modification summary screen press OK Deleting Groups You can delete a Group to delete all of its content including Subgroups and Ac counts How to Delete a Group or a Subgroup How to Delete a Group or a Subgroup To delete a Group or a subgroup 1 Follow the procedure How to View Edit a Group or a Subgroup p 104 2 On the Group managem...

Page 109: ... mode accounts See How to Display and Change the Account Mode p 99 1 As supervisor see How to Log in as Supervisor p 160 The Account list screen is displayed 2 Select Add Acct Group and then select Add account or type 1 The Add account screen is displayed You can also import a list of accounts See Importing Exporting Account Lists p 110 Press and type 5 2 1 or select the path Account management Ma...

Page 110: ...oup other than Root select the Folder button select a Group or Subgroup in the list and press OK 5 On the Add account screen press OK The Account creation summary screen is displayed 6 Press OK to confirm the creation of the account The Budget and Surcharge settings are only available when Advanced Reporting option is activated See Budget and Sur charge Preferences p 118 DELTA3_UK book Page 107 Lu...

Page 111: ... 2 Select the account or type the account number and press OK If the account is not contained in the list select the group or the subgroup that contains the account press Edit Del or OK and then press View Edit content until you can select the account by pressing OK 3 Select Edit Modify The Edit Modify screen appears 4 Select each parameter and change it using the keypad use key C to clear charact...

Page 112: ...the changes by pressing OK on the Account modi fication summary If an account is deactivated it is no longer visible to the operator Deleting Accounts You may need to delete an account How to Delete an Account How to Delete an Account To delete an Account 1 Perform procedure How to View Edit Account Information p 108 2 Perform procedure How to View Edit Account Information p 108 3 On the Account m...

Page 113: ...List To export an account list on a USB memory key 1 As supervisor see How to Log in as Supervisor p 160 2 Insert the USB memory key into the USB port of the base at rear left and press OK 3 Follow the instructions displayed on the screen At the end of the process a message will inform you that you when you may remove the USB memory key Using a spreadsheet program or a simple text editor modify an...

Page 114: ...press OK 3 Select the CSV file to import and press OK 4 Follow the instructions displayed on the screen At the end of the process a message will inform you when you may remove the USB memory key You can only import CSV files located in the root directory of the USB memory key Name Format is ACS_yyyymmdd_hhmmss CSV example ACS_20091007_035711 CSV Field delimiter semi colon Record delimiter New line...

Page 115: ...nting and Assigning Rights Overview p 91 If you use a postal expense software you can only manage the operator PINs from the PC Option Format Description PIN code 4 digit Operator PIN code Two Operators can not have the same PIN code Name 20 alphanumeric characters Operator name Two Operators cannot have the same name Status Active Inactive Users can only log in using active Opera tor s PIN codes ...

Page 116: ...ow to Create an Operator To create an Operator 1 As supervisor see How to Log in as Supervisor p 160 The Manage Operator screen is displayed 2 Select Operator List The Operator list screen is displayed 3 Select Add operator The Add operator screen is displayed In order to create an operator you must first set up an Account with Access Control in Account Mode Management Mode Press and type 5 3 or s...

Page 117: ...ame PIN code status or assigned accounts How to Modify an Existing Operator How to Modify an Existing Operator To modify an existing Operator 1 As supervisor see How to Log in as Supervisor p 160 The Manage Operator Wizard window opens 2 Select Operator List 3 Select the operator and select Edit Del 4 Select Edit Modify or type 1 The Edit Modify screen is displayed 5 Change the operator options as...

Page 118: ...til the Edit modify screen and select Account list The Account List screen is displayed 2 Select Add Account Group The Account list screen is displayed 3 You can allocate entire groups or subgroups to the operator select the group and press OK Enable Disable Repeat until all accounts to be assigned are checked 4 Press to return to the Edit modify screen 5 Press OK to accept the changes If you assi...

Page 119: ... 2 In the operator options select the line Status to activate or deactivate the operator the button displays the current status and then press OK 3 Once the Operator modification summary screen appears press OK Deleting Operators Follow the procedure below in order to delete an operators How to Delete an Operator How to Delete an Operator To delete an Operator 1 Perform procedure How to Modify an ...

Page 120: ...onsumed their budget Send a message to the supervisor when the budget of an account is reached Reset the consumed amount at the next beginning of the period Applying Surcharges to Accounts You can charge any account an additional amount each time postage is applied to mail processed under selected accounts For each account you can set the additional charge to be proportional to the postage amount ...

Page 121: ...ferences The surcharge preferences are set for each account individually Budget and Surcharge functions are only available if the Advanced Reporting option has been loaded onto your Mailing System Preference Range Description Amount 0 to 99999 Budget allocated to the account for the period Warning limit 0 to 100 Consumed percentage of the budget at which the system warns the user and the superviso...

Page 122: ...preferences on the screen become accessible 4 Select a basic period for budgets month or year 5 Enter a starting date or day for the period and then press OK The Mailing System calculates the amount consumed for each account in the period and then displays the Account Mode Management menu How to Modify the Period or Start the Day of Budgets How to Modify the Period or Start the Day of Budgets 1 Di...

Page 123: ...Managing Accounts and Assigning Rights 120 5 DELTA3_UK book Page 120 Lundi 29 octobre 2012 6 29 18 ...

Page 124: ...eport as Supervisor 126 6 3 Counter Data 127 6 4 Postage Data 129 6 5 Credit Data 132 6 6 Account Data 134 How to Generate the Account Report 135 How to Generate the Operator List Report 139 6 7 System Data 140 How to Generate a IP Configuration Report 143 How to Generate a Proxy Configuration Report 144 6 8 Advanced Reporting Reports 145 6 Reports DELTA3_UK book Page 121 Lundi 29 octobre 2012 6 2...

Page 125: ...Reports 122 6 DELTA3_UK book Page 122 Lundi 29 octobre 2012 6 29 18 ...

Page 126: ...n be added as an option Reports generally require a beginning date and an end date Typically the reports are available on screen and can be printed out on an external USB printer or saved on a USB memory key Your Mailing System also allows you to get reports on mailing activity over the past two years Additional reporting capabilities are available through connection to PC based ac counting softwa...

Page 127: ...Permit Number of pieces for each type of per mit mail in a selected period SP p 131 CREDIT DATA Credit Usage Information Information on the credit usage in the machine since the installation of the machine Contents is limited to the history available in the PSD LSPF p 132 Adding Postage Last refill operations performed on the machine in a selected period SPF p 133 ACCOUNT DATA Account Report List ...

Page 128: ... p 141 Meter errors p 142 IP Configuration Report IP configuration settings L IP Con figura tion Report p 143 Proxy Configuration Report Proxy configuration settings L Proxy Config uration Report p 144 ADVANCED REPORTING Budget Consumption Budget consumption of all accounts for the current or previous budget period p 145 Operator Activity Activity number of items postage value of all operators in ...

Page 129: ... rences such as Period of time targeted begin date end date Desired account etc Select or type the required parameters and press OK The Output selection screen is displayed 5 Select an available output device The system will send the report details to the selected output How to Generate a Report as Supervisor HowtoGenerate a Report as Supervisor To generate a Report 1 As supervisor see How to Log ...

Page 130: ...printer Fields 6 3 Counter Data Fields Comments Period Begin Date of last reset End Current date Die number On printed report only Number of items without 0 00 items Total value of items After issuing reports like Metering Batch Data or Received Batch Data you may wish to reset the batch counters so that your next set of reports restart from zero at the current date See How to Reset Batch Counters...

Page 131: ...pe to view incoming mail batch counter Output Screen USB printer Fields Fields Comments Period Begin Date of the last reset End Current date Incoming Mail Number of items After issuing reports like Batch Data or Received Batch Data you may wish to reset the batch counters so that your next reports restart from zero at the current date See How to Reset Batch Counters p 79 DELTA3_UK book Page 128 Lu...

Page 132: ...y the Begin date the End date field is filled with a proposed value Begin date 31 days You can specify another End date but maximum is Begin date 31 days Default period Begin 1st day of the current month End current day Output Screen USB printer USB memory key Fields 6 4 Postage Data Fields Comments Die number On printed report only For each day in the period Day number Number of items processed z...

Page 133: ...the End date of the report Use the se lection of month and year Default period Begin Current month of the previous year End Current month Output Screen USB printer USB memory key Fields Fields Comments Die number On printed report only For the period for each month presented in data col lected Month name and year Total number of items processed Total postage value for the month DELTA3_UK book Page...

Page 134: ...eport you have to be logged in as a user Output Screen USB printer Fields Fields Comments For each permit indicia including date only permit if present Permit friendly name Permit mail piece total count Total weight Grand total mail piece count for all the permit indicia DELTA3_UK book Page 131 Lundi 29 octobre 2012 6 29 18 ...

Page 135: ... 6 5 Credit Data Fields Comments Current date and time Printed report only PSD status Printed report only Die number Printed report only Credit used ascending Total postage printed by the system Credit available descend ing Control total Total credit downloaded into the system Must be equal to ascending descending Non zero items Total number of normal items Zero Items Total number of zero items To...

Page 136: ...ogged in as a supervisor Output Screen USB printer USB memory key Fields Fields Comments Period Default period Begin Current date 6 months End Current date Die number On printed report only For each postage download performed Download date time Credit amount New descending Represents the new total amount avail able in the machine DELTA3_UK book Page 133 Lundi 29 octobre 2012 6 29 18 ...

Page 137: ...s control Output Printer USB memory key Fields 6 6 Account Data Data The report displays the account structure tree view with groups subgroups For each group subgroup Group subgroup name Status For each account Account number Account name Status When Advanced reporting is enabled budget and surcharge data is included in the report Please contact your Customer Ser vice to enable options DELTA3_UK b...

Page 138: ...t Report To generate the Account Report 1 As supervisor see How to Log in as Supervisor p 160 2 Select an Output and then press OK Press and type 5 2 2 or select the path Account management Manage accounts Account report DELTA3_UK book Page 135 Lundi 29 octobre 2012 6 29 18 ...

Page 139: ...t an account in the list of accounts then the Begin date and the End date of the report Default period Begin 1st day of the current month End Current date Output Screen Fields Fields Comments Period Die number printed report only Account number Account name Number of items processed zero non zero items Total postage value When Advanced reporting is enabled budget and surcharge data is included in ...

Page 140: ...egin 1st day of current month End current date Output USB printer USB memory key Fields Fields Comments Period Die number On printed report only The report displays the hierarchy of groups and sub groups with the total val ues per group and sub total values per sub group For each group sub group Group sub group name Total number of items processed Total postage value For each account Account Numbe...

Page 141: ...rts 138 6 When Advanced reporting is enabled budget and surcharge data is included in the report Please contact your Customer Ser vice to enable options DELTA3_UK book Page 138 Lundi 29 octobre 2012 6 29 18 ...

Page 142: ...report 1 As supervisor see How to Log in as Supervisor p 160 2 Select the Output and then press OK Data Comments For each Operator Operator name PIN code Status Activated Deactivated Active account assigned status if there is at least one active account assigned to the operator the value is Yes otherwise the value is No There is no time period to enter Press and type 5 3 1 or select the path Accou...

Page 143: ...nerating a Report p 126 6 7 System Data Fields Imprint default settings Default ERA Default Slogan Default Rate Date advance parameters Credit settings High value Low Credit Connections settings phone numbers System settings including for example MMI settings language default home screen sleep mode timeout backlight Weighing settings Geo code weight threshold rounding mode Connection settings DELT...

Page 144: ...ional USB Key See also Generating a Report p 126 If you use screen to see this report Scroll the errors using the arrow keys and Press if you want to go back to the selection of the out put Fields Comments Code Reference code of the base error BAS XX YYY XX is a 2 digit number YYY is a 3 digit number Date Date when error occurred Cycles Number of imprints when this error occurred DELTA3_UK book Pa...

Page 145: ...tional USB Key See also Generating a Report p 126 If you use screen to see this report Scroll the errors using the arrow keys and Press if you want to go back to the selection of the out put Fields Comments Code Reference code of the meter error PSD XX YYY XX is a 2 digit number YYY is a 3 digit number Date Date when error occured Cycles Number of imprints when this error occured DELTA3_UK book Pa...

Page 146: ...ing machine must be connected to the network with a modem or LAN Output The IP Configuration Report output is Label How to Generate a IP Configuration Report HowtoGenerate a IP Configuration Report To generate a IP Configuration Report 1 See Generating a Report p 126 DELTA3_UK book Page 143 Lundi 29 octobre 2012 6 29 18 ...

Page 147: ...ogged in as a supervisor Output The Proxy Configuration report output is Label How to Generate a Proxy Configuration Report HowtoGenerate a Proxy Configuration Report To generate a Proxy Configuration Report 1 See Generating a Report p 126 DELTA3_UK book Page 144 Lundi 29 octobre 2012 6 29 18 ...

Page 148: ... hour bands Budget Consumption Report This report displays the budget consumption of all accounts for the current or previous budget period Requirements To generate this report you have to be logged in as a supervisor Output Screen USB Printer USB Memory device Fields 6 8 Advanced Reporting Reports Fields Comments Budget period Period begin date end date For each group subgroup Group or subgroup n...

Page 149: ...y the period for the report Begin date and an End date Default period Begin 1st day of the current month and End current date Output Screen USB printer USB memory key Fields Fields Comments For each operator Period Operator name whatever its status Number of items on the period Total postage value on the period If an account mode without operators has been used during the period the items printed ...

Page 150: ...Begin date and an End date Default period Begin 1st day of the current month and End current date Outputs Screen USB printer USB memory key Fields Fields Comments For each hour band Number of items Total postage value Before 7h00 aggregates items performed between midnight and 7h00 After 19h00 aggregates items performed between 19h00 and midnight DELTA3_UK book Page 147 Lundi 29 octobre 2012 6 29 ...

Page 151: ...Reports 148 6 DELTA3_UK book Page 148 Lundi 29 octobre 2012 6 29 18 ...

Page 152: ... Online Services Overview 151 7 2 Connecting to Online Services 152 How to Call Online Services Manually as a User 153 How to Call Online Services Manually as Supervisor 153 How to Test the Connection to Online Services 154 7 3 Uploading Statistics 155 How to Upload Report Data to the Online Services Server 155 7 4 System Online Services 156 7 Online Services DELTA3_UK book Page 149 Lundi 29 octob...

Page 153: ...Online Services 150 7 DELTA3_UK book Page 150 Lundi 29 octobre 2012 6 29 18 ...

Page 154: ...ine ink supply and e mails an alert notification when it is time to re order Remote diagnostics and technical support experienced technical professionals analyze your mailing machine s error logs diagnose your mailing machine before an on site service visit and your system software can be updated remotely re ducing service delays Slogan ERA download order a new slogan ERA and get it downloaded via...

Page 155: ... upload cor responding data For the Reports service the Mailing System automatically connects at the end of each month to upload accounting and postal category statistics For the Ink Management service the Mailing System automatically connects when it s time to re order ink supplies 7 2 Connecting to Online Services It is strongly recommended that you leave the Mailing System turned on in sleep mo...

Page 156: ...ailbox p 192 How to Call Online Services Manually as Supervisor How to Call Online Services Manually as Supervisor To trigger a generic call 1 As supervisor see How to Log in as Supervisor p 160 The Mailing System connects to the server and downloads the available elements rates slogans etc 2 Check your mailbox for messages see Using the Mailbox p 192 Synchronize Call This type of call is only for...

Page 157: ...w to Test the Connection to Online Services How to Test the Connection to Online Services To ping the server 1 As a user 2 Or as supervisor see How to Log in as Supervisor p 160 To test the server 1 As a user 2 Or as supervisor see How to Log in as Supervisor p 160 The call process starts and displays its sequence of ope rations on the screen Test server is a bandwidth test and should only be unde...

Page 158: ...o Upload Report Data to the Online Services Server How to Upload Report Data to the Online Services Server To upload report data 1 As supervisor see How to Log in as Supervisor p 160 The call to the server is triggered 7 3 Uploading Statistics Your system uploads basic statistic data for basic postal expense management reporting Enhanced reporting is optional See Acti vating New Options p 195 Pres...

Page 159: ... your Mailing System When the Postal Service announce changes in their rate and fee schedule the Online Services server downloads the new rates into your Mailing System Your Mailing System automatically switches to the approved rates on the effective date of rate change Account level It is possible to increase the number of accounts in your system 7 4 System Online Services For more information pl...

Page 160: ... How to Change the Display Contrast by Default 164 8 6 System Time outs and Settings 165 How to Adjust the Time outs 165 How to Change System Time Outs 166 8 7 High Value Low Credit Warnings and PIN Codes 167 How to Set the High Value Warning Amount 167 How to Set the Low Credit Threshold 167 How to Set Cancel a Credit PIN Code 168 8 8 Weighing Settings 169 How to Change the Default Weighing Type ...

Page 161: ...2 How to Create an Imprint Memory 183 How to Edit Modify an Imprint Memory 183 How to Delete an Imprint Memory 184 8 11 Default Sealing Mode 185 How to Set the Default Sealing Mode 185 How Set the Current Sealing Mode 185 8 12 Connection Settings 186 How to Set the Postal Online Services Connection 186 How to Set the Analog Modem Parameters 187 How to Set LAN High speed Internet Parameters 187 8 1...

Page 162: ...ns such as managing accounts and access rights generating certain reports etc The supervisor settings allow you to Change the default user settings Modify system time outs Set credit warnings high amount low credit and activate a credit PIN code Define a default weighing method for mailing and calibrate the weighing devices Design a default imprint rate ERA slogan activate the Automatic Date Advan...

Page 163: ...as a user 1 As a user The Login screen is displayed 2 Type the supervisor PIN code and press OK The supervisor Main menu is displayed 8 2 Logging in out as the Supervisor When you are logged in as supervisor only the supervisor menu is available Printing postage is not possible while logged in as supervisor Press and type 13 or select the path Supervisor You can log in as supervisor by directly ty...

Page 164: ...r mode You must exit the supervisor Mode before you can begin to print postage How to Exit the Supervisor Mode How to Exit the Supervisor Mode To exit the supervisor mode 1 As supervisor The system will go into Sleep mode and supervisor is logged out Press DELTA3_UK book Page 161 Lundi 29 octobre 2012 6 29 18 ...

Page 165: ...g the steps listed below How to Change the Display Language by Default How to Change the Display Language by Default To change the user language by default 1 As supervisor see How to Log in as Supervisor p 160 2 Select the default language 3 Press OK to validate 8 3 Changing the Display Language Press and type 11 1 or select the path Preferences Language This is a user setting that only lasts as l...

Page 166: ... the default beep state for user sessions How to Change the Beeps by Default How to Change the Beeps by Default To change the sounds by default 1 As supervisor see How to Log in as Supervisor p 160 2 Check Beep on key and or Beep on error to enable the sounds 3 Press OK to validate 8 4 Enabling Disabling Sounds Press and type 11 2 or select the path Preferences Sounds This is a user setting that o...

Page 167: ...st by Default How to Change the Display Contrast by Default To set the default contrast 1 As supervisor see How to Log in as Supervisor p 160 2 Use the 1 or 2 keys or touch the Increase Decrease button to increase or decrease the contrast The display updates to the new setting 3 Press OK to validate 8 5 Display Settings Press and type 11 3 or select the path Preferences Contrast This is a user set...

Page 168: ...ss OK to exit 8 6 System Time outs and Settings Start The period of time the system waits for an envelope after pressing Once this time out is reached the system stops Stop The period of time the system waits for the next envelope after printing Once this time out is reached the system will stop Sleep Period of inactivity after which the system automatically switches to Sleep mode see Power Manage...

Page 169: ... 160 The Timeout setting screen is displayed 2 Select each field and specify the length of each the time out 3 Press OK to validate This is a user setting that only lasts as long as you are logged in Press and type 3 5 or select the path Default user settings System settings Time out set tings Use the C key to clear old settings then enter a new value DELTA3_UK book Page 166 Lundi 29 octobre 2012 ...

Page 170: ...o Log in as Supervisor p 160 2 Enter the high value warning amount or press C and enter 0 to disable the warning function 3 Press OK to validate How to Set the Low Credit Threshold How to Set the Low Credit Threshold To set a low credit threshold 1 As supervisor see How to Log in as Supervisor p 160 2 Select the Low credit threshold field Enter the low credit warning amount or press C and enter 0 ...

Page 171: ...edit PIN Code How to Set Cancel a Credit PIN Code To set a credit PIN code 1 As supervisor see How to Log in as Supervisor p 160 2 Press the arrow to the Enable or Disable state to enable or disable the PIN code 3 Enter the credit PIN code if enabled 4 Press OK to validate Press and type 3 4 or select the path Default user settings Credit settings DELTA3_UK book Page 168 Lundi 29 octobre 2012 6 29...

Page 172: ...ting defines both the weighing device and the weighing type that are selected by default when a user starts the mailing process see Choosing a Weighing Type p 68 How to Change the Default Weighing Type How to Change the Default Weighing Type To change the default weighing type 1 As supervisor see How to Log in as Supervisor p 160 2 Select a default weighing type in the list 3 Press OK to validate ...

Page 173: ... How to Activate the Automatic Weight Detection on the WP To activate the automatic weight detection on the WP 1 Log in as the Supervisor see How to Log in as Supervisor p 160 then 2 Select Auto Weight Detection to activate the function 3 Press OK to validate How to De activate the Automatic Weight Detection on the WP How to De activate the Automatic Weight Detection on the WP To de activate the a...

Page 174: ...As a user 2 Remove all items from the Weighing Platform 3 Press OK to set to zero the Weighing Platform How to Tare the Weighing Platform How to Tare the Weighing Platform To tare the Weighing Platform as a user 1 As a user 2 Place the item you want to use on the Weighing Platform 3 Press OK to set weight to zero To zero the Weighing Platform quickly press and maintain the key until the weight is ...

Page 175: ...ero the Weighing Platform How to Tare the Weighing Platform How to Tare the Weighing Platform To tare the Weighing Platform 1 As supervisor see How to Log in as Supervisor p 160 2 Press OK to tare the Weighing Platform Press and type 6 1 2 or select the path System settings Weighing functions Zero Weigh Plarform Press and type 6 1 1 or select the path System settings Weighing functions Weigh Platf...

Page 176: ...acy Mode To activate the high accuracy setting 1 As supervisor see How to Log in as Supervisor p 160 2 Press the button to activate or deactivate the function or type 1 3 Press OK to validate Press and type 6 2 1 or select the path System settings Weighing settings Dynamic scale high accuracy mode DELTA3_UK book Page 173 Lundi 29 octobre 2012 6 29 18 ...

Page 177: ...to Change the GEO Code How to Change the GEO Code To change the GEO code 1 As supervisor see How to Log in as Supervisor p 160 2 See the map and table on the next pages to get the 5 digit GEO code from your location altitude and latitude and enter the 5 digit using the keypad 3 Press OK to validate Changing the GEO code modifies the weight values the Mailing System calculates Make sure you enter t...

Page 178: ...Configuring your Mailing System 175 8 Geodesic map DELTA3_UK book Page 175 Lundi 29 octobre 2012 6 29 18 ...

Page 179: ...Configuring your Mailing System 176 8 Geodesic codes DELTA3_UK book Page 176 Lundi 29 octobre 2012 6 29 18 ...

Page 180: ...rameters for the stamp elements that follow Rate Prepaid imprint ERA Slogan On list screens a mark indicates the default parameter Changing the Default Rate Use the procedure below to change the rate the machine activates at start up How to Change the Default Rate How to Change the Default Rate To change the default rate 1 As supervisor see How to Log in as Supervisor p 160 2 Select the default ra...

Page 181: ...ent PPI see How to Select a PPI p 67 To manage the PPIs see Managing Prepaid Imprints PPI p 202 Changing the Default ERA How to Change the Default ERA How to Change the Default ERA To change the default ERA 1 As supervisor see How to Log in as Supervisor p 160 2 Select the default ERA and press OK to validate See also Managing ERAs p 198 Press and type 3 3 4 or select the path Default user setting...

Page 182: ...nge the Default Slogan To change the default Slogan 1 As supervisor see How to Log in as Supervisor p 160 2 Select the default slogan from the list or None for no slogan 3 Press OK to validate Press and type 3 3 2 or select the path Default User Settings Default Imprint Parameters Slogan DELTA3_UK book Page 179 Lundi 29 octobre 2012 6 29 18 ...

Page 183: ...utomatic Date Advance Time How to Set the Automatic Date Advance Time To set the auto date advance time and days 1 As supervisor see How to Log in as Supervisor p 160 The Automatic date advance screen is displayed 2 Press the Auto Date Advance button to Enabled status 3 Enter the Automatic Date Advance time 00 00 hours is not allowed 4 Select Working Day to gain access to working days selection sc...

Page 184: ... 5 mm or 10 mm How to Set the Default Printing Offset How to Set the Default Printing Offset To change the default printing offset 1 As supervisor see How to Log in as Supervisor p 160 2 Set the Default from a position list 3 Press OK to validate Press and type 3 2 3 or select the path Default user settings System settings Print DELTA3_UK book Page 181 Lundi 29 octobre 2012 6 29 18 ...

Page 185: ... by a name and a number The system displays on the home screen the name of the current Imprint Memory Standard Stamp Imprint Memory The table below gives the content of a Standard stamp imprint memory PPI Stamp Imprint Memory The table below gives the content of a PPI stamp imprint memory 8 10 Imprint Memories Imprint settings ERA slogan Slogan Date mode Rate Account setting Account number if any ...

Page 186: ... name of the new imprint memory in the list 7 You can modify any preference by using the Edit Del function see How to Edit Modify an Imprint Memory p 183 How to Edit Modify an Imprint Memory How to Edit Modify an Imprint Memory To edit or modify an imprint memory 1 As supervisor see How to Log in as Supervisor p 160 2 Select an imprint memory from the list displayed on the screen 3 Press OK to val...

Page 187: ...sor see How to Log in as Supervisor p 160 2 Select an imprint memory from the list of saved imprint me mories 3 Press OK to validate 4 Select the menu path Delete or type 2 5 Press OK to confirm to delete the imprint memory Press and type 4 or select the path Predefined imprint management DELTA3_UK book Page 184 Lundi 29 octobre 2012 6 29 18 ...

Page 188: ...date Changing the Current Sealing Mode As a user you can change the current sealing state as follows How Set the Current Sealing Mode How Set the Current Sealing Mode To change the sealing Mode 1 As a user The Sealing screen is displayed 2 Press the ON OFF key or type 1 to change the sealing state and press OK to validate 8 11 Default Sealing Mode This setting is used only if the Mixed Size Feeder...

Page 189: ...tion How to Set the Postal Online Services Connection To set the postal Online Services connection 1 As supervisor see How to Log in as Supervisor p 160 The Server Access screen is displayed 2 Select Server access 3 Select Analog modem or LAN 4 For further modem settings see How to Set the Analog Modem Parameters p 187 For LAN settings see How to Set LAN High speed Internet Parameters p 187 See al...

Page 190: ...ications settings screen LAN Settings How to Set LAN High speed Internet Parameters How to Set LAN High speed Internet Parameters To set the parameters of the LAN 1 As supervisor see How to Log in as Supervisor p 160 The LAN configuration menu is displayed 2 Select Auto to automatically configure the LAN recom mended Otherwise select Manual to set parameters manually Make sure the telephone line i...

Page 191: ...lay them See also Automatic Date Advance p 180 How to Check Adjust the Machine Time and Date How to Check Adjust the Machine Time and Date To check adjust the current time and date 1 As supervisor see How to Log in as Supervisor p 160 2 Select Audit call to adjust the time The system adjusts its time if necessary and displays time and date values 8 13 Time and Date Management To check the time and...

Page 192: ...isplay the Options 194 How to Load New Options 195 9 4 Managing Slogan 196 How to Display the List of Slogans 196 How to Modify or Delete a Slogan 197 How to Download New Slogans 197 9 5 Managing ERAs 198 How to Display the List of ERAs 198 How to Modify or Delete an ERA 199 9 6 Managing Postal Rates 200 How to Check your Rate Updates 200 How to Download New Postal Rates 201 9 7 Managing Prepaid I...

Page 193: ...Options and Updates 190 9 DELTA3_UK book Page 190 Lundi 29 octobre 2012 6 29 18 ...

Page 194: ...r ERAs The operations above are available through the supervisor menu Options and Updates How to Access the Options and Updates Menu How to Access the Options and Updates Menu 1 As supervisor see How to Log in as Supervisor p 160 The Options and Updates menu is displayed 9 1 Options and Updates Process To update your Mailing System s operating system see Online Services p 149 Press and type 8 or s...

Page 195: ...e Mailbox screen is displayed 2 Select the message to read and press OK 3 Select Delete message to erase the message after you have read it How to Read Messages How to Read Messages 1 As supervisor see How to Log in as Supervisor p 160 The Mailbox screen is displayed 2 Select the message to read and press OK 3 Select Delete message to erase the message after you have read it 9 2 Using the Mailbox ...

Page 196: ...e message How to Delete Messages How to Delete Messages 1 As supervisor see How to Log in as Supervisor p 160 The Mailbox screen is displayed 2 Select the message to be deleted and press OK 3 Select Delete message to erase the message Select or on display or Press and type 8 or select the path Mailbox Press and type 1 or select the path Mailbox DELTA3_UK book Page 193 Lundi 29 octobre 2012 6 29 18...

Page 197: ...w to Display the Options To display the option list 1 As supervisor see How to Log in as Supervisor p 160 either The Options list screen is displayed 2 To display the details of an option select the option and press OK 9 3 Managing Options For more information about the options you can add to your Mail ing System please contact customer service Press and type 8 1 or select the path Options and Upd...

Page 198: ...y for downloading on the Online Services server 1 Check that your Mailing System is connected to a telephone line or network see Connections p 20 and that the connection is properly configured see Connection Settings p 186 2 Select Check for updates It will trigger a call to the Online Services server 3 After the call you can display installed options See How to Display the Options p 194 Contact c...

Page 199: ...ow to Change the Default Slogan p 179 How to Display the List of Slogans How to Display the List of Slogans To display the list of slogans 1 As supervisor see How to Log in as Supervisor p 160 The list of slogans is displayed in the Slogan management screen 9 4 Managing Slogan Slogans include BM Business Mail licence plates To select a BM select the corresponding slogan The available slogans are a...

Page 200: ...ect Edit 2 Change the slogan name using the keypad and press OK The system updates the slogan list To delete the slogan 1 Select Delete The system asks for a confirmation 2 Press OK to confirm deletion The system updates the slogan list Downloading New Slogans The procedure below allows you to download new slogans How to Download New Slogans How to Download New Slogans To download new slogans 1 Di...

Page 201: ...ark indicates the ERA that is printed by default if any If None is ticked no ERA is printed by default Users can change the current ERA during their work session How to Display the List of ERAs How to Display the List of ERAs To display the list of ERAs 1 As supervisor see How to Log in as Supervisor p 160 The list of ERAs is displayed 9 5 Managing ERAs To add load ERAs contact your Customer Servi...

Page 202: ...ete an ERA 1 Display the list of ERAs see How to Display the List of ERAs p 198 2 Select an ERA and press OK The Edit ERA menu is displayed To change the name of the ERA 1 Type 1 or select Edit 2 Change the ERA name using the keypad and press OK The system updates the ERA list To delete the ERA 1 Type 2 or select Delete 2 Confirm deletion The system updates the ERA list DELTA3_UK book Page 199 Lun...

Page 203: ... Check your Rate Updates How to Check your Rate Updates To display the list of rate tables 1 As supervisor see How to Log in as Supervisor p 160 The list of rate tables is displayed in the Rate management screen The tables are identified by the effective date of the rate 9 6 Managing Postal Rates New rate tables are automatically downloaded into your Mailing System by connecting the Mailing System...

Page 204: ...load New Postal Rates How to Download New Postal Rates To download new rates 1 Display the list of rate tables see How to Check your Rate Updates p 200 above 2 Select Check for updates The Mailing System connects to the Online Services server and downloads available rates DELTA3_UK book Page 201 Lundi 29 octobre 2012 6 29 18 ...

Page 205: ...displays the PPIs that are installed in the Mailing System and in dicates with a mark the default PPI How to Display the List of PPIs How to Display the List of PPIs To display the list of PPIs 1 As supervisor see How to Log in as Supervisor p 160 The list of PPIs is displayed in the PPI management screen 9 7 Managing Prepaid Imprints PPI Press and type 8 5 or select the path Options and updates U...

Page 206: ...ct Add new and connect the memory device to an USB port of the machine on your left hand side at the rear of the base see Connectors p 20 3 Press OK The USB memory key content is displayed 4 Select a PPI to load into the machine an press OK The PPI list is updated with the new PPI To delete a PPI 1 Select the PPI to delete and press OK 2 Confirm deletion otherwise press The system updates the PPI ...

Page 207: ...that you should perform a software download When you are ready to download the new software package contact your Supervisor who must connect to the Online Server Updating Procedure To check for available updates Perform a call to the Online Services server see How to Call Online Services Manually as Supervisor p 153 After the call your mailbox will contain a message indicating that a software down...

Page 208: ...n the date and time are reached the machine automa tically calls the Online Services server for downloading After downloading The Mailing System indicates it has to be re started 1 Disconnect and reconnect the Mailing System power cord see Connection Diagram p 22 After restarting the Mailing System calls the server to confirm installation The Mailing System is ready for use with the new software P...

Page 209: ...Options and Updates 206 9 DELTA3_UK book Page 206 Lundi 29 octobre 2012 6 29 18 ...

Page 210: ...3 How to Clean the Print Heads Automatically 213 How to Clean the Print Heads Manually 213 How to Change the Ink Cartridge 214 10 2 Filling and Adjusting the Feeder Sealer 216 How to Fill the Sealer Bottle 216 How to Adjust the Sealing Water Flow 216 10 3 Cleaning the Mail Path 217 How to Clean the Brushes and Sponge Sealer 217 How to Clean the Feeder Belts and Rollers 219 How to Clean the Mail Pa...

Page 211: ...Maintaining your Mailing System 208 10 DELTA3_UK book Page 208 Lundi 29 octobre 2012 6 29 18 ...

Page 212: ...eads manually if the au tomatic cleaning is not sufficient The ink cartridge also contains two print heads that have to be aligned Ink Cartridge Maintenance This section explains how to Check the ink level in the cartridge to make sure you will not be run out of ink Align the print heads Do an automatic cleaning of the print heads Clean the print heads manually Change the ink cartridge Note the te...

Page 213: ...k information screen is displayed How to Display Ink Level and Cartridge Data How to Display Ink Level and Cartridge Data To display the Ink Level and the Cartridge Data 1 As supervisor see How to Log in as Supervisor p 160 The Ink information screen is displayed Also check the Best before date on the cartridge box After this date the cartridge warranty is void Press and type 12 1 or select the pa...

Page 214: ...s Supervisor p 160 2 Press OK and put a piece of paper in the mail transport The system prints a test pattern 3 The Set headset alignment screen is displayed Check the printed pattern and press the letter that cor responds to the straightest and complete vertical line Your Mailing System requires the heads to be aligned after each cartridge change Press and type 7 2 4 or select the path Maintenanc...

Page 215: ...Maintaining your Mailing System 212 10 4 Press OK to validate 5 Repeat the previous step until lines F are aligned DELTA3_UK book Page 212 Lundi 29 octobre 2012 6 29 18 ...

Page 216: ...ally To clean the print heads automatically 1 As supervisor see How to Log in as Supervisor p 160 The cleaning starts automatically Manual Cleaning If automatic cleaning is not sufficient you can clean the printing heads manually How to Clean the Print Heads Manually How to Clean the Print Heads Manually To clean the print heads manually 1 Open the base cover 2 Remove the ink cartridge see How to ...

Page 217: ...t position 2 Press down on the back of the ink cartridge to di sengage it 3 Lift out the old ink cartridge 4 Remove the protective strips from the new ink cartridge The Power cord must be plugged in to move the cartridge into the replacement position Keep fingers away from the ink cartridge while it is moving to the replacement position DELTA3_UK book Page 214 Lundi 29 octobre 2012 6 29 18 ...

Page 218: ...tem 215 10 5 Insert the new ink cartridge and then push it forward until you hear the click 6 Close the cover The alignment process of the printing heads starts automa tically DELTA3_UK book Page 215 Lundi 29 octobre 2012 6 29 18 ...

Page 219: ...o the limit marks 3 Screw the cap back and put the bottle back into place Adjusting the Sealing Water Flow Before you adjust the sealing water flow make sure that the brushes and sponge are clean see How to Clean the Brushes and Sponge Sealer p 217 How to Adjust the Sealing Water Flow How to Adjust the Sealing Water Flow To adjust the sealing water flow 1 Set the water flow using the back lever Wh...

Page 220: ... the Brushes and Sponge Sealer How to Clean the Brushes and Sponge Sealer To clean the brushes and sponge of the feeder 1 Open the feeder and push the left of the upper blue release lever to raise the upper drive assembly 2 Pull up the brush release lever 3 Raise the brush and lift the complete brush holder as sembly 10 3 Cleaning the Mail Path MAKE SURE YOUR SYSTEM IS DISCONNECTED FROM POWER SOUR...

Page 221: ...ion 5 Clean the sponge and the brush 6 Re install the sponge and retainer in the same direction 7 Put the brush back and push the release lever back down until it snaps into place 8 Push down on the upper drive assembly until it locks back into position DELTA3_UK book Page 218 Lundi 29 octobre 2012 6 29 18 ...

Page 222: ... rollers with a damp cloth or 70 alcohol on a cotton applicator 3 Push down the upper drive assembly until it locks back into position and close the feeder cover Cleaning Mail Path Sensors The sensors are light sensitive devices successively covered by the envelopes during their travel along the mail path Clean the mail path sensors as indicated below on system base feeder and optional dynamic sca...

Page 223: ... connected to the network before starting How to Run the Registration Update How to Run the Registration Update To run the registration update 1 As supervisor see How to Log in as Supervisor p 160 A confirmation message is displayed 2 Press OK 3 Select Update registration or type 6 4 Connect your USB memory key and press OK 5 Select the new town die and press OK The update registration processes i...

Page 224: ... to Remove Mail Jammed in the Dynamic Scale 226 11 2 Label Jamming 227 How to Clear a Label Jammed in the Base 227 11 3 Weighing Problems 228 11 4 Diagnostics and System Data 229 How to Access Diagnostic Data 230 How to Display Software Data 230 How to Display Hardware Data 230 How to Display the Event Lists 231 How to Display the Machine Counters 231 11 Troubleshooting DELTA3_UK book Page 221 Lun...

Page 225: ...Troubleshooting 222 11 DELTA3_UK book Page 222 Lundi 29 octobre 2012 6 29 18 ...

Page 226: ...he handle 2 Using your other hand remove the jammed envelopes 3 Release the jam release handle to put the transport belt and wheels back in position 11 1 Paper Jamming Possible causes Actions Mailpiece is too thick Mail size is incorrect Envelopes are not properly stacked on the feeder platform 1 Clear the Base as indicated below 2 Correct the cause indicated in the left column Mail sizes see Mail...

Page 227: ... many envelopes are on the feed deck Envelopes are not properly stacked on the feed platform 1 Unblock the Mixed Size Feeder as indicated below 2 Correct the cause Mail sizes see Mail Specifi cations p 235 Envelope stack height 4 max Envelope stacking see Using the Feeder p 37 Sealing is ON while feeding closed envelopes 1 Feed closed envelopes only with sealing OFF 2 Check that already closed en ...

Page 228: ...ase lever 4 Remove jammed envelopes 5 Position the brush and push the brush release lever until it snaps into place 6 Push down on the upper drive assembly until it locks back into position 7 Close the cover DELTA3_UK book Page 225 Lundi 29 octobre 2012 6 29 18 ...

Page 229: ...ove the jammed envelopes 3 Close the cover Possible causes Actions Mail size is incorrect Envelopes are not properly stacked on the Feed Platform 1 Unblock the Dynamic Scale by fol lowing the steps outlined below 2 Correct the cause Mail sizes see Mail Specifi cations p 235 Envelope stacking see Using the Feeder p 37 Do not lean on or leave any object on the Dynamic Scale Platform as it may alter ...

Page 230: ...enser 2 Pull the release handle located underneath the base to lower the transport belts and wheels Hold the handle 3 Using your other hand remove the jammed label 4 Release the jam release handle to put the transport belt and wheels back into position 11 2 Label Jamming Possible causes Actions A label is blocked in the Automatic Label Dispenser or in the transport mechanism of the system base Cle...

Page 231: ...e Automatic Weight Detection on the WP p 170 Possible causes Actions The weighing device is not selected See the weighing type selection procedures in Choosing a Weighing Type p 68 There are vibrations or air drafts in the weighing area Use a solid and steady table Away from any door Away from any fan Something is touching or laying on the Weighing Platform Clear the weighing zone and re zero the ...

Page 232: ...ostic Comments 1 Ping Server Sends a message to a server if connected to check the line 2 Sensors Status Reports the status 0 or 1 of the sensors below Top doc Start print Cover Carriage Top Seal 3 Advanced Feeder 4 Dynamic Scale Sensors Gives access to the tests bellow 1 Dynamic Scale main motor test 2 Dynamic test 5 Display The screen displays successively a black bar without text then a text 6 ...

Page 233: ... Base errors PSD events and Server connection history The data of the machine counters How to Display Software Data How to Display Software Data To display Software Data 1 As supervisor see How to Log in as Supervisor p 160 2 The system software data appears on the screen How to Display Hardware Data How to Display Hardware Data To display hardware data 1 As supervisor see How to Log in as Supervi...

Page 234: ...e event The Date where appends the event The Cycles count when the event occurred The Description The Category 5 Note the Code and refer to your customer service How to Display the Machine Counters How to Display the Machine Counters To display the data of the machine counters 1 As supervisor see How to Log in as Supervisor p 160 2 The system displays the data of the machine counters Press and typ...

Page 235: ...Troubleshooting 232 11 DELTA3_UK book Page 232 Lundi 29 octobre 2012 6 29 18 ...

Page 236: ... specifications of your Mailing System 12 1 Mail Specifications 235 12 2 Recommended Operating Conditions 237 12 3 General Specifications 238 12 4 Operating Specifications 239 12 Specifications DELTA3_UK book Page 233 Lundi 29 octobre 2012 6 29 18 ...

Page 237: ...Specifications 234 12 DELTA3_UK book Page 234 Lundi 29 octobre 2012 6 29 18 ...

Page 238: ...mensions Your Mailing System can handle the envelope flap sizes as illustrated below note the illustration is not on scale Envelope Weight Envelope Thickness 12 1 Mail Specifications Min 2 83 g Max 907 g Min 0 2 mm Max 10 mm DELTA3_UK book Page 235 Lundi 29 octobre 2012 6 29 18 ...

Page 239: ...r p 37 Envelope Stack In the Dynamic Scale Envelope Thickness Envelope Weight Min weight 2 83 g Max weight 907 g Max height 10 cm The feeder cannot process nested envelopes Min 0 2 mm Max 1 25 cm Min 3 g Max 1 kg DELTA3_UK book Page 236 Lundi 29 octobre 2012 6 29 18 ...

Page 240: ...ent 12 2 Recommended Operating Conditions Temperature range Ambient temperature 10 C 40 C Relative humidity 80 max without condensation To obtain the best weighing results use a solid and steady table Away from any doors Away from any fan The Dynamic Scale uses optical sensors do not install it in an area exposed to excessive light or heat sources DELTA3_UK book Page 237 Lundi 29 octobre 2012 6 29...

Page 241: ...0 x 350 x 615 Dynamic scale 263 x 350 x 438 Weight Base 10 8 kg Mixed Size Feeder 9 7 kg Dynamic scale 11 9 kg Catch tray 1 2 Kg Power Frequency 50 Hz Max current rating full configuration 0 2 A Power supply 230 V 10 2 poles with EARTHED circuit up to standards NFC15 100 12 3 General Specifications DELTA3_UK book Page 238 Lundi 29 octobre 2012 6 29 18 ...

Page 242: ... max 102 mm high Min weight 2 85 g Max weight 1 2 kg Label dimensions pre cut and self adhesive Max width 40 mm Min length 150 mm Dynamic Scale Range Resolution in dynamic weighing mode 1g Dynamic Scale Speed In weighing mode 90 envelope minute In no weighing mode 150 envelope minute Accounts The number of accounts you can create is set to 30 by default and can be raised op tionally to 200 Operato...

Page 243: ...Specifications 240 12 DELTA3_UK book Page 240 Lundi 29 octobre 2012 6 29 18 ...

Page 244: ...ifferential Weighing Automatic Label 45 Differential Weighing 44 55 68 Differential weighing auto tape 56 Disconnecting 9 Dynamic weighing 46 Dynamic Scale 13 Dynamic Weighing Batch Mode 68 Dynamic weighing 57 68 Dynamic weighing batch mode 57 E ERA 17 74 Energy Star 24 Enter Postage Amount Manually 48 Envelope Dimensions 235 F Folder 101 102 G GEO Code 174 Group 102 103 H High Accuracy 173 Hopper...

Page 245: ...et 181 R Rate Protection 156 Rate Selection 65 Rate Updates 151 Rate tables 200 Rear Guide Wall 14 Received 59 Remaining credit 17 Remote Account Management 98 Running Mail 43 51 61 63 S Sealer Bottle 14 15 Selecting a Rate 65 Session 33 Side Guide 14 Single Account 136 Slogan 17 196 Sorting Mail 32 Sounds 163 Specifications 238 Standard Weighing 43 54 68 68 Subgroups 100 Supervisor 160 Synchroniz...

Page 246: ...4140882T F 03 04 2020 ...

Reviews: