background image

Quadivator UTV 2 Bottom Plow

Page 9 

3.2 Storage 


Thoroughly clean off any dirt prior to storage. 

Store the Plow on a level location to ensure its stability and safety. 

Coat the Moldboard Plow with oil or other rust inhibitor when storing the Plow after a season. 

)

!./

0

PROBLEM 

POSSIBLE CAUSE 

POSSIBLE SOLUTION 

Hard ground from being too dry 

Wait for rain to soften ground 

Worn plowshares 

Replace plowshare 

Plow does not penetrate deep 
enough 

Check to ensure plow is level 
front to back when in the ground 
– adjust hitch as required 

Plow not heavy enough for soil 
conditions 

Add weight kit 

Coulter too low 

Move Coulter up one notch 

Poor soil penetration. 
Poor performance. 

Cutting width too wide leaving 
strips of unplowed material 

Adjust the plow beam positions 
on frame from right to left as 
described in the Adjustments 
section 


1 0

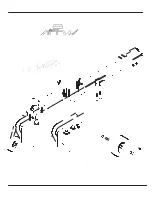
The Parts Repair section contains the replacement part numbers of all components of the Agline 3 PT. Hitch 
and the Moldboard Plow. 

To obtain replacement parts, please contact your Quadivator Dealer for Service.  To locate the nearest 
dealer, please contact a Quadivator representative using the contact information below. 

When ordering parts – please have the following information on hand: 


-Part Number you are looking for. 


-Model and Serial Number of the machine. 


-Quantity Required. 

To ensure warranty support for your Quadivator Product, please fill out the Warranty Registration card 
included in this Operator’s manual. 

Summary of Contents for 86935

Page 1: ...inted Sept 2009 Part 87566 www quadivator com QUADIVATOR INC UTV Plow Assembly Operators Parts Manual English Language Version 00 1000 6th Ave NE Portage La Prairie MB Canada R1N 3C5 READ SAVE THIS MANUAL ...

Page 2: ...or Inc that has been subject to alteration misuse abuse improper assembly or installation shipping damage or normal wear of the product 4 Exclusions excluded from this warranty are normal wear normal adjustments and normal maintenance In the event you have a claim under this warranty you must return the product to an authorized service dealer All transportation charges damage or loss incurred duri...

Page 3: ...ATION 5 2 2 Adjustments and Operation of the Moldboard Plow 6 2 4 Optional Equipment 7 2 5 Transportation 8 3 SERVICE 8 4 TROUBLESHOOTING 9 6 HOW TO ORDER REPAIR PARTS 9 7 CONTACT INFORMATION 10 8 WARRANTY STATEMENT 10 Notes 11 Parts explosions and listing 13 Warranty Registration Tear out last page fill in blanks and fax to Quadivator ...

Page 4: ...u attempt to assemble or operate the Moldboard Plow implement Important indicates that equipment or property damage could result if instructions are not followed Notes Gives helpful information Indicates an immanently hazardous situation which if not avoided will result in death or serious injury Indicates a potentially hazardous situation which if not avoided could result in death or serious inju...

Page 5: ...Quadivator UTV 2 Bottom Plow Page 3 Congratulations on the purchase of your Quadivator 2 bottom Moldboard Plow To obtain the best use ...

Page 6: ... direction on slopes Do not operate across slopes up and down only Do not attempt to operate on steep slopes 9 Beware of hidden underground objects Contact with hidden objects might cause sudden stop of the UTV and damage to the equipment 10 Keep hands and feet out from under the implement at all times 11 Never operate the Moldboard Plow without proper guards plates or other safety protective devi...

Page 7: ...up of the Hitch The Hitch has been strapped to the top of the plow frame for shipment to conserve space and to ensure that shipment was at the least possible cost to you The hitch must be installed on the plow before it can be used Step 1 Remove ...

Page 8: ......

Page 9: ...Quadivator UTV 2 Bottom Plow Page 7 Coulter wheel adjustment ...

Page 10: ...ving over bumps at improper speeds will cause the implement to hit and scrape the ground Attaching the Plow to the UTV increases the overall length of the working unit Allow additional clearance when turning If the implement is too close to the ground or occasionally scrapes the ground while in transport adjust the wheel height as necessary 3 1 Maintenance Periodically inspect for loose damaged or...

Page 11: ...e notch Poor soil penetration Poor performance Cutting width too wide leaving strips of unplowed material Adjust the plow beam positions on frame from right to left as described in the Adjustments section 1 0 The Parts Repair section contains the replacement part numbers of all components of the Agline 3 PT Hitch and the Moldboard Plow To obtain replacement parts please contact your Quadivator Dea...

Page 12: ...ained within this manual The warranty does not apply to any product of Quadivator Inc that has been subject to alteration misuse abuse improper assembly or installation shipping damage or normal wear of the product 4 Exclusions excluded from this warranty are normal wear normal adjustments and normal maintenance In the event you have a claim under this warranty you must return the product to an au...

Page 13: ...Quadivator UTV 2 Bottom Plow Page 11 ...

Page 14: ......

Page 15: ......

Page 16: ......

Page 17: ...ch Coupler 2 ball x 2 channel 5 2 86459 Bearing Support Spacer 74mm 6 6 86937 Plate Plow Mount 7 1 86938Q Weld t Plow Frame Massey Red 8 1 86945Q Weld t UTV Plow Hitch Massey Red 9 1 86991 Weld t Lift Link 10 1 86994 Weld t UTV Plow Front Rockshaft 11 1 86995 Weld t UTV Plow Rear Rockshaft 12 1 87025X Assembly Guage Wheel 13 4 87134 Plate Clamp Plow Beam 14 2 87450Q Sub Assy Sngl Bottom Plow Masse...

Page 18: ...___ Operators Manual Version 00 Please fax this sheet to 204 239 4271 or mail it to Quadivator Inc P O Box 1127 1000 6th Ave NE Portage la Prairie Manitoba R1N 3C5 CANADA UTV Plow Model UTV Plow Serial Purchased by Name Address City State Prov Mail Code Dealer Date Purchased D M Y Thank you ...

Reviews: