Installation Instructions
Quad Power Brush
4
86348
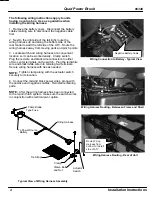
40 Amp Blade
Type Fuse
Wiring Harness
Tie Straps
Clamp
Clamp Bolt
and Nut
To Power Source
- Battery
Wiring Harness Routing - Betweeen Frame and Shell
Wiring Harness Routing - Rear of Unit
Actuator
Switch
The following wiring instructions apply to units
having no cargo box. Use as a guideline when
installing the wiring harness.
1. Remove the battery cover. Disconnect the battery
cables making sure to disconnect the negative cable
first.
2. Next to the right side of the tail light, route the
wiring harness up and along the bottom side of the
rear fender toward the left side of the ATV. Route the
wiring harness away from moving parts and pinch points.
3. Locate switch and wiring harness at a convenient
location so it can be worked easily. Clamp switch.
Plug the red wire and black wire connectors to either
of two center terminals on the switch. Plug the red/white
wire and black/white wire into remaing two terminals.
Secure wiring harness with ties as needed.
NOTE:
Tighten clamp along with the actuator switch
securely to its location.
4. Connect the red and black power wires, along with
the positive and negatives cables. Reinstall remaining
parts.
NOTE:
After the wiring harness has been connected
to the 3-point hitch system, make sure the switch works
in conjunction with electrical pivot option.
Typical View of Wiring Harness Assembly
Wiring Connection to Battery - Typical View
Negative Battery Cable.
Route Wiring
Harness from
bottom to the left
side of ATV.


