

3100 ACT Wood Stove Series
Page 22
250-6103C December 6, 2004
R
MAINTENANCE and GLASS CARE
DISPOSAL OF ASHES
Ashes should be placed in a metal container with a tight
fitting lid. The closed container of ashes should be placed
on a noncombustible floor or on the ground, well away from
all combustible materials, pending final disposal. If the
ashes are disposed of by burial in soil or otherwise locally
dispersed, they should be retained in the closed container
until all cinders have thoroughly cooled.
CREOSOTE
FORMATION AND NEED FOR REMOVAL
:
When wood is
burned slowly, it produces tar and other organic vapors
which combine with expelled moisture to form creosote.
The creosote vapors condense in the relatively cool
chimney flue of a newly-started or a slow-burning fire. As
a result, creosote residue accumulates on the flue lining.
When ignited, this creosote creates an extremely hot fire
which may damage the chimney or even destroy the house.
The chimney connector and chimney should be inspected
once every two months during the heating season to
determine if a creosote or soot buildup has occurred. If
creosote or soot has accumulated, it should be removed
to reduce the risk of a chimney fire.
INSPECTION
:
Inspect the system at the stove connection
and at the chimney top. Cooler surfaces tend to build
creosote deposits quicker, so it is important to check the
chimney from the top as well as from the bottom.
REMOVAL
: The creosote or soot should be removed with
a brush specifically designed for the type of chimney in
use. A chimney sweep can perform this service. It is also
recommended that before each heating season the entire
system be professionally inspected, cleaned and repaired
if necessary.
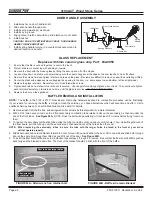
GLASS CARE
NOTE: REMOVE ALL LABELS FROM GLASS BEFORE LIGHTING
THE FIRST FIRE IN YOUR STOVE.
Quadra-Fire stoves are equipped with ceramic super heat-resistant
glass, which can only be broken by impact or misuse. Do not slam
stove door or impact the glass. When closing door, make sure
that logs do not protrude against the glass. Clean glass with a
nonabrasive glass cleaner, such as Windex. Abrasive cleaners may
scratch and cause glass to crack. Inspect glass regularly. If you find
a crack or break, immediately put the fire out and return the door to
your dealer for replacement of glass before further use.
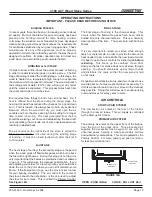
A portion of the combustion air entering the firebox is deflected
down over the inside of the door glass. This air flow “washes” the
glass, helping to keep smoke from adhering to its surface. When
operated at a low burn rate, less air will be flowing over the glass
and the smokey, relatively cool condition of a low fire will cause the
glass to become coated. Operating the stove with the Primary Air
Control all the way open for 15-20 minutes should remove the built
up coating. If the deposits on the glass are not very heavy, normal
glass cleaners work well. Heavier deposits may be removed by using
a damp cloth dipped in wood ashes or by using a commercially
available oven cleaner. After using an oven cleaner, it is advisable
to remove any residue with a glass cleaner or soap and water. Oven
cleaner left on during the next firing can permanently stain the glass
and damage the finish on plated metal surfaces.
CARE AND CLEANING OF PLATED SURFACES
Clean plated surfaces with vinegar or a glass cleaner before
lighting your first fire.
CHIMNEY CLEANING
Remove all ash from the firebox and extinguish all hot
embers before disposal. Allow the stove to cool completely.
Disconnect flue pipe or remove baffle from stove before
cleaning chimney. Otherwise residue can pile up on top of
the baffleand the stove will not work properly. Close the
door tightly and proceed with sweeping the chimney. Clean
out fallen ashes from the firebox.
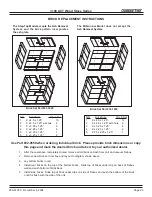
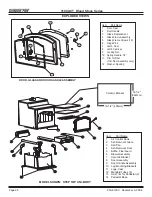
FIREBRICK
The firebox of your Quadra-Fire stove is lined with high quality
firebrick, which has exceptional insulating properties. There is no
need to use a grate; simply build a fire on the firebox floor of your
stove. Do not operate stove without firebrick.
OVERFIRING
Do not overfire.
Using flammable liquids or too much
wood, burning trash in the stove, or allowing too much
air into the stove may result in overfiring. If the chimney
connector or stove glows red or even worse, white, the
stove is overfired. This condition may ignite creosote in
the chimney, which can be dangerous, possibly causing
a house fire. If you overfire, immediately close the air
controls and door, if open, to reduce the air supply to the
fire.
Overfiring will void the stove warranty.
WARNING:
When the appliance is equipped with a plated door,
you must clean all the fingerprints and oils from the surface before
firing the appliance for the first time. Use a glass cleaner or
vinegar and towel to remove the oils. If not cleaned properly
before lighting your first fire, the oils can cause permanent
markings on the plating. After the plating is cured, the oils will
not affect the finish and little maintenance is required: just wipe
clean as needed.
CAUTION:
Do not use polishes with abrasives as it will
scratch the surface.


