background image

Page  32

7021-130F

May 12, 2014

Castile-B FS Pellet Stove 

Cl

O t C

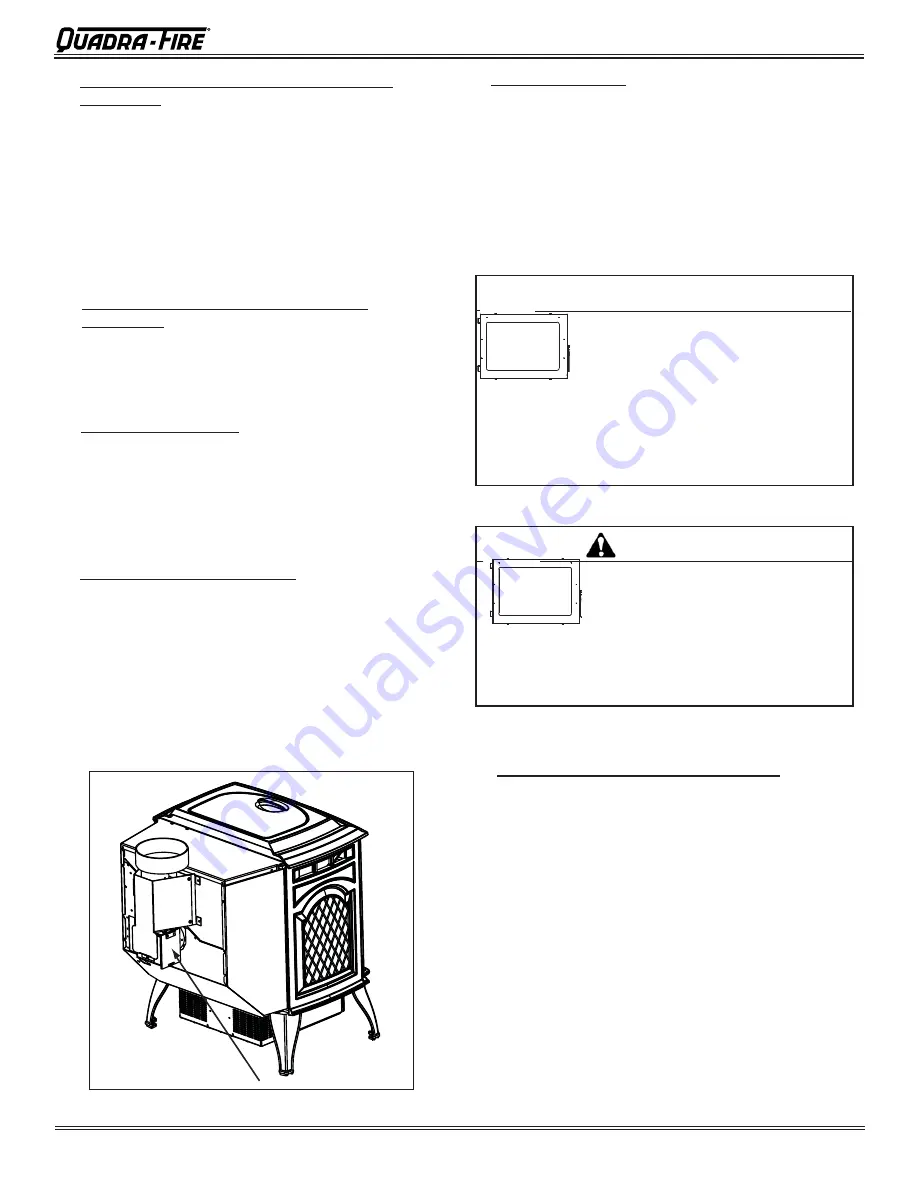
Figure 32.1

14.  Cleaning the Top Vent Adapter

a. 

The appliance must be in complete shutdown and the 
exhaust blower should be off.  Allow the appliance to 
completely cool down.

b. 

Open the clean out cover. 

See Figure 32.1.

c. 

Sweep out any ash build-up.

NOTE:  There are heavy duty vacuum cleaners specifi ically 

designed for solid fuel appliance cleaning.

12.  Cleaning Exhaust Blower - Requires No 

Lubrication

• Frequency:

  Yearly or as needed

• By:

  Qualifi ed Service Technician 

• Task: 

 Contact your local dealer.

11.  Cleaning Convection  Blower - Requires No 

Lubrication

• Frequency:

  Yearly or as needed

• By:

   Qualifi ed Service Technician / Homeowner

The convection blower is located at the bottom rear of 
the stove.  It is housed inside the screen box.  See 

page 

34-35

 for detailed instructions on removing the blower.

The blower has two impellers, one on each side of the 
motor.  They should be cleaned at least once each year 
or more often as needed.

13.  Door Latch Inspection

• Frequency:

  Prior to heating season

• By:

  Homeowner

The door latch is non-adjustable but the gasketing between 
the glass and fi rebox should be inspected periodically to 
make sure there is a good seal.

16.  Preparing Firebox for Non-Burn Season

• Frequency:

  Yearly

• By:

  Homeowner


a. Be sure the appliance is allowed to cool, has been 

unplugged and the exhaust blower is off.

 b. 

Remove all ash from the fi rebox and vacuum thoroughly.


c.  Paint all exposed steel, including cast-iron.  

•  Use the Touch-Up paint supplied with the appliance; 

or;

•  Purchase paint from your local dealer.  

•  Must use a high-temperature paint made specifi -

cially for heating appliances.

15.  Cleaning the Glass

• Frequency:

  When clear view of the fi repot becomes 

obscure

• By:

  Homeowner


a.  Appliance must be completely cool before cleaning 

glass.


b. Use a damp paper towel or any non-abrasive glass 

cleaner.  Wipe off with dry towel.

Handle glass assembly with care.

When cleaning glass:

•  Avoid striking, scratching or 

slamming glass.

•  Do NOT clean glass when hot.

CAUTION

•  Do NOT use abrasive cleaners.
•  Use a hard water deposit glass cleaner on white fi lm.
•  Refer to maintenance instructions.

Handle glass with care.
•  Inspect the gasket to ensure it is 

undamaged.

•  Do NOT strike, slam or scratch glass.
•  Do NOT operate appliance with glass  

assembly removed. 

WARNING

•  Do NOT operate with glass cracked, broken or 

scratched.

Summary of Contents for CASTILE-MBK-B

Page 1: ...requirements in your area CAUTION Tested and approved for wood pellets and shelled field corn fuel only Burning of any other type of fuel voids your warranty CAUTION WARNING Hot glass will cause burns...

Page 2: ...des codes locaux pour les pr cautions requises pour passer une chemin e travers un mur ou un plafond combustibles et les compensations maximums Inspectez et nettoyez la chemin e fr quemment Ne pas co...

Page 3: ...n A Chimney Exhaust Connection 11 B Venting Termination Requirements 11 C Equivalent Feet of Pipe 12 D Pipe Selection Chart 12 Section 5 Venting Systems A Alcove 13 B Through the Wall 14 C Vertical 15...

Page 4: ...e Technologies Operate the appliance without fully assembling all components Overfire Install any component not approved by Hearth Home Technologies Install parts or components not Listed or approved...

Page 5: ...loca tion of the vent termination CAUTION If burning shelled field corn you must use ap proved venting specifically designed for corn to prevent corro sion or degradation Follow the instructions from...

Page 6: ...appliance is drafting successfully all combustion byproducts are exiting the home through the chimney Considerations for successful draft include Preventing negative pressure Location of appliance and...

Page 7: ...ials have been met 8 The masonry chimney is inspected by a profes sional and is clean or the factory built metal chimney is installed according to the manufac turer s instructions and clearances 9 The...

Page 8: ...nsions Figure 8 2 Front View Figure 8 1 Top View Figure 8 3 Side View Figure 8 4 Side View with Top Vent Adapter 24 in 609mm 24 5 8 in 626mm 12 in 305mm 24 in 609mm 28 9 16 in 725mm 15 15 16 in 405mm...

Page 9: ...Appliance 2 51 H Side Wall to Flue Pipe 3 76 Alcove Installation Inches Millimeters Minimum Alcove Height 43 1092 Minimum Alcove Side Wall 6 152 Minimum Alcove Width 38 965 Maximum Alcove Depth 36 91...

Page 10: ...required with hori zontal venting or under the Top Vent Adapter with vertical installation Must extend 2 inches 51mm beyond each side of pipe shaded area C Hearth Pad Requirements UL and ULC Use a no...

Page 11: ...otruding parts of the structure roof overhang plants and shrubs etc 6 Termination Cap Location Home Electrical Service Side to side clearance is to be the same as minimum clearance to vinyl inside cor...

Page 12: ...ere above the diagonal line a 4 inch 102mm diam eter pipe is required The chart reveals that a 90 elbow is 5 times as restrictive to the flow of exhaust gases under positive pressure as 1 foot of hori...

Page 13: ...S ONLY Illustrations diagrams are not drawn to scale Actual installation may vary due to individual design preference A Alcove Figure 13 1 All minimums listed are to a combustible surface Minimum Maxi...

Page 14: ...ust be a minimum of 6 inches 152mm from the wall Approved for mobile home instal lations Must use 3 or 4 inch 76 102mm L or PL listed pellet venting or listed double wall pipe and a Quadra Fire Outsid...

Page 15: ...Single wall pipe is approved for residential installations only C Vertical D Through The Wall Vertical Firestop Flashing Rain Cap 6 in 152mm Min Non combustible Hearth Pad 3 in 76mm Min Clean out Cov...

Page 16: ...nry Figure 16 1 Figure 16 2 Non combustible Hearth Pad Airtight Clean out Door Clean out cover Sheathing 3 in 76mm minimum 1 in 25mm clearance Flashing Fireclay flue liner with airspace Concrete Cap 1...

Page 17: ...ling the vent system for use in a mobile home 8 Installation shall be in accordance with the Manufactur ers Home Safety Standard HUD CFR 3280 Part 24 Installation must comply with Manufactured Home an...

Page 18: ...interior wall Tools Needed Phillips headscrewdriver wire cutters hole saw or jig saw CAUTION Never draw outside combustion air from Wall floor or ceiling cavity Enclosed space such as an attic or gar...

Page 19: ...tion Figure 19 5 Figure 19 4 Installing the Top Vent Adapter Top Vent Adapter 3 to 3 inch Rear Exhaust Outlet Use hole on each side as drilling guide Offset Collar 3 to 6 inch Mount with 4 screws Clea...

Page 20: ...overed under warranty Any placement varia tion other than shown here can cause excessive heat and shall void the appliance warranty Figure 20 2 1 Open door to expose the firebox 2 Install the left log...

Page 21: ...he thermostat should be mounted on an inside wall and not in direct line with the appliance convection air NOTE If the thermostat is located too close to the appliance you may need to set the temperat...

Page 22: ...ood pellets should be left in their original sealed bag until using This will prevent moisture absorption Shelled corn should be stored in a tight container where it will not absorb moisture from damp...

Page 23: ...nutes after start up and again in 5 minutes This will fill the feed system and allow the appliance to begin dropping pellets The appliance will continue to run as long as the thermostat is calling for...

Page 24: ...ped calling for heat until the appliance has cooled down 3 Occasionally the appliance may run out of fuel and shut itself down When this happens the red call light will be on Figure 24 1 To restart it...

Page 25: ...does not affect the operation or longevity of your appliance 2 Ash buildup on glass 2 This is normal Clean the glass 3 Glass has turned dirty 3 Excessive build up of ash The lower burn settings will p...

Page 26: ...clean Make sure front door is closed Replace control box Call light on No fire Partially burned fuel in firepot Firepot clean out plate not closed Firepot is dirty missed ignition Check that firepot...

Page 27: ...s of vacuum Empty hopper of fuel Use a wet dry vacuum cleaner to remove remaining fuel from hopper including feed tube Check feed chute for obstructions Loosen 2 feed assembly mounting screws and ligh...

Page 28: ...less steel baffle from firebox to clean ash from on top of baffle Clean behind rear brick panels Change fuel brand to premium Check that firepot clean out plate is fully closed Reduce feed rate using...

Page 29: ...Removal from Firebox More frequently depending on the fuel type or ash build up OR X Beneath Heat Exchanger Every 1 ton of fuel OR X Blower Combustion Exhaust More frequently depending on the fuel ty...

Page 30: ...sal If the ashes are disposed of by burial in soil or otherwise locally dispersed they should be retained in the closed container until all cinders have thoroughly cooled Other waste shall not be plac...

Page 31: ...left behind from the use of the cleaning rods for the heat exchanger tubes c The ash will be resting on the back of the baffle This will require removing the cast baffle Please refer to page 35 for a...

Page 32: ...on adjustable but the gasketing between the glass and firebox should be inspected periodically to make sure there is a good seal 16 Preparing Firebox for Non Burn Season Frequency Yearly By Homeowner...

Page 33: ...An inefficient and non economical method of burning of fuel caused by poor quality pellet fuel is shown in Figure 33 2 The correct flame size when good quality premium pellet fuel is burned is shown i...

Page 34: ...the thermostat block and disconnect the 2 yellow wires e Remove the 2 screws from the power inlet and rotate it through the hole and out of the screen leaving the wires attached f Disconnect the vacuu...

Page 35: ...ont of the housing and very carefully bend the 2 housing sides out and bend the back of the housing away from the blower This allows for room to access the back 2 screws and nuts 4 total that is secur...

Page 36: ...el by loosening 2 screws do not remove and pull side panel away 3 The wire leads to the igniter are connected to the wire harness black wires with 1 4 inch male female spade connectors Disconnect the...

Page 37: ...for 120 volt 60 Hz standard current Make sure the outlet is grounded and has the correct polarity A good surge protector is recommended When operating with a generator you need a least 600 watts of p...

Page 38: ...ly reset itself 19 Snap Disc 3 Back Burn Protector 250 F Snap disc 3 is mounted on the back of the auger tube in the center of the appliance and has a red reset button To access it remove the right si...

Page 39: ...vection Blower Housing Feed Motor High Med Low Heat Output Switch Reset Button Reset Button Combustion Blower TERMINAL BLOCK CENTER 2 SCREWS FOR THERMOSTAT WIRES POWER OUTLET FUSE Fuse Red Call Light...

Page 40: ...chase In the case of new home construction warranty coverage begins on the date of first occupancy of the dwelling or six months after the sale of the product by an independent authorized HHT dealer d...

Page 41: ...Pellet Stove R Castile Pellet Insert WARRANTY CONDITIONS This warranty is void if LIMITATIONS OF LIABILITY 8 K N N OQ R U Z 8 88 U 8 U Q 8 N N Q Z R N U Q 8 R Z N N 88 N U Q 8 N O K WARRANTY EXCLUSION...

Page 42: ...Page 42 7021 130F May 12 2014 Castile B FS Pellet Stove...

Page 43: ...May 12 2014 7021 130F Page 43 Castile B FS Pellet Stove...

Page 44: ...502 6170481 6237588 6296474 6374822 6413079 6439226 6484712 6543698 6550687 6601579 6672860 6688302B2 6715724B2 6729551 6736133 6748940 6748942 6769426 6774802 6796302 6840261 6848441 6863064 6866205...

Reviews: