background image

4

7061-196J

April 24, 2019

Explorer II

B. Warranty Policy

4021-645J • 08-03-17

1

Hearth & Home Technologies

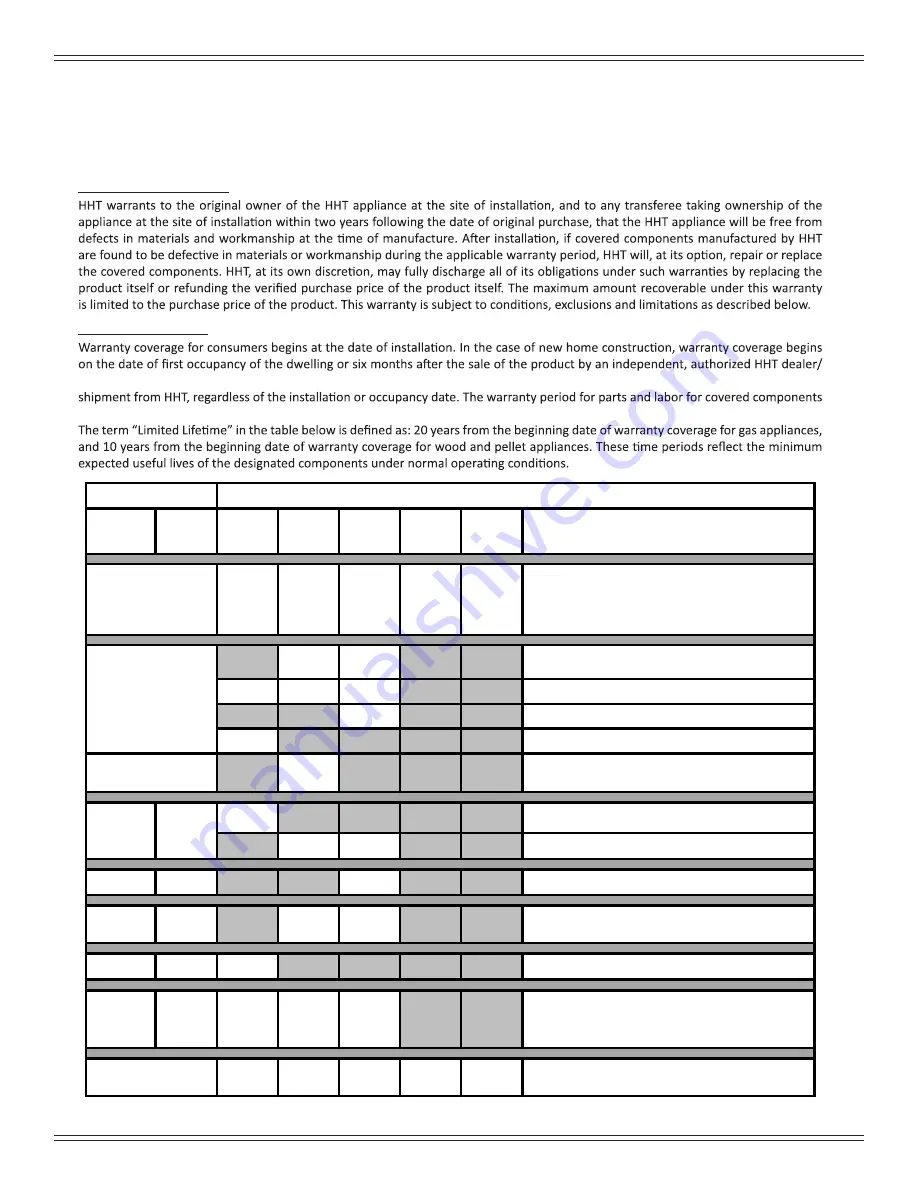
LIMITED LIFETIME WARRANTY

Hearth & Home Technologies, on behalf of its hearth brands (“HHT”), extends the following warranty for HHT gas, wood, pellet and 

electric hearth appliances that are purchased from an HHT authorized dealer.

WARRANTY COVERAGE:

WARRANTY PERIOD:

distributor, whichever occurs earlier. However, the warranty shall commence no later than 24 months following the date of product 

is produced in the following table.

Parts

Labor

Gas 

Pellet

 Wood

Electric

Venting

Components Covered

X

X

Igniters, auger motors, electronic components, and 

glass

X

X

X

Factory-installed blowers

X

Molded refractory panels

X

Ignition Modules

X

Firepots, burnpots, mechanical feeders/auger 

assemblies

X

Vent Free burners, Vent Free ceramic fiber logs, 

Aluminized Burners

X

X

Castings and Baffles

6 years

3 years

X

Catalyst - limitations listed

7 years

3 years

X

X

Manifold tubes, HHT chimney and termination

10 years

1 year

X

Burners, logs and refractory

 Limited 

Lifetime

3 years

X

X

X

Firebox and heat exchanger, Grate and Stainless 

Steel Burners, FlexBurn

®

 System (engine, inner 

cover,access cover and fireback)

X

X

X

X

X

All replacement parts beyond warranty period

Warranty Period

HHT Manufactured Appliances and Venting

All parts and material except as covered by 

Conditions, Exclusions, and Limitations listed

X

X

X

2 years

3 years

1 Year

90 Days

5 years

1 year

x

X

Summary of Contents for Explorer II series

Page 1: ...ine or other flammable vapors and liquids in the vicinity of this or any other appliance Do not over fire If appliance or chimney connector glows you are over firing Over firing will void your warrant...

Page 2: ...ney and the referenced clearances DOUBLE WALL Six inch 6 inches 152mm diameter listed double wall air insulated connector pipe with listed factory built UL103HT Class A chimney or a masonry chimney an...

Page 3: ...Maintenance and Service 17 A Quick Reference Maintenance Guide 17 B General Maintenance 18 C Correct Baffle Blanket Placement 20 4 Troubleshooting Guide 21 5 Service Part Replacement 22 A Glass 22 B F...

Page 4: ...nic components and glass X X X Factory installed blowers X Molded refractory panels X Ignition Modules X Firepots burnpots mechanical feeders auger assemblies X Vent Free burners Vent Free ceramic fib...

Page 5: ...ing a warranty call Travel and shipping charges for parts are not covered by this warranty Limited Catalyst Warranty o For wood burning products containing a catalyst the catalyst will be warranted fo...

Page 6: ...water or weather damage which is the result of but not limited LIMITATIONS OF LIABILITY have other rights which vary from state to state EXCEPT TO THE EXTENT PROVIDED BY LAW HHT MAKES NO EXPRESS WARRA...

Page 7: ...LS Set to desired heat output LOW LOW Burn Rate Control ACC Control The appliance is ready for normal operation Warning Risk of Fire Close and securely latch the door after the fire has started and af...

Page 8: ...e the water in the fuel A range of BTU outputs calculated using HHV Efficiency and the burn rates from the EPA tests using Douglas Fir dimensional lumber A peak BTU out of the appliance calculated usi...

Page 9: ...nd chimney must be listed to UL103 HT or a listed UL 1777 full length six inch 152mm diameter liner must be used Outside Air Kit part OAK ACC must be installed in a mobile home installation Improper i...

Page 10: ...from rain or snow delaying the seasoning process C Burning Process In recent years there has been an increasing concern about air quality Much of the blame for poor air quality has been placed on the...

Page 11: ...ing your wood up too quickly before you shut down the air controls to the desired burn rate With the Automatic Combustion Control ACC system you do not have to continually monitor the fire Once you se...

Page 12: ...low setting 1 8 1 2 Activate startup air by pushing in and pulling out 3 Medium high burn setting Move burn rate control to far left Activate the startup air by pushing in and pulling out 4 High burn...

Page 13: ...iance Be sure the room is adequately ventilated and the flue unobstructed 5 Light the paper in the appliance NEVER light or rekindle fire with kerosene gasoline or charcoal lighter fluid the results c...

Page 14: ...llow these guidelines 1 Initial cold start up and all Burn Settings The blower can be plugged in and turned on right away The blower fan is turned on and off by a snap disc When your appliance has rea...

Page 15: ...nt Ensure furnace and air conditioning return vents are not located in the immediate vicinity of the appliance Avoid installing the appliance near doors walkways or small isolated spaces Recessed ligh...

Page 16: ...in volume as the speed is increased CONTACT YOUR DEALER for additional information regarding operation and troubleshooting Visit www quadrafire com to find a dealer Fire Risk Keep combustible materia...

Page 17: ...Listed Chimney Listed Termination Cap Storm Collar Flashing Firebrick Ash Removal WEEKLY or After Every 25 Loads of Wood Ashes must be cool before you can dispose of the ashes in a non combustible co...

Page 18: ...sult creosote residue accumulates on the flue lining When ignited this creosote creates an extremely hot fire which may damage the chimney or even destroy the house The chimney connector and chimney s...

Page 19: ...keep smoke from adhering to its surface When operated at a low burn rate less air will be flowing over the glass and the smokey relatively cool condition of a low fire will cause the glass to become...

Page 20: ...in contact with the back of the firebox and even with each other in the front Ceramic Blanket Back of Firebox Baffle Board Baffle Retainer Bracket WARNING Fire Risk Firebox damage due to improper baff...

Page 21: ...g a Fire Section Check for adequate vent height refer to Chimney Height Section Open window below the appliance towards the wind Wood condition is too wet too large Use dry seasoned wood refer to Seas...

Page 22: ...cool to the touch 2 Protect a table or counter top with padding or towels Protect your hands and wear gloves to prevent injury 3 Remove the door with the broken glass by lifting the door up and off o...

Page 23: ...over tighten lock nut The door handle needs to move smoothly NOTE Tube Channel does not need to be removed to replace the baffles Service Part SRV7061 160 1 Remove all ash from the firebox and extingu...

Page 24: ...ts Figure 24 1 Figure 24 2 1 2 3 4 NOTE Soak the bolts with penetrating oil for at least 15 minutes before trying to remove them 3 Remove the 2 channel nuts 7 16 and 2 bolts 3 8 inside of chamber Figu...

Page 25: ...25 7061 196J April 24 2019 Explorer II A Service Maintenance Log 6 Reference Materials Date of Service Performed By Description of Service...

Page 26: ...26 7061 196J April 24 2019 Explorer II Date of Service Performed By Description of Service...

Page 27: ...t number list on following page 09 17 Color SKU No Mfg Dates Matte Black EXPLRMED MBK 03 14 Porcelain Black EXPLRMED PBK 10 14 Porcelain Dark Blue EXPLRMED PDB 10 14 Porcelain Frost EXPLRMED PFT 10 14...

Page 28: ...ransition Assembly SRV29138 5 Top Matte Black 7061 101MBK Porcelain Black 7061 101PBK Porcelain Dark Blue 7061 101PDB Porcelain Frost 7061 101PFT Porcelain Mahogany 7061 101PMH 6 Side Left Matte Black...

Page 29: ...ty 1 req 11 5 Brick 5 w angle 9 X 4 5 X 1 25 Qty 2 req 11 6 Brick 6 6 69 X 3 5 X 1 25 Qty 2 req Brick Uncut Must specilfy size when ordering Pkg of 1 832 0550 Pkg of 6 832 3040 12 Ashlip Matte Black 7...

Page 30: ...BK Porcelain Black 7061 103PBK Porcelain Dark Blue 7061 103PDB Porcelain Frost 7061 103PFT Porcelain Mahogany 7061 103 Gasket 7 16 844 3980 15 Andirons 2 pcs SRV7061 020 16 Air Wash Bar SRV7061 199 17...

Page 31: ...7061 033 Porcelain Mahogany SRV7061 028 Leveling Assembly 7000 000 Paint Touch Up Matte Black 812 0910 Porcelain Black 1 00 0022 Porcelain Dark Blue 1 00 0020 Porcelain Frost 1 00 0021 Porcelain Mahog...

Page 32: ...and maintenance instructions included Read understand and follow these instructions for safe installation and operation Leave this manual with party responsible for use and operation of this appliance...

Reviews: