background image

 10 


                       7060-228G 


       November 29, 2016

Explorer III Wood Stove

Recommended 

Location 

Marginal 

Location 

Location 

Not 

Recommended 


Recommended 

Location 


Location NOT 

Recommended 

Multi-level Roofs 

Windward 

Leeward 

Outside Air Kit Termination Cap

Figure 10.1

E.  Chimney Termination Requirements

Follow manufacturer’s instructions for clearance, securing 
flashing and terminating the chimney. 

Fig. 11.1 & 11.2


Must have an approved and Listed cap


Must not be located where it will become plugged by 

snow or other material


•  Must terminate at least 3 feet (91cm) above the roof 

and

 at least 2 feet (61cm) above any portion of the 

roof within 10 feet (305cm).


•  Must be located away from trees or other structures

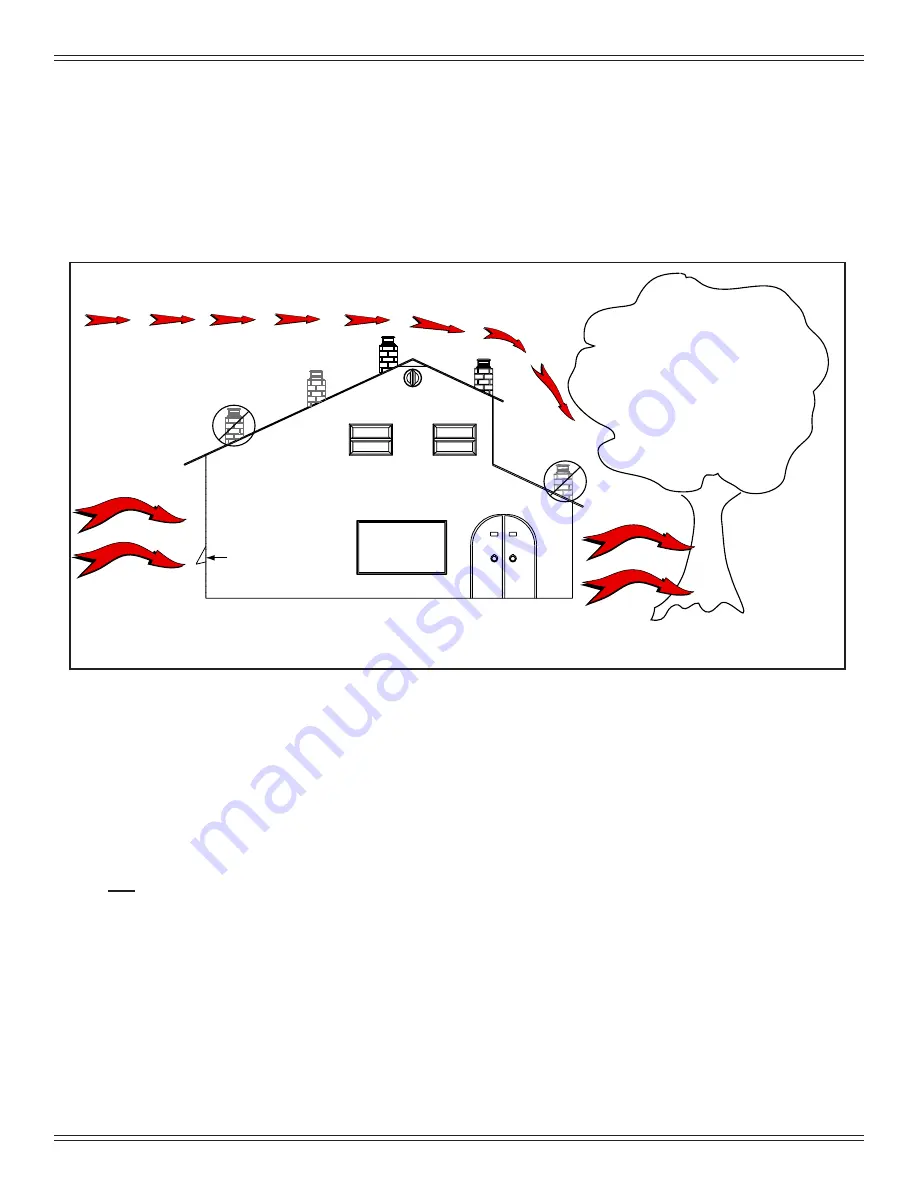
D.  Locating Your Appliance & Chimney

Location  of  the  appliance  and  chimney  will  affect  perfor-

mance.  As shown in 

Figure 10.1

 the chimney should:

  •  Install through the warm space enclosed by the build-

ing envelope. This helps to produce more draft, espe-

cially during lighting and die down of the fire.

  •  Penetrate the highest part of the roof.  This minimizes 

the affects of wind turbulence and down drafts.

  •  Consider the appliance location in order to avoid floor 

and ceiling attic joists and rafters.

 • 

Locate  termination  cap  away  from  trees,  adjacent 

structures, uneven roof lines and other obstructions.

Your local dealer is the expert in your geographic area and 

can usually make suggestions or discover solutions that will 

easily correct your flue problem.

NOTICE:

•  Chimney performance may vary.
•  Trees, buildings, roof lines and wind conditions affect 

performance.

•  Chimney height may need adjustment if smoking or 

overdraft occurs.

NOTICE: 

  Locating  the  appliance  in  a  basement  or  in  a 

location of considerable air movement can cause intermittent 

smoke spillage from appliance. Do not locate appliance near

•  Frequently open doors
•  Central heat outlets or returns

Summary of Contents for EXPLR-III-PBK

Page 1: ...s Do not touch glass until it is cooled NEVER allow children to touch glass Keep children away CAREFULLY SUPERVISE children in same room as fireplace Alert children and adults to hazards of high tempe...

Page 2: ...fications 3 E Non Combustible Materials 3 F Combustible Materials 3 2 Getting Started 4 A Design and Installation Considerations 4 B Fire Safety 4 C Negative Pressure 5 D Tools And Supplies Needed 5 E...

Page 3: ...s Material which will not ignite and burn composed of any combination of the following Steel Plaster Brick Iron Concrete Tile Glass Slate Materials reported as passing ASTM E 136 Standard Test Method...

Page 4: ...e or air conditioning Imbalances of the HVAC air handling system Upper level air leaks such as Recessed lighting Attic hatch Duct leaks WARNING Asphyxiation Risk Negative pressure can cause spillage o...

Page 5: ...thout fully assembling all components Operating appliance without legs attached if supplied with appliance Do NOT Over fire If appliance or chimney connector glows you are over firing Any such action...

Page 6: ...nsible for use and operation ATTENTION INSTALLER Follow this Standard Work Checklist This standard work checklist is to be used by the installer in conjunction with not instead of the instructions con...

Page 7: ...Figure 7 1 Front View Figure 7 2 Side View 8 3 16 28 5 16 31 3 8 13 1 16 20 1 16 Figure 7 2 Top View 30 1 8 3 28 5 8 24 1 8 Center of Flue Figure 7 4 Side View with horizontal flue 3 Dimensions and Cl...

Page 8: ...door and measure 8 inches 203mm from the side edge of the opening in the face of the appliance See exception In Canada similar floor protection must be provided 18 inches 457mm in front and 8 inches 2...

Page 9: ...1 2 241 6 153 27 686 12 305 N A N A 52 1 2 1334 18 457 INSTALLATION HORIZONTAL THROUGH THE WALL SINGLE WALL PIPE N A N A 43 1 2 1105 25 1 2 648 N A N A 52 1 2 1334 N A For alcove only Six inch diamete...

Page 10: ...mney should Install through the warm space enclosed by the build ing envelope This helps to produce more draft espe cially during lighting and die down of the fire Penetrate the highest part of the ro...

Page 11: ...um 3 ft 91cm Minimum Wall or Parapet Flat Roof F 2 10 3 Rule These are safety requirements and are not meant to assure proper flue draft This appliance is made with a 6 inch 152mm diameter chimney con...

Page 12: ...el black or 26 gauge blued steel or an approved air insulated double wall venting pipe Thimble A manufactured or site constructed device installed in combustible walls through which the chimney connec...

Page 13: ...ide dimension frame from 2 x 2 framing lumber to fit into wall opening Inside opening of frame should be no less than 14 inch x 14 inch 356mm x 356mm Figure 13 1 4 Attach the wall spacer to the chimne...

Page 14: ...ppliance in a mobile home The listed connectors must conform to each other to ensure a proper fit and seal Flue Gas Direction Crimped End Toward Appliance Secure pipe sections with a minimum of 3 scre...

Page 15: ...ter to the appliance using 4 screws Figure 15 1 15 2 3 Floor Rear Installation Cut a 4 inch 102mm hole in outside wall or floor to accommodate outside air piping Use 4 inch 102mm aluminum metal flex o...

Page 16: ...et under the bottom left rear corner See Owner s Manual for detailed operating instructions for the blower and snap disc Shock Risk Do NOT remove grounding prong from plug Route cord away from applian...

Page 17: ...olt from each side of the flue transition and retrieve nuts attached to bolts 3 Turn flue transition to horizontal position Inspect rope gasket to ensure a leak free seal Re attach 4 Remove upper flue...

Page 18: ...inch 152mm factory built chimney conforming to CAN ULC 629M STANDARD FOR FACTORY BUILT CHIMNEYS 6 Follow the chimney and chimney connector manufacturer s instructions when installing the flue system f...

Page 19: ...sulation Blanket SRV7060 238 30 2 Baf e Blanket SRV7060 233 Y 30 3 Baf e Plate SRV7060 250 30 4 Baf e Board SRV7060 148 Y 30 5 Secondary Tubes Qty 3 req SRV7060 226 Y 30 6 Baf e Cover Plates SRV7060 2...

Page 20: ...eration DO NOT DISCARD Please contact your Quadra Fire dealer with any questions or concerns For the number of your nearest Quadra Fire dealer log onto www quadrafire com CONTACT INFORMATION This prod...

Reviews: