background image

November 7, 2014 


           7061-197D 


                  9

Explorer II Medium Wood Stove

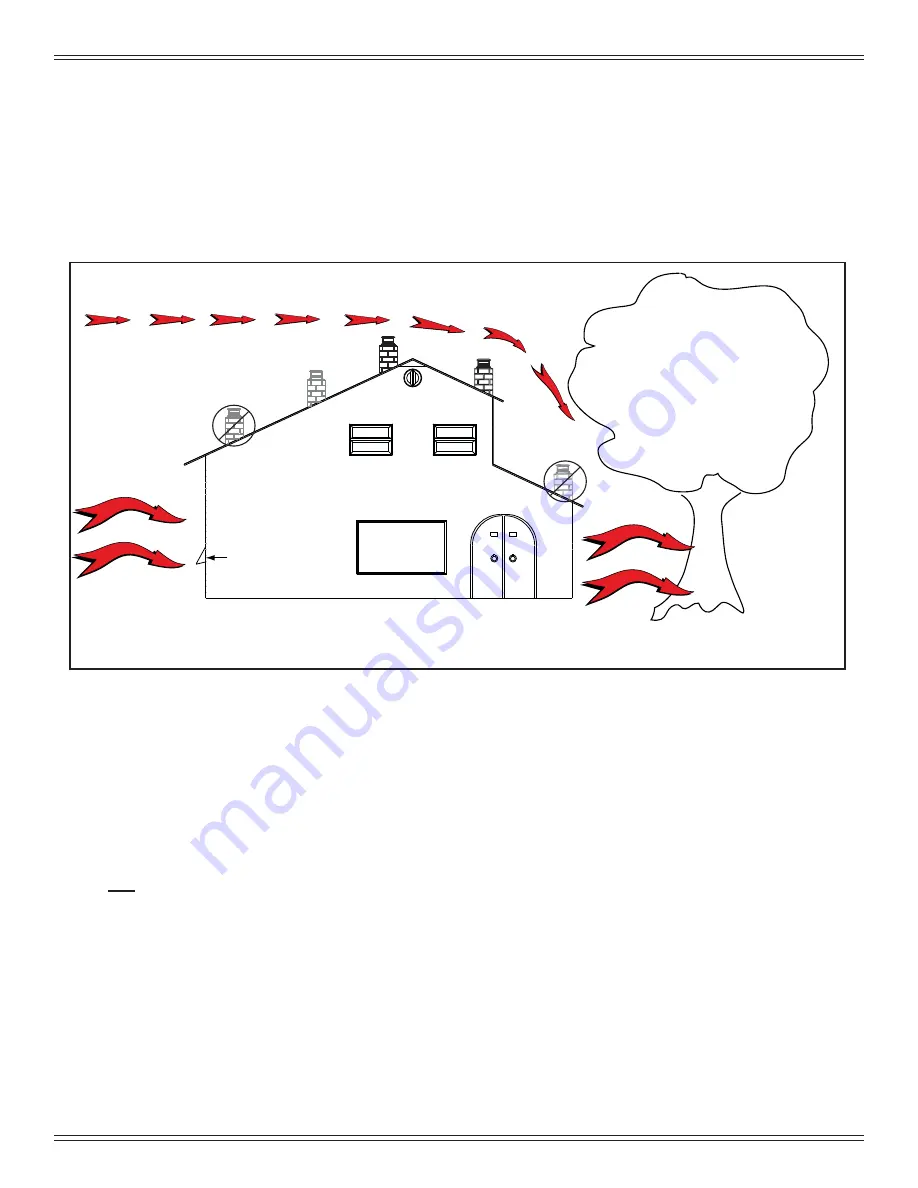
Recommended 

Location 

Marginal 
Location 

Location 

Not 

Recommended 


Recommended 

Location 


Location NOT 

Recommended 

Multi-level Roofs 

Windward 

Leeward 

Outside Air Kit Termination Cap

Figure 9.1

D.  Chimney Termination Requirements

Follow manufacturer’s instructions for clearance, securing 

fl ashing and terminating the chimney. 

Fig. 10.1 & 10.2


Must have an approved and Listed cap


Must not be located where it will become plugged by 
snow or other material


•  Must terminate at least 3 feet (91cm) above the roof 

and

 at least 2 feet (61cm) above any portion of the 

roof within 10 feet (305cm).


•  Must be located away from trees or other structures

C.  Locating Your Stove & Chimney

Location of the appliance and chimney will affect perfor-
mance.  As shown in 

Figure 9.1

 the chimney should:


•  Install through the warm space enclosed by the build-

ing envelope. This helps to produce more draft, espe-
cially during lighting and die down of the fi re.


•  Penetrate the highest part of the roof.  This minimizes 

the affects of wind turbulence and down drafts.


•  Consider the appliance location in order to avoid fl oor 

and ceiling attic joists and rafters.

 • 

Locate termination cap away from trees, adjacent 

structures, uneven roof lines and other obstructions.

Your local dealer is the expert in your geographic area and 
can usually make suggestions or discover solutions that will 
easily correct your fl ue problem.

NOTICE:

•  Chimney performance may vary.

•  Trees, buildings, roof lines and wind conditions affect 

performance.

•  Chimney height may need adjustment if smoking or 

overdraft occurs.

NOTICE: 

 Locating the appliance in a basement or in a 

location of considerable air movement can cause intermittent 
smoke spillage from appliance. Do not locate appliance near

• 

Frequently open doors

• 

Central heat outlets or returns

Summary of Contents for EXPLRMED-PBK

Page 1: ...Hearth Home Technologies recommends NFI certified professionals or technicians supervised by an NFI certified professional HOT SURFACES Glass and other surfaces are hot during operation AND cool down...

Page 2: ...y Specifications 3 C Mobile Home Approved USA ONLY 3 D Glass Specifications 3 E Non Combustible Materials 3 F Combustible Materials 3 2 Getting Started 4 A Design and Installation Considerations 4 B F...

Page 3: ...OAK ACC must be installed in a mobile home installation Improper installation adjustment alteration service or maintenance can cause injury or property damage For assistance or additional information...

Page 4: ...practiced evacuation plan consisting of at least two escape routes 4 A plan to deal with a chimney fire as follows In the event of a chimney fire a Evacuate the house immediately b Notify fire depart...

Page 5: ...pped or sealed Attic mounted duct work and air handler joints and seams taped or sealed Basement installations should be avoided WARNING Negative pressure can cause spillage of com bustion fumes soot...

Page 6: ...secured in place with proper clearance Chimney meets recommended height requirements 14 16 feet Roof flashing installed and sealed Terminations installed and sealed Clearances Section 3 Pg 7 Combusti...

Page 7: ...19 1 2 26 3 4 Figure 7 1 Front View Figure 7 2 Side View 12 1 4 20 1 16 7 15 16 27 28 15 16 Figure 7 2 Top View 29 3 25 7 8 22 3 16 Figure 7 4 Side View with horizontal flue 3 Dimensions and Clearance...

Page 8: ...97 FOLLOW PIPE MANUFACTURES CLEARANCES AS REQUIRED Explorer II 10 5 267 20 25 514 13 5 343 55 1397 MINIMUM CLEARANCES TO COMBUSTIBLE MATERIALS in inches Millimeters NOTE All A B and C Dimensions are t...

Page 9: ...ney should Install through the warm space enclosed by the build ing envelope This helps to produce more draft espe cially during lighting and die down of the fire Penetrate the highest part of the roo...

Page 10: ...Minimum 3 ft 91cm Minimum Wall or Parapet Flat Roof E 2 10 3 Rule These are safety requirements and are not meant to assure proper flue draft This appliance is made with a 6 inch 152mm diameter chimne...

Page 11: ...or 26 gauge blued steel or an approved air insulated double wall venting pipe Thimble A manufactured or site constructed device installed in combustible walls through which the chimney connector passe...

Page 12: ...tside dimension frame from 2 x 2 framing lumber to fit into wall opening Inside opening of frame should be no less than 14 inch x 14 inch 356mm x 356mm Figure 12 1 4 Attach the wall spacer to the chim...

Page 13: ...nectors must conform to each other to ensure a proper fit and seal Flue Gas Direction Crimped End Toward Stove Secure pipe sections with a minimum of 3 screws Figure 13 2 Chimney Connector Stove Pipe...

Page 14: ...cessary to install a floor protector of a minimum of 3 8 inch 9 5mm thick metal clad millboard or equivalent a min imum of 16 inches 406mm in front of glass and 8 inches 203mm to both sides of the fue...

Page 15: ...acking box 2 Using a 2 Phillips screw driver attach the flex adapter to the stove using 4 screws Figure 15 1 3 Floor Rear Installation Cut a 4 inch 102mm hole in outside wall or floor to accommodate o...

Page 16: ...lts securing blower onto outer wall of appliance 4 Place the bracket containing the snap disc and magnet under the bottom left rear corner See Owner s Manual for detailed operating instructions for th...

Page 17: ...e collar in the top vent position Converting Collar For Rear Vent Installation and Installing Required Horizontal Flue Shield 1 Remove flue collar 3 Phillips and convection chamber top 2 Phillips 2 Re...

Page 18: ...6 inch 152mm factory built chimney conforming to CAN ULC 629M STANDARD FOR FACTORY BUILT CHIMNEYS 6 Follow the chimney and chimney connector manufacturer s instructions when installing the flue syste...

Page 19: ...BK ACC Blower Control Box W Switch SRV7000 194 Y Component Pack 7033 051 Magnet Round SRV7000 140 Y Snap Disc Bracket Assembly 7033 036 Snap Disc 1 Convection Blower SRV230 0470 Y Speed Control Only R...

Page 20: ...eration DO NOT DISCARD Please contact your Quadra Fire dealer with any questions or concerns For the number of your nearest Quadra Fire dealer log onto www quadrafire com CONTACT INFORMATION This prod...

Reviews: