background image

Page  14

7005-151D

December 22, 2006

R

Mt. Vernon Pellet Stove 

RR

We  recommend  a  minimum  of  60  inches 

(1524mm) vertical, however above the eave 

is preferred. 

Both  installations  are  approved  for  mobile 

home installations.  Must use 3 or 4 inch (76 

to 102mm) “L” or “PL” listed pellet venting or 

listed double wall pipe and Quadra-Fire Out-

side Air Kit  in mobile homes.  Single wall pipe 

is approved for residential installations only.

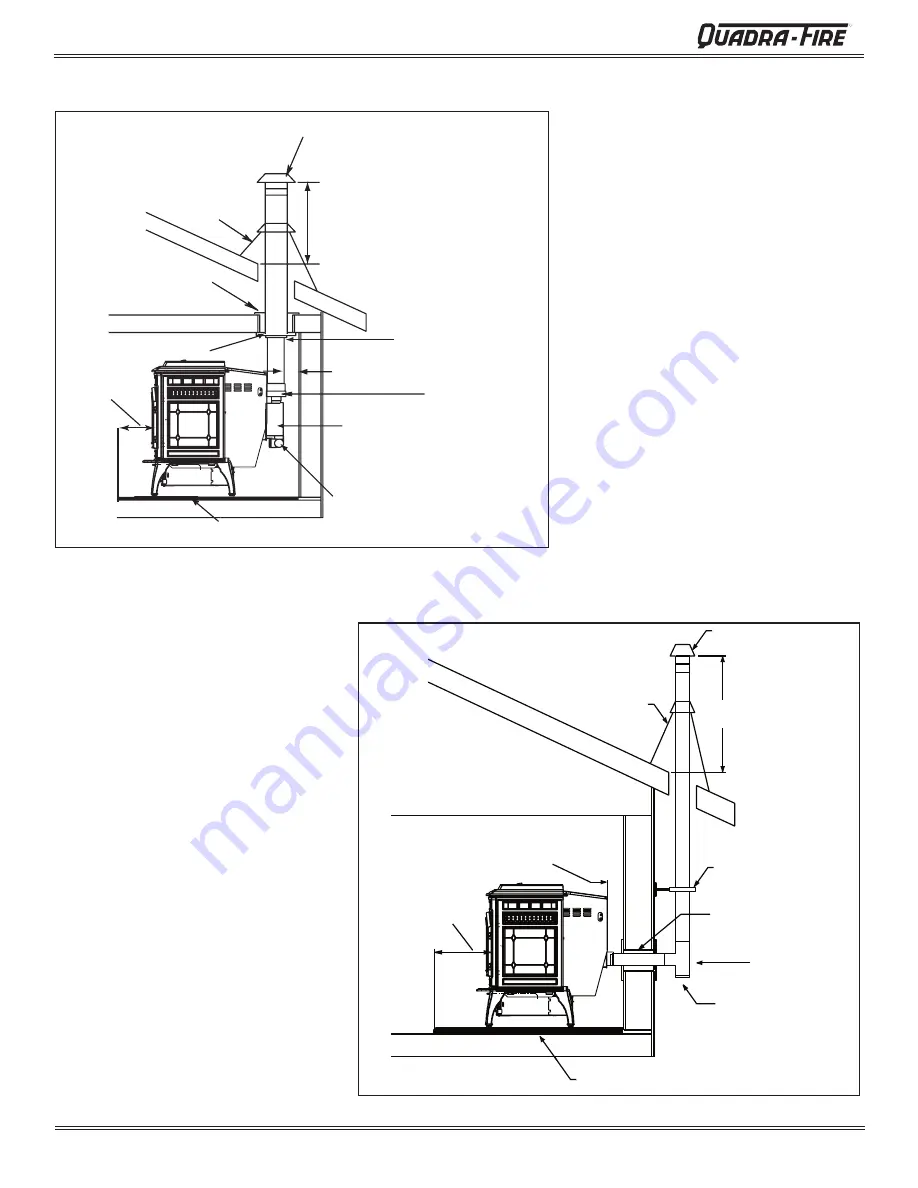
C.  Vertical

D. Through The Wall & Vertical

Firestop

Flashing

Rain Cap

6 in. 

(152mm) 

Min.

Non-combustible Hearth Pad

3 in. (76mm)


Min.

Cleanout Cover

24 in. (610mm)


Minimum

Ceiling Support

6 in. (152mm) Flue 

Connector

6 in. (152mm) Class A 

Chimney Connector 

Adapter

3 in. to 6 in. 

(76-152mm) 

Top Vent Kit

Non-combustible Hearth Pad

Cleanout Cover

Tee

Wall Thimble

Support Bracket

every 60 in. (1524mm)

24 in. (610mm) minimum

Rain Cap

Flashing

2 in. (51mm) minimum

6 in. (152mm)

minimum

Figure 14.1

Figure 14.2

f i r e - p a r t s . c o m

Summary of Contents for Mt. Vernon Series

Page 1: ...d follow these instruc tions for safe installa tion and operation DO NOT DISCARD WARNING Please read this entire manual before installation and use of this pellet fuel burning room heater Failure to f...

Page 2: ...nserts and replaces And yet we are old fashioned when it comes to craftsmanship Each unit is meticulously fabricated and gold and nickel surfaces are hand nished for lasting beauty and enjoyment Our p...

Page 3: ...ertical 14 E Masonry 15 F Alternate Masonry 15 Section 6 Mobile Home 16 Section 7 Appliance Set Up A Leg Leveling System 17 B Outside Air Kit 17 C Top Vent Adapter 18 D Log Set Placement 19 E Thermost...

Page 4: ...Home Approved NOTE This installation must conform with local codes In the absence of local codes you must comply with the ASTM E1509 UM 84 HUD ULC ORD C 1482 D Electrical Rating 115 VAC 60 Hz Start 4...

Page 5: ...ety Maintain the designated clearances to combustibles Insu lation must not touch the chimney You must maintain the designated air space clearance around the chimney This space around a chimney is nec...

Page 6: ...NOT Over re Or any such action that may cause a re hazard WARNING Hearth Home Technologies disclaims any responsibility for and the warranty will be voided by the following actions D Measuring Standar...

Page 7: ...9mm 28 1 8 714mm 28 7 16 772mm 14 1 16 357mm C L 29 1 2 749mm 15 1 4 387mm C L 29 1 2 749mm 17 1 2 445mm 32 1 4 819mm 32 1 8 816mm C L C L 2 7 8 73mm 3 to 3 Adapter 1 5 8 41mm 3 to 6 Adapter 20 0 508m...

Page 8: ...liance 2 51 H Side Wall to Flue Pipe 3 76 Alcove Installation Inches Millimeters Minimum Alcove Height 43 1092 Minimum Alcove Side Wall 6 152 Minimum Alcove Width 40 1016 Maximum Alcove Depth 48 1219...

Page 9: ...combustible oor protection extending beneath the ue pipe is required with horizontal venting or under the Top Vent Adapter with vertical installation Must extend 2 inches 51mm beyond each side of pipe...

Page 10: ...y be used Substitute or damaged vent components may impair safe operation WARNING B Venting Termination Requirements 1 Termination must exhaust above air inlet elevation It is recommended that at leas...

Page 11: ...haust gases under positive pressure as 1 foot of horizontal pipe and a foot of horizontal pipe is twice as restrictive as a foot of vertical pipe D Pipe Selection Chart The table below can help you ca...

Page 12: ...Illustrations diagrams are not drawn to scale Actual installation may vary due to individual design preference A Alcove Figure 12 1 All minimums listed are to a combustible sur Minimum Maximum Inches...

Page 13: ...or your installation 2 in 51mm Minimum 2 in 51mm Minimum B Through The Wall Horizontal termination cap must be a minimum of 12 inches 305mm from the wall Approved for mobile home instal lations Must u...

Page 14: ...ingle wall pipe is approved for residential installations only C Vertical D Through The Wall Vertical Firestop Flashing Rain Cap 6 in 152mm Min Non combustible Hearth Pad 3 in 76mm Min Cleanout Cover...

Page 15: ...combustible Hearth Pad Airtight cleanout door Sheathing 2 in 51mm minimum Flashing 1 in 25mm clearance 1 in 25mm clearance with firestop 6 in 152mm minimum Fireclay Flue Liner with airspace Concrete C...

Page 16: ...tion requirements on pages 4 10 for listings to combustibles and appropriate chimney systems 6 Use silicone to create an effective vapor barrier at the location where the chimney or other component pe...

Page 17: ...of 2 inch x 3 foot ex hose 2 hose clamps 1 collar assembly 1 termi nation cap assembly 1 trim ring 12 screws 1 Measure distance from oor to air vent opening in appli ance and mark location on wall Use...

Page 18: ...s Figure 18 1 6 Install the vent pipe into the top vent adapter be sure to silicone all joints 7 To clean top vent adapter open clean out cover Figure 18 2 C Top Vent Adapter Installation 3 in to 6 in...

Page 19: ...included wall mount thermo stat or purchase an optional programmable thermostat or remote control It is equipped with an adjustable heat anticipator The current rating is 05 amps The anticipator needs...

Page 20: ...conomical fuel We recommend the use of a 50 50 blend of corn and wood pellets The only change in operation is that the feed rate may require a slight adjustment The BTU output of the appliance varies...

Page 21: ...er if the flame height is too high or too low you will need to adjust the feed rate Wait until the appliance has been burning for 15 minutes before making your adjustments and allow 15 minutes for fee...

Page 22: ...ING Fire Risk Do NOT operate appliance With appliance door open Firepot oor open Cleaning slide plates open Do NOT store fuel Closer than required clearances to com bustibles to appliance Within space...

Page 23: ...nting system is clean Make sure front door is closed Replace control box Call light on No re Partially burned fuel in repot Firepot clean out plate not closed Firepot is dirty missed ignition Check th...

Page 24: ...ebox causing loss of vacuum Empty hopper of fuel Use a wet dry vacuum cleaner to remove remaining fuel from hopper including feed tube Check feed chute for obstructions Loosen 2 screws and jiggle feed...

Page 25: ...less steel baf e from rebox to clean ash from on top of baf e Clean behind rear brick panels Change fuel brand to premium Check that repot clean out plate is fully closed Reduce feed rate using feed r...

Page 26: ...ly closed when cleaning is complete See Disposal of Ashes on page 27 WARNING NEVER pull repot cleaning rod or cleaning slide plates out when appliance is operating Hot pellets may fall into ashpan and...

Page 27: ...rods OUT and IN a couple of times Figure 27 1 8 Cleaning Beneath Heat Exchanger Frequency Monthly or after burning 1 ton of fuel By Homeowner Task A more thorough cleaning is needed to remove the exce...

Page 28: ...e a year or more often depending upon the quality of your fuel or if there is a lot of horizontal pipe sec tions Ash will build up more quickly in the horizontal sections 10 Cleaning the Hopper Freque...

Page 29: ...ontent Maintenance Frequency As needed By Homeowner Task Poor quality pellet fuel or lack of maintenance can create conditions that make the repot ll quickly with ashes and clinkers This condition mak...

Page 30: ...all the ash drawer and close the ash removal door and then re install the side panel and re connect the power Thumb Screw Igniter Figure 30 2 2 Exhaust Blower Replacement Frequency As needed By Qualit...

Page 31: ...y shatter and cause injury WARNING Rope Retainer Rods Slide this end in first Crimped end at the bottom Crimped end must be parallel with the glass Glass Figure 31 3 Frequency As needed By Quali ed Se...

Page 32: ...should be set on the lowest setting available When describing the location of a component it is always AS YOU FACE THE FRONT OF THE APPLIANCE 2 Convection Blower The convection blower is mounted at th...

Page 33: ...ube in the center of the appliance and has a red reset button To access it remove the right side panel If the re tries to burn back into the feed system or push exhaust up the feed tube this snap disc...

Page 34: ...ns VACUUM SWITC H EXHAUST BLOWER CONTRO L BOX CLEANING RODS 10 HEAT EXCHANGER TUBES RED CALL LIGHT TERMINAL BLOCK CENTER 2 SCREWS FOR THERMOSTAT WIRES POWER OUTLET FUSE Fuse Fuse Remove 3 screws on ea...

Page 35: ...0440 8 Rope Retainer 7005 268 9 Glass Assembly with Gasket 7005 058 10 Hinge Door 450 2910 11 Screw 10 32 x 5 16 PH PHL MS ZC 229 1230 12 Hinge Pin Rivet Gold 72171 Nickel 433 1590 11 10 12 13 16 15 1...

Page 36: ...Adapter 3 to 6 inch 33 Vacuum Switch 34 Control Box 35 Hopper 36 Snap Disc 2 200 o 37 Snap Disc 1 125 o 38 Feed Motor Assembly 39 Feed Spring Assembly 40 Exhaust Blower 41 Snap Disc 3 250o Nbr Descri...

Page 37: ...5 062 PCR 7005 063 PMB 7005 065 PMH 7005 066 34 Control Box 4 speed SRV7000 206 Door Latch Assembly 7021 006 Door Rope Shield SRV7005 271 55 Door Left Matte Black with gold hinge pins 7005 020MBK 55 D...

Page 38: ...repot 240 0930 Gasket Tadpole 10 ft 842 5130 6 Glass Assembly with Gasketing 7005 130 53 Hinge Pin Rivet Gold order quantity needed 72171 53 Hinge Pin Rivet Nickel order quantity needed 433 1590 Heat...

Page 39: ...ome Technologies discontinues the model and two 2 years for optional accessories Adjustments regular maintenance cleaning and temporary repairs do not qualify for a service call fee and will not be co...

Page 40: ...ions included Read understand and follow these instruc tions for safe installation and operation Leave this manual with party responsible for use and operation This product may be covered by one or mo...

Reviews: