


12
7080-131D
October 28, 2014
MT VERNON E2
C. Negative Pressure
Negative pressure results from the imbalance of air avail-
able for the appliance to operate properly. It can be strongest
in lower levels of the house.
Causes include:
• Exhaust fans (kitchen, bath, etc.)
• Range
hoods
• Combustion air requirements for furnaces, water heaters
and other combustion appliances
• Clothes
dryers
• Location of return-air vents to furnace or air conditioning
• Imbalances of the HVAC air handling system
• Upper level air leaks such as:
-
Recessed
lighting
-
Attic
hatch
-
Duct
leaks
To minimize the effects of negative air pressure:
• Install the outside air kit with the intake facing prevailing
winds during the heating season
•
Ensure adequate outdoor air for all combustion appliances
and exhaust equipment
• Ensure furnace and air conditioning return vents are not
located in the immediate vicinity of the appliance
• Avoid installing the appliance near doors, walkways or
small isolated spaces
• Recessed lighting should be a “sealed can” design
• Attic hatches weather stripped or sealed
•
Attic mounted duct work and air handler joints and seams
taped or sealed
D. Draft
Draft is the pressure difference needed to vent an appli-
ance successfully. When an appliance is drafting suc-
cessfully, all combustion byproducts are exiting the home
through the chimney.
Install through the warm airspace enclosed by the build-
ing envelope. This helps to produce more draft, especially
during lighting and die-down of the fi re.
Considerations for successful draft include:
• Preventing negative pressure
• Location of appliance and chimney
WARNING
Risk of Asphyxiation!
Negative pressure can cause spillage of combustion
fumes and soot.
NOTICE: Hearth & Home Technologies assumes no
responsibility for the improper performance of the chimney
system caused by:
• Inadequate draft due to environmental conditions
• Downdrafts
• Tight sealing construction of the structure
• Mechanical exhausting devices
E. Chimney and Exhaust Connection
1.
Chimney & Connector
: Use 3 or 4 inch (76-102mm)
diameter type “L” or “PL” venting system. It can be vented
vertically or horizontally.
WARNING
USE ONLY RECOMMENDED VENTING COMPONENTS;
OTHERWISE MAKESHIFT PARTS MAY RESULT IN PROP-
ERTY DAMAGE, PERSONAL INJURY, OR DEATH.
NOTE
: The appliance exhaust outlet is designed to ac-
commodate 3 inch venting. Use of 4 inch venting requires
the use of a 3-to-4 inch exhaust vent increaser in addition
to any other venting components needed, sold separate-
ly.
2.
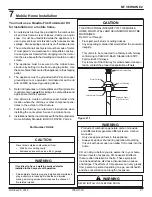
Mobile Home:
Approved for all Listed pellet vent. If using
the 3 inch (76mm) vertical Top Vent Adapter Kit or the 3
to 6 inch (76-152mm) Top Vent Offset Adapter, use Listed
double wall fl ue connector. A Quadra-Fire Outside Air Kit
(OAK-3) must be used with manufactured home installa-
tions.
3.
Residential:
The 3 inch (76mm) vertical Top Vent Adapter
Kit and the 3 to 6 inch (76-152mm) Top Vent Offset Adapter
are tested to use 24 gauge single wall fl ue connector or
Listed double wall fl ue connector to Class A Listed metal
chimneys, or masonry chimneys meeting International
Residential Code standards for solid fuel appliances.
4.
INSTALL VENT AT CLEARANCES SPECIFIED BY THE
VENT MANUFACTURER.
5. Secure exhaust venting system to the appliance with at
least 3 screws. Also secure all connector pipe joints with
at least 3 screws through each joint.
6. DO NOT INSTALL A FLUE DAMPER IN THE EXHAUST
VENTING SYSTEM OF THIS UNIT.
7. DO NOT CONNECT THIS UNIT TO A CHIMNEY FLUE
SERVING ANOTHER APPLIANCE.
NOTE: All pipe must be welded seam pipe whenever
possible. Seal pipe joints with high temperature silicone
(500°F [260°C] minimum rated only).


