B. Replacement Maintenance
1. Glass Replacement
•
Ensure that the fire is out and the fireplace is cool to
the touch.
• Protect a table or counter top with padding or towels.
•
Open the door and while supporting it, remove the
(2) top hinge screws and retainer, lift door up and off.
•
Lay door face down on table or counter making sure
handle and handle attachment knob hang over the
edge of the table top so door lays flat on the soft
surface.
• Remove screws from the top and bottom glass frame
(12 screws) using a #2 Phillips Head screwdriver. Set
frame aside and retain screws.
HINT
: Soak screws in penetrating oil for easy removal.
• Remove the glass and discard.
• Position the new glass with gasket into the door.
• Replace the glass frames.
•
Start screws to secure glass frame to door, keeping
them loose for adjusting the glass. Then continue to
tighten each screw alternately, a few turns at a time,
until the glass panel is tightened snugly. DO NOT
OVERTIGHTEN OR CROSS THREAD SCREWS.
•
Replace the door on the fireplace.
•
After the first burn, recheck the tightness of the
screws.
NOTICE:
Remove all labels from glass before lighting the
first fire in your fireplace.
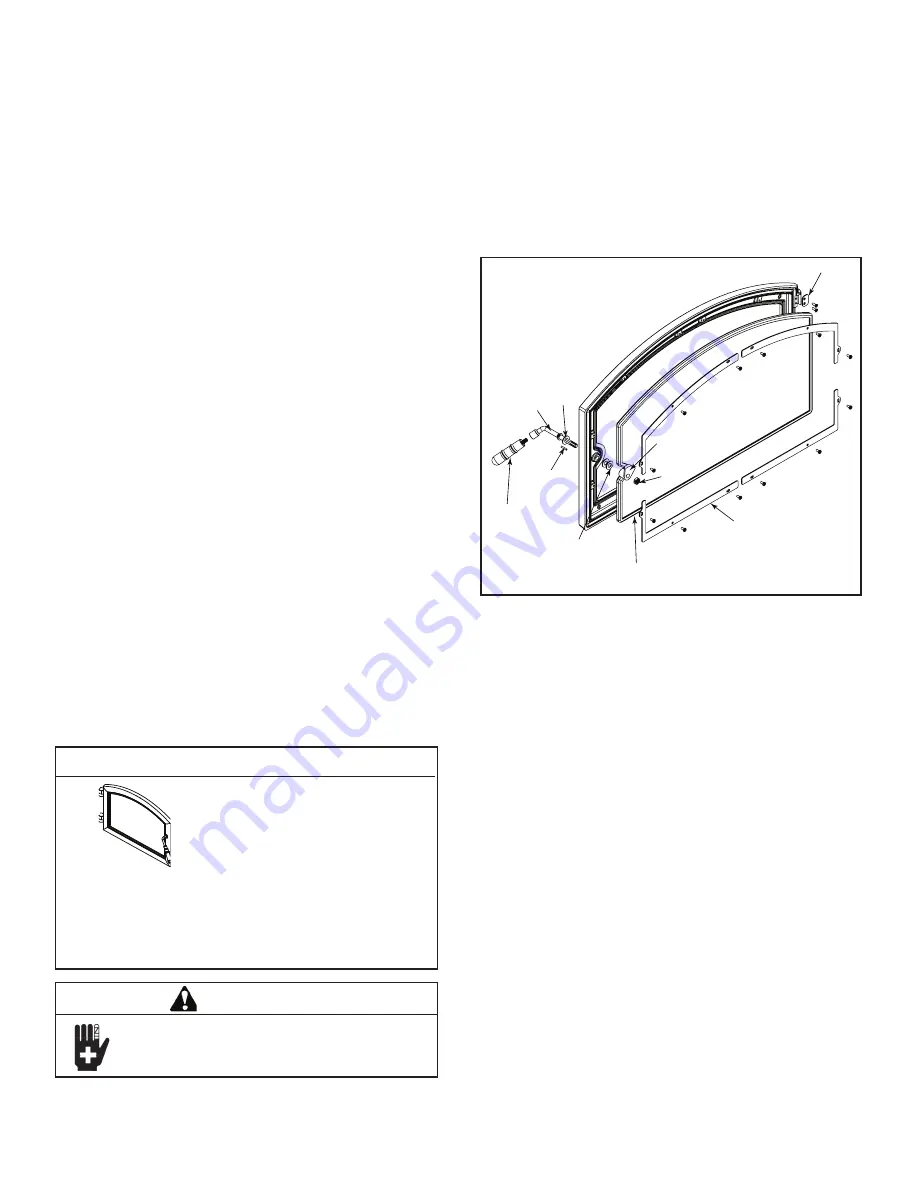
Figure 4.2 Door Assembly
2. Tighten or Adjust Door Latch
Remove the lock nut holding latch cam and one or two
spacing washers on the door as shown in Figure 4.2.
Reinstall the cam and tighten locknut.
OR
Replace the gasket material. Wear or damage to the
gasket material can cause air leakage into the firebox
resulting in overfiring and loss of efficiency.
A replacement gasket is available from your dealer.
Door Handle
Washer
Latch Cam Key
Fiber Handle
Spacing Washers
Latch Cam
Lock Nut
Glass w/ Gasket
Glass Retainers
Hinge Retainer
WARNING
Injury Risk.
• Use only glass specified in manual.
• DO NOT REPLACE with any other material.
Handle glass assembly with care.
When cleaning glass:
• Avoid striking, scratching or
slamming glass.
•
Do NOT clean glass when hot.
•
Do NOT use abrasive cleaners.
• Use a hard water deposit glass cleaner on white film.
•
Refer to maintenance instructions.
CAUTION!
3. Manifold Tubes Removal and Replace-
ment
•
Remove all ash from the firebox disposing of it in a
metal container.
• The manifold tubes are located in the upper portion
of the inside of the firebox.
•
Each tube is attached with one 3/16” stainless steel
hex head screw attached to the firebox on the left
hand side. The right hand side of the tube just
slides into a hole.
• Please note that each tube is different in regards to
the air holes or mounting holes.
•
Remove the hex head screw and clip. Slide the tube
to the right, angle down and pull out. It is recom
-
mended to replace one tube at a time to insure cor-
rect placement.
28
Quadra-Fire • Pioneer III Owner’s Manual • 4182-900 • Rev D • 08/19


