background image

R

Page 2

September 1, 2008

Cumberland Gap Wood Stove

7006-188E 

and Welcome to the Quadra-Fire Family

!

H

earth & Home Technologies welcomes you to our tradition of 

excellence!  In choosing a Quadra-Fire appliance, you have our 
assurance of commitment to quality, durability, and performance.

This commitment begins with our research of the market, including 
‘Voice of the Customer’ contacts, ensuring we make products that 
will satisfy your needs. Our Research and Development facility 
then employs the world’s most advanced technology to achieve 
the optimum operation of our stoves, inserts and fireplaces.  And 

yet we are old-fashioned when it comes to craftsmanship.  Each 
unit is meticulously fabricated and gold and nickel surfaces are 
hand-finished for lasting beauty and enjoyment.  Our pledge to 
quality is completed as each model undergoes a quality control 
inspection.    

We wish you and your family many years of enjoyment in the 
warmth and comfort of your hearth appliance.  Thank you for 
choosing Quadra-Fire.

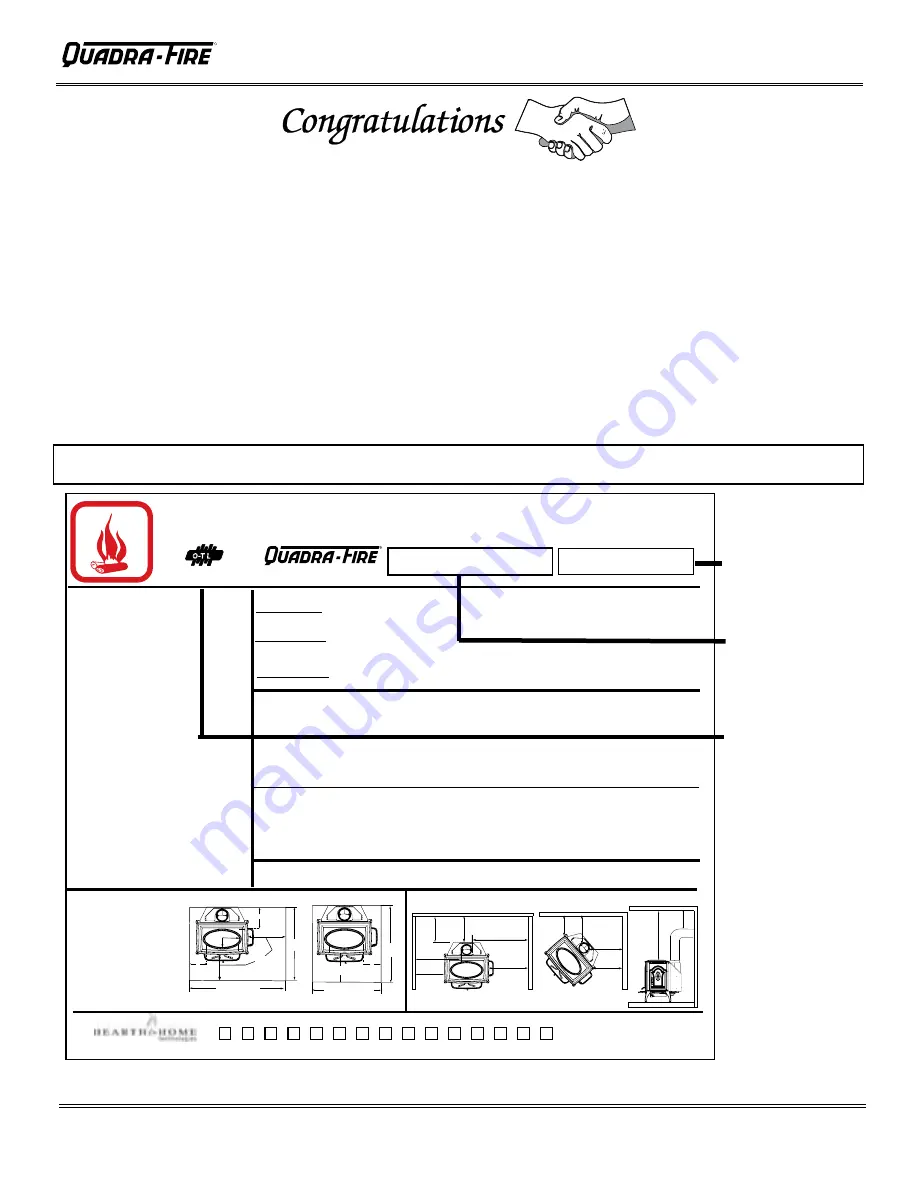
VENT SPECIFICATIONS: 

SINGLE WALL: 

Six inch (6") (152mm) diameter, minimum 24 MSG black or blued steel connector pipe, with a listed 

factory-built UL103 HT Class "A" chimney, suitable for use with solid fuels, or a masonry chimney, and the referenced 
clearances. 

DOUBLE WALL: 

Six inch (6") (152mm) diameter, listed double wall air insulated connector pipe with listed 

factory-built UL103 HT Class "A" chimney, or  a masonry chimney and the referenced clearances. 

*In Canada must comply with Standard CAN/ULC-S629-M87 for the 650 degree Factory-built chimneys. 

MOBILE HOME:  

Use double wall pipe by Dura-Vent DVL, Selkirk Metalbestos DS or Security DL double wall 

connector pipe. Must be equipped with a spark arrestor.  Apply double wall clearances below when installing unit. 

 2008  2009  2010  Jan.  Feb.  Mar.  Apr.  May  June  July  Aug.  Sept.  Oct.  Nov.  Dec.

DO NOT REMOVE THIS LABEL  

Made in U.S.A. 

LISTED ROOM HEATER, SOLID FUEL TYPE.   ALSO FOR 
USE IN MOBILE HOMES.  (UM) 84-HUD . 

"For Use with 

Solid Wood Fuel Only"  

Install and use only in accordance with manufacturer's 
installation and operating instructions.  Contact local building or 
fire officials about restrictions and installation inspections in 
your area. Do not obstruct the space beneath heater. 
WARNING - For Mobile Homes:  Do not install in a sleeping 
room.  An outside combustion air inlet must be provided and 
unrestricted while unit is in use.  The structural integrity of the 
mobile home floor, ceiling and walls must be maintained.  The 

stove needs to be properly grounded to the frame of the mobile 
home.  Components required for mobile home installation:  
Outside Air Kit, Part Number 831-1780. 
Refer to manufacturer's instructions and local codes for 
precautions required for passing chimney through a 
combustible wall or ceiling and maximum offsets. 
Inspect and clean chimney frequently - Under Certain Conditions of 
Use, Creosote Buildup May Occur Rapidly. 

Do not connect this unit to a chimney serving another appliance. 

Optional Components:Optional Blower, Part 831-1701. 
Electrical Rating:  115 VAC, 1.2 Amps, 60 Hz. 
Route power cord away from unit.  Do not route cord under or 
in front of appliance. 
DANGER: Risk of electrical shock.  Disconnect power supply 
before servicing. 
Replace glass only with 5mm ceramic available from your dealer. 
Do not use grate or elevate fire.  Build wood fire directly on firebrick. 

Do not overfire - if heater or chimney connector glows, you are 
overfiring. 
Operate only with the fuel loading door closed.  Open only to 
add fuel to the fire. 
Optional Fire Screen Part SCR-7006 can only be used in full 
vertical installations. 

U.S. ENVIRONMENTAL PROTECTION AGENCY - 

Certified to comply with July 1990 particulate emission 

standards. 

PREVENT HOUSE FIRES 

FLOOR PROTECTION*: 
Floor protector must be 1/2" 
minimum thickness ("k" value = 
0.84) non-combustible material 
or equivalent, extending beneath 
heater and to front/sides/rear as 
indicated on the diagram.  
Exception: Non-combustible 
floor protections must extend 
beneath the flue pipe when 
installed with horizontal venting 
and extend 2" (51mm) beyond 
each side.  

O-T L

Tested and Listed 

by

Portland

Oregon USA

OMNI-Test Laboratories, Inc.

C

Report:  #061-S-55-2 

TESTED TO: 

  UL 1482, UL737, ULC S627.  

CAUTION:

HOT WHILE IN OPERATION DO NOT TOUCH, KEEP CHILDREN AND CLOTHING AWAY. CONTACT MAY CAUSE SKIN BURNS.  KEEP 

FURNISHINGS AND OTHER COMBUSTIBLE MATERIAL FAR AWAY FROM THE APPLIANCE. SEE NAMEPLATE AND INSTRUCTIONS. 

SERIAL NO. 

Cumberland Gap 

R

7006-186

www.quadrafire.com 

1445 N. Highway, Colville, WA 99114 

Mfg by 

MINIMUM CLEARANCES TO COMBUSTIBLE MATERIALS: In Inches & (Millimeters) 

NOTE:  All "A" , "C" and "F" Dimensions are to the inside diameter of the flue collar. 

SEE MANUAL FOR OTHER CONFIGURATIONS 

*In Canada: Must be minimum 18"(450mm) in front of both fuel loading 

doors and 8" (200mm) on both sides and back. 

C1 

Non-fuel 

door side 

D2 

Fuel Door 

side 

C2 

D1 

E1 

E2 

F1 

F2 

Fuel door 

side 

Non-fuel 

door side 

16" 

(406mm) 

from fuel 

loading door 

8" 

(200mm) 

USA 

Front Fuel 

loading door 

34-5/8"

(879mm) 

Minimum 

36-11/16" 

(932mm)


Minimum 

Minimum 16"


(406mm)


from 

fuel loading


door 

8"

(200mm) 

USA 

44-7/8"

(1140mm) 

Minimum 

39-1/8" 

(994mm) 

Minimum 

 Fuel loading doors 

Front 

Side 

8" 

(200mm) 

TOP VENT VERTICAL 

A B 


C1 

C2* 

D1 

D2* 

E1 

E2* F1 F2* G 

Single Wall-USA 

13(330) 11.5(292) 27(686)  27(686) 18(457) 18 457) 16.5(419) 

16.5(419) 20(508) 20(508)  56.5(1435) N/A 

Single Wall-Canada


13(330) 11.5(292) 27(686)  27(686) 18(457) 18(457) 16.5(419) 18(457)  20(508) 21.5(546) 56.5(1435) N/A 

Double Wall-USA

 12(305) 

10.5(267) 

25(635) 

26(660) 

15(381) 

16(406) 

11(279) 

16(406) 

14(356) 

19(483) 

56.5(1435) 

N/A 

Double Wall-Canada

 12

(305) 10.5(267) 25(635)  28(711) 15(381) 18(457)  11(279) 18(457)  14(356) 21(533)  56.5(1435) N/A


HORIZONTAL WITH MINIMUM 2FT (609mm) VERTICAL OFF STOVE TOP 

Single Wall-USA 

13.5(343) 12(305) 27(686)  27(686)  17(432) 17(432)  N/A 

N/A 

N/A 

N/A  42.5(1080) 10.5(267) 

Single Wall-Canada


13.5(343) 12(305)  27(686)  28(711)  17(432)  18(457)  N/A 

N/A 

N/A 

N/A  42.5(1080) 10.5(267) 

Double Wall-USA

 11(279) 

9.5(241) 

27(686) 

27(686) 

17(432) 

17(457) 

N/A 

N/A  N/A N/A 

39(991) 

8(203) 

Double Wall-Canada

 11(279) 9.5(241) 27(686) 28(686) 17(432) 

18(457)  N/A  N/A 

N/A 

N/A  39(991)  8(203) 

Both fuel loading doors accessible 

Side fuel loading door locked shut 

007 

S

A

M

P

L

E


US

LABEL IS LOCATED ON THE BACK OF THE STOVE

Serial Number

Model Name

Testing Lab &
Report Number

SAMPLE

Summary of Contents for Quadra-Fire CUMBGAP-MBK

Page 1: ...rn wet or green wood Store wood in a dry location 6 DO NOT BURN GARBAGE OR FLAMMABLE FLUIDS SUCH AS GASOLINE NAPHTHA OR ENGINE OIL Do not burn treated wood or wood with salt driftwood etc Burning materials other than wood including charcoal under adverse conditions may generate carbon monoxide in the home resulting in illness or possible death 7 Do not permit creosote or soot to accumulate excessi...

Page 2: ...Rating 115 VAC 1 2 Amps 60 Hz Route power cord away from unit Do not route cord under or in front of appliance DANGER Risk of electrical shock Disconnect power supply before servicing Replace glass only with 5mm ceramic available from your dealer Do not use grate or elevate fire Build wood fire directly on firebrick Do not overfire if heater or chimney connector glows you are overfiring Operate on...

Page 3: ...ement 25 26 Care cleaning of plated surfaces 26 Door gasket door handle assembly 26 Brick replacement 27 Baffle removal installation 27 PARTS DIAGRAM 28 SERVICE PARTS ACCESSORIES 29 30 SERVICE MAINTENANCE LOG 31 WARRANTY POLICY 32 CONTACT INFORMATION 36 TABLE OF CONTENTS PRE USE CHECK LIST CAUTION DO NOT TILT THE UNIT ON THE CAST IRON LEGS Lift the unit upright and place it into position on the floo...

Page 4: ...ee pages 13 14 It is intended to keep the walls from igniting CHIMNEY SYSTEMS A APPROVED MASONRY see specifications on page 12 with at least 5 8 16mm fire clay lining joined with refractory cement or other listed system suitable for use with wood stoves B PREFABRICATED 6 152mm listed high temperature UL 103 HT or ULC S629 chimney Components required by manufacturers for installation such as the chim...

Page 5: ...e equipped with a spark arrestor and the referenced clearances Use only double wall connector pipe Dura Vent DVL Selkirk metalbestos DS Security DL double wall connector or any listed double wall connector pipe In Canada must comply with CAN ULC S629 for the 650 C Factory built chimney SERIAL NUMBER LABEL IS LOCATED ON THE BACK OF THE STOVE TOP VIEW SIDE VIEW WITH FUEL DOOR 27 1 4 692mm 18 1 8 460...

Page 6: ...d factory built Class A chimney or a masonry chimney Mobile Home must be equipped with a spark arrestor Double Wall USA 12 305 10 5 267 25 635 26 660 15 381 16 406 N A N A N A N A 44 1118 N A Double Wall Canada 12 305 10 5 267 25 635 28 711 15 381 18 457 N A N A N A N A 44 1118 N A REAR VENT INSTALLATIONS INAMASONRY FIREPLACE OR THROUGH THE WALL HORIZONTAL FLUE HEAT SHIELD PART HTSHLD 7006 REQUIRE...

Page 7: ...om the sides and rear of the stove See exception below EXCEPTION Non combustible floor protections must extend beneath the flue pipe when installed with horizontal venting and extend 2 51mm beyond each side Minimum 16 406mm from fuel loading door 8 200mm USA 44 7 8 1140mm Minimum 39 1 8 994mm Minimum Fuel loading doors Front Side 8 200mm Minimum 16 406mm from fuel loading door CANADA 1371mm 54 Minim...

Page 8: ...neath it The R value of a material must be equal or larger then the required R value to be accept able Converting k to R Divide 1 by k and multiply the results times the thickness in inch es of the material R 1 k x inches of thickness Converting R to k Divide the inches of thickness by R k inches of thickness R Calculatons Example Floor protection requires k value of 0 84 and 3 4 inch thick Altern...

Page 9: ...ce You must first decide where you are locating your stove and determine if you meet the minimum required clearances from combustibles for loading wood into the firebox from the side door If you do not meet the clearances found on pages 6 8 leave the door locked in place If you unlock the door without meeting the minimum requried clearances YOU WILL VOID YOUR WARRANTY AND ASSUME ALL RESPONSIBILITY I...

Page 10: ...ad screws from the rear shield 2 on each side lift rear heat shield off and set aside 3 Remove 1 bolt from each side of the flue collar using a Phillps head screwdriver and 7 16 wrench 4 Turn flue collar to horizontal position Inspect sealant to ensure a leak free application Re attach bolts 5 Re attach the rear heat shield 6 Attach required accessory Horizontal Flue Shield with screws provided Figu...

Page 11: ... chimney not including chimney cap Availability of combustion air A source of air oxygen is necessary in order for combustion to take place It is impor tant to realize that whatever combustion air is consumed by the fire must be replaced If you are using room air the air is replaced via air leakage that occurs around windows and under doors etc However in most newly constructed houses mobile homes ...

Page 12: ...to be no more than 3 times the cross sectional area of the flue collar of the stove 28 x 3 84 square inches It is recom mended that a chimney with a larger diameter be relined since the oversized flue can cause poor performance and contribute to the accumulation of creosote See page 11 for more information about troubleshooting draft problems CAUTION DO NOT CONNECT THIS UNIT TO A CHIMNEY FLUE SERVIN...

Page 13: ...o the chimney must leave a minimum 18 457mm vertical clearance between the connector pipe and the ceiling to prevent the ceiling from catching fire Measure as shown in Figure 13A Cut an opening in the wall large enough to accommodate the outside dimension of the chimney section plus the minimum air space specified by its manufacturer It may be necessary to cut the wall studs and install a header and...

Page 14: ...Clearance to Wall Spacer and Combustibles 2 51mm Chimney Section Trim Collar Chimney Section with 2 51mm Clearance to Combustibles Chimney Connector Fire Clay Flue Liner with Airspace Masonry Chimney Wall Band to Secure Chimney Section Wood Studs Used for Framing Spaced 2 51mm clearance from Masonry Chimney Wall Spacer Figure 14B Figure 14A CONNECTION TO A MASONRY FIREPLACE There are several kits ...

Page 15: ...e the required height above the roof or other obstruction for safety and for proper draft operation The require ment is that the chimney must be at least 3 ft 91cm higher than the highest point where it passes through the roof and at least 2 ft 61cm higher than the highest part of the roof or structure that is within 10 ft 305cm of the chimney measured horizontally See page 11 In Canada when using...

Page 16: ...nnected to a 6 152mm factory built chimney conforming to CAN ULC 629M STANDARD FOR FACTORY BUILT CHIMNEYS Floor protection referenced on page 8 must be followed 8 Use silicone to create an effective vapor barrier at the location where the chimney or other component penetrates to the exterior of the structure 9 Follow the chimney and chimney connector manufacturer s instructions when installing the...

Page 17: ...ed control clockwise to decrease the speed At full clockwise the blower should blow gently but should not stop 1 With the unit plugged in turn the speed control knob to slow full clockwise 2 With a small screwdriver adjust the blower speed by turning the adjustment mechanism through the hole on the side of the speed control 3 Adjust the speed so the blower runs slowly but does not stop Turn clockw...

Page 18: ...at the bottom of the tem plate HAND BEND 1 Bend the diverter to match the same degree bend as in the template HAND BEND 2 Bend the diverter 90 to complete the process Place diverter on tem plate to confirm the bends match the template Baffle Diverter is shipped inside firebox WARNING Risk of Fire Required on all rear horizontal installations Excessive smoke or flame spillage into the room may occur ...

Page 19: ...oth doors 2 Hold the diverter in a vertical position with the straight edge going in first and then rotate it to the inside of the firebox as you slide the bent diverter over the ceramic blanket 3 Place in position as shown in diagram below The front edge of the diverter will rest on the front edge of the manifold chamber in a flush position The back edge will butt up against the back slanted corner ...

Page 20: ... it is used during the kindling stage of burning It must be closed pulled out after the first 5 to 15 minutes Figure 21A 2nd STAGE The next stage of burning the secondary stage is the period when the wood gives off flammable gases which burn above the fuel with bright flames During this stage of burning it is very important that the flames be maintained and not allowed to go out This will ensure the c...

Page 21: ...hould do so responsibly To do this we need to learn to burn our stoves in the cleanest way possible Doing this will allow us to continue using our wood stoves for many years to come START UP AIR SYSTEM The combustion air enters at the rear of the firebox through the rear air tubes This air supply is controlled by the Start up Air Control For more air push control IN for less air pull control OUT PR...

Page 22: ...ure as your stove heats You will notice an odor and perhaps see some vapor rise from the stove surface this is normal We recommend that you open a window until the odor dissipates and paint is cured NOTE Stove should be run full open for 15 minutes a day to keep air passages clean WARNING ALWAYS OPERATE THIS APPLIANCE WITH THE DOOR CLOSED AND LATCHED EXCEPT DURING START UPAND RE FUEL ING OR WHEN U...

Page 23: ... placement and replace baffle com ponents if damaged or missing CORRECT BAFFLE BLANKET PLACEMENT Ceramic Blanket and Baffle Board are NOT in contact with the back of the firebox Ceramic Blanket is NOT in contact with the back of the firebox and NOT even with the Baf fle Board in the front Ceramic Blanket is bunched up at the back of the firebox and NOT even with the Baffle Board in the front Ceramic Blan...

Page 24: ...blower should be left off until a good burn is established then turned on at your desired setting 4 Low burn setting The blower tends to cool off the stove Leave blower off until burn is well established Then turn on at your desired rate 5 The highest blower speed is obtained by turning the speed control on and then adjusting counterclockwise towards OFF as far as possible without turning the blow...

Page 25: ... should remove the built up coating If the deposits on the glass are not very heavy normal glass cleaners work well Heavier deposits may be removed by using a damp cloth dipped in wood ashes or by using a com mercially available oven cleaner After using an oven cleaner it is advisable to remove any residue with a glass cleaner or soap and water Oven cleaner left on during the next firing can perman...

Page 26: ... soft rag glass cleaner and a paper towel or vinegar and a paper towel to remove the oils DO NOT use abrasive cleaners If not cleaned properly prior to lighting the first fire the oils can cause permanent stains The plating will be cured upon firing of the stove and oils will no longer affect the finish Subsequently little maintenance is then required Wipe clean as needed with a soft towel FRONT DOOR ...

Page 27: ...etrating oil for at least 15 minutes before trying to remove them 4 To remove manifold tube slide the tube to one side until one end is out of its hole Then while lifting that end of the fiber board baffle pull tube up over the air channel and out of hole at the other end 5 Slide fiber board baffle forward to front of stove and straight out through door See Figure 27B 6 To install the fiber board baffle...

Page 28: ...R Page 28 September 1 2008 Cumberland Gap Wood Stove 7006 188E 14 1 4 23 0 14 0 5 0 4 3 8 Ceramic Blanket 10 15 9 8 6 16 3 13 12 4 7 14 17 2 5 18 1 11 19 Part number list on following page Parts Diagram ...

Page 29: ...06 155MBK 16 Door Left Front Porcelain specify color 7006 155POR 3 Door Right Front Matte Black 7006 154MBK 3 Door Right Front Porcelain specify color 7006 154POR 6 Door Side Matte Black 7006 225MBK 6 Door Side Porcelain specify color 7006 225POR 11 Face Matte Black 7006 223MBK 11 Face Porcelain specific color 7006 223POR 8 Flue Transition 7006 019 Gasket Rope Ash Removal Door 3 8 medium density 10...

Page 30: ...450 Rivnut Repair Kit RIVNUT REPAIR 4 Side Right Cast Matte Black 7006 151MBK 4 Side Right Cast Porcelain specific color 7006 151POR 12 Side Left Cast Matte Black 7006 152MBK 12 Side Left Cast Porcelain specific color 7006 152POR 10 Top Cast Matte Black 7006 153MBK 10 Top Cast Porcelain specific color 7006 153POR Service Parts Accessories IMPORTANT THIS IS DATED INFORMATION The most current informati...

Page 31: ...Page 31 Cumberland Gap Wood Stove R September 1 2008 7006 188E Date of Service Performed By Description of Service Service Maintenance Log ...

Page 32: ...ox Heat Exchanger 90 Days X X X X X X All Replacement Parts See Conditions Exclusions and limitations 9 01 08 CONDITIONS EXCLUSIONS LIMITATION OF LIABILITY This warranty applies to the original owner and is transferable up to two years from date of purchase to the new homeowner provided the purchase was made through an authorized dealer or distributor of HHT and the appliance remains in its origin...

Page 33: ...if the appliance has been over fired or operated in atmospheres contaminated by chlorine fluo rine or other damaging chemicals the appliance is subject to prolonged periods of dampness or condensation or there is any damage to the appliance or other components due to water or weather damage which is the result of but not limited to improper chimney or venting installation HHT s liability under this ...

Page 34: ...R Page 34 September 1 2008 Cumberland Gap Wood Stove 7006 188E This page intentionally left blank ...

Page 35: ...Page 35 Cumberland Gap Wood Stove R September 1 2008 7006 188E This page intentionally left blank ...

Page 36: ...502 6170481 6237588 6296474 6374822 6413079 6439226 6484712 6543698 6550687 6601579 6672860 6688302B2 6715724B2 6729551 6736133 6748940 6748942 D320652 D445174 D462436 Canada 1297749 2195264 2225408 or other U S and foreign patents pending Hearth Home Technologies 1445 North Highway Colville WA 99114 Division of HNI INDUSTRIES CONTACT INFORMATION Please contact your Quadra Fire dealer with any que...

Reviews: