background image

The Trusted Source

®

4

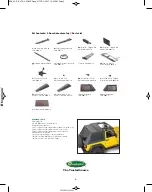
Kit Contents: Door Surround Parts List

T: 

Door Surround Knob -

Medium 11113.9041 (4)

X: 

Top Retention Strap &

Hardware 11113.9084 (1)

K: 

LH Door Bar 11113.9076 (1)

L: 

RH Door Bar 11113.9077 (1)

M: 

LH Front Plastic

11113.9020 (1)

N: 

RH Front Plastic

11113.9021 (1)

G: 

Self Tapping Screw - Small

Head 11113.9045 (12)

H: 

Upright Knob - Small

11113.9043 (2)

I: 

Door Surround Bracket

Front 11113.9030 (2)

J: 

Door Surround Bracket

Rear 11113.9031 (2)

A:

LH Upright Lower Plastic

11113.9034 (1)

B:

RH Upright Lower Plastic

11113.9035 (1)

C:

LH Upright 11113.9072 (1)

D:

RH Upright 11113.9073 (1)

The door surrounds are intended to be
used with the Frameless and Fold Back
Tops in place of the factory door sur-
rounds. They have been designed to
strengthen some of the weak areas of
the factory door surrounds and provide
a simple, sturdy mount specifically for
Adventure Top. To begin, assemble
both left & right door surrounds as
follows:

ADV_2DR_S_UPDATED.qxp_QTOP  5/23/17  11:45 AM  Page 4

05232017114839

Summary of Contents for QuadraTop Adventure Top S

Page 1: ...THER PROTEC TION ONLY AND SHOULD NOT BE RELIED UPON TO CONTAIN OCCUPANTS IN THE EVENT OF AN ACCIDENT OR TO PROTECT FROM EITHER GROUND CONTACT OR FALLING OBJECTS TO REDUCE RISK OF ACCIDENT OR INJURY AL...

Page 2: ...irect sun light for 1 2 hours before you install the top When warm this top will install quickly Important Note that it is normal for the fabric and glass to contract and wrinkle when stored in the sh...

Page 3: ...1113 9061 1 AA Flip Top Header Assembly 11113 9029 1 V Flip Top Hinge Plate LH 11113 9016 1 W Flip Top Hinge Plate RH 11113 9017 1 GG Retainer Tailgate Bar Metal 11113 9022 2 HH Retainer Tailgate Bar...

Page 4: ...0 2 J Door Surround Bracket Rear 11113 9031 2 A LH Upright Lower Plastic 11113 9034 1 B RH Upright Lower Plastic 11113 9035 1 C LH Upright 11113 9072 1 D RH Upright 11113 9073 1 The door surrounds are...

Page 5: ...Repeat to Join the Right Hand Door Bar and Corner Plastic L to Right Hand Upright D and secure the pieces with the other Upright Knob H See FIG 2 Figure 1 Figure 2 Slide a Front Door Surround Bracket...

Page 6: ...the Right Side Then slide a Left Rear Door Surround Bracket J to the Left Door Surround Assembly See FIG 6 Repeat this procedure for the Right Side Figure 5 Figure 6 I M K J Refer to FIG 7 Next slide...

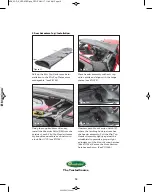
Page 7: ...riate knobs listed in FIG 9 Firstly insert the Upright Lower Plastic s alignment pin into the body tub rail hole and slide the door surround assembly onto the sport bars and align the holes on the fro...

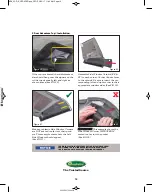
Page 8: ...secure the plate See FIG 13 Repeat this procedure for the Left Side Figure 13 Locate and remove original footman loops using a T 25 torx socket see FIG 15 Install the Front Section Latches Z using the...

Page 9: ...sembly at each side see FIGS 18 19 Figure 17 Figure 18 2 Door Adventure TopS Installation Rotate and clip into place the soft top channel to the Flip Top Header Assem bly as shown see FIG 19 Secure th...

Page 10: ...lder Bolts BB from the outside of each Flip Top Header Assem bly knuckle and secure each bolt with a lock Nut CC see FIG 26 Unscrew each Front Section Latch Z where the latching hook just reaches the...

Page 11: ...ate the long strap on the rear of the top deck material Pull strap down and with buckle facing out use the hook on the strap to grab and hold the body tub belt rail Photo is zoomed in on the lower par...

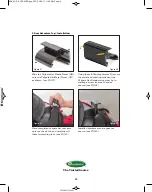
Page 12: ...ppropriate window sides See FIG 30 Make sure plastic Side Window Corners are NOT seated too far into their pock ets This example shows how the Left Side Window should appear See FIG 31 INCORRECT This...

Page 13: ...not zip all the way at this time see FIG 34 Install rear window to the strap at rear of top see FIG 35 Start rear window zipper to the side window as shown Do not zip all the way at this time see FIG...

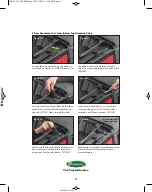
Page 14: ...Bar Retainers together by in stalling a screw from each end as shown see FIG 38 Place completed tailgate bar brackets onto rear body tub and carefully roll them forward in place see FIG 39 Installed...

Page 15: ...r Window as shown Note orientation carefully Insert the Tailgate Bar into the Tailgate Bar Retainers see FIG 46 Begin to secure the windows by starting with the vertical lip on the side windows as sho...

Page 16: ...ure that the flip top portion hook loop fasteners are secured to the door surrounds see FIG 48 On next page the Retention Strap Item X is intended to improve the function and enjoyment of your Adventu...

Page 17: ...ock nut on top of the strap and snug with a 13mm socket wrench and 13mm wrench FIG52 When the top is in the folded back posi tion reach up and hook the retention strap over the bar as shown FIG53 Make...

Page 18: ...ill rest on the top deck allowing you to enjoy the open top experience To close the sun roof stop the vehicle pull off the road and put the vehicle in park Simply grab the center hold bar and fold the...

Page 19: ...ith pliers and try the zipper again Repeat procedure until your zipper operates correctly Windows It is very important that you keep your QuadraTop windows clean Use a mild soap and water solution to...

Page 20: ...or subjected to a installation damage alteration modification failure to maintain or attempted repair or service by anyone not authorized by Quadratec b normal wear and tear cosmetic damage or damage...

Reviews: