background image

5

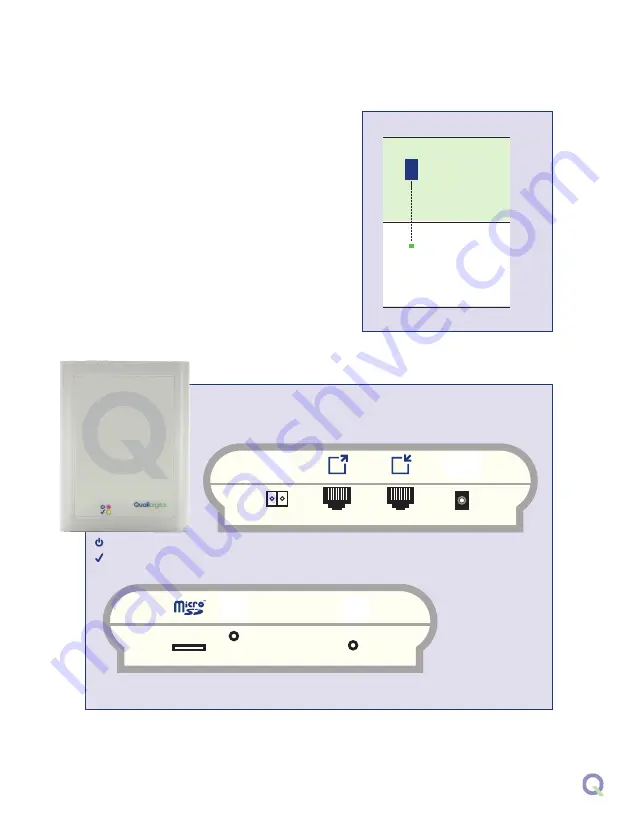
If you plan to mount the Base higher than
2m above floor level consider installing a

Registration  Button

-  it  should  be  wall-

mounted  underneath  the  Base  so  you
can  see  the  Base  LEDs  during  the
registration process. 

The Registration Button is used to activate
the  registration  process  (press  for  5
seconds) and to reset the entire network
(press for 15 seconds).

Registration

Button

Cat5

Out

Cat5

In

Power

adaptor

Micro

SD card

Message 

volume

Registration: press for 5 secs

Reset: press for 15 secs

4m

2m

0m

Base

Registration

Button

Power

Status

Base Station

Bottom

Top

REGISTRATION

POWER

48v DC

MESSAGE

VOLUME

REGISTRATION/

RESET

Summary of Contents for Q-P7BS

Page 1: ...User guide PRO7 HEADSET SYSTEM...

Page 2: ...aimed at a person with a reasonable level of technical competence and familiar with the safety precautions relevant to the use of electrical and electronic equipment You should not attempt to install...

Page 3: ...3 Installing the system 4 Positioning the charger 8 Registering and using headsets 9 Frequently asked questions 11 Product specification 12 Troubleshooter 14 Contents...

Page 4: ...ht can affect range Installing single or multiple Bases The diagram below illustrates possible locations to mount your Base As a tip always locate a Base where it has maximum direct sight of the area...

Page 5: ...ess The Registration Button is used to activate the registration process press for 5 seconds and to reset the entire network press for 15 seconds Registration Button Cat5 Out Cat5 In Power adaptor Mic...

Page 6: ...ources should not exceed 200m The maximum number of Bases a single power supply should support is four When mapping the premises as a general rule place the next Base 10m beyond the point where the he...

Page 7: ...ll or calls on this Base BOTH LEDs FLASHING CORRECTIVE ACTION Power too low to boot up Check the individual power supplies on the network for possible failure or being switched off or consider adding...

Page 8: ...o the charger when not in use Charge time is approximately 2 5 hours When charging the blue LED on the headset will flash every 5 seconds When fully charged the blue LED is constant Headsets will last...

Page 9: ...conds On the Base both LEDs should be flashing green 4Place the new headset to your right ear press the large silver button and volume toggle down for 3 seconds Wait for the bleeps to change their fre...

Page 10: ...the silver button while you are talking then release when finished Up to 6 users can speak at any one time All headsets hear all the time Best practice only use TalkLock if you need to be hands free...

Page 11: ...sers can remain in TalkLock mode continuously without concern that their TalkLock will be cancelled by the system What happens if TalkLock is left on when the headset has finished being used Is the Ta...

Page 12: ...articipants Multiple Bases max Network via Cat5 cable up to 20 Bases Expansion with Cat5 cable max 100m cable length between Bases Power requirements 100 240v AC voltage sensing Dimensions HxWxD 170 x...

Page 13: ...TalkLock Charge time 2 5 hours to full re charge Volume control 5 stage slide button up down Battery part number Lithium Ion 3 7v Q RH7BAT Weight 23g CHARGER Q P7CH Capacity for headsets 6 port Power...

Page 14: ...ng Put the headset to your ear stand near to the Base are you hearing 1 beep every 3 seconds If so headset isn t registered Follow registration procedure Are you hearing 2 beeps every 10 seconds If so...

Page 15: ...15...

Page 16: ...ada applicables aux appareils radio exempts de licence L exploitation est autoris e aux deux conditions suivantes 1 l appareil ne doit pas produire de brouillage et 2 l appareil doit accepter tout bro...

Reviews: