background image

18

19

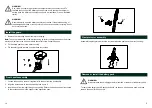
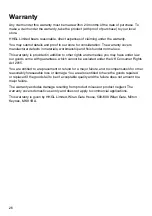
Install the battery pack: Align the ribs on both sides of the battery pack with the slots in the 

housing, and slip it into place. Always insert it all the way until it locks in place with a click 

sound. If not, it may accidentally fall out of the tool, causing injury to you or someone around 

you.

Operating the grass trimmer

  Starting

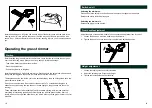
Before starting the grass trimmer for the first time, check that the nylon lines touch or pass 

over the wire cutting blade. If they are not long enough, follow these steps:

- Take off the battery pack from the machine.

- Press the spool button.

- Pull more nylon wire to lengthen.

Install the battery pack. Switch the trimmer on. Press and hold the safety lock-off button and 

then press the trigger on the handle. Release the safety lock-off button.

The lengthened nylon line will be cut to size automatically by the wire cutting blade once the 

grass trimmer is turned on.

During use, the nylon line will become shortened or worn. To automatically lengthen or 

advance the nylon cutting line, tap the spool button lightly on the ground (while the unit is 

running).

These operations should be repeated a few times before starting work to make sure that 

everything is functioning properly and to familiarise you with the grass trimmer. Start off 

slowly; when you have gained experience, you will be able to use the grass trimmer to its full 

potential.

  Switch on/off

Switching the trimmer on:

Press and hold the safety lock-off button and then press the trigger on the handle.
Release the safety lock-off button again.

Switching the trimmer off:

Release the trigger on the handle.

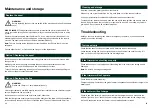
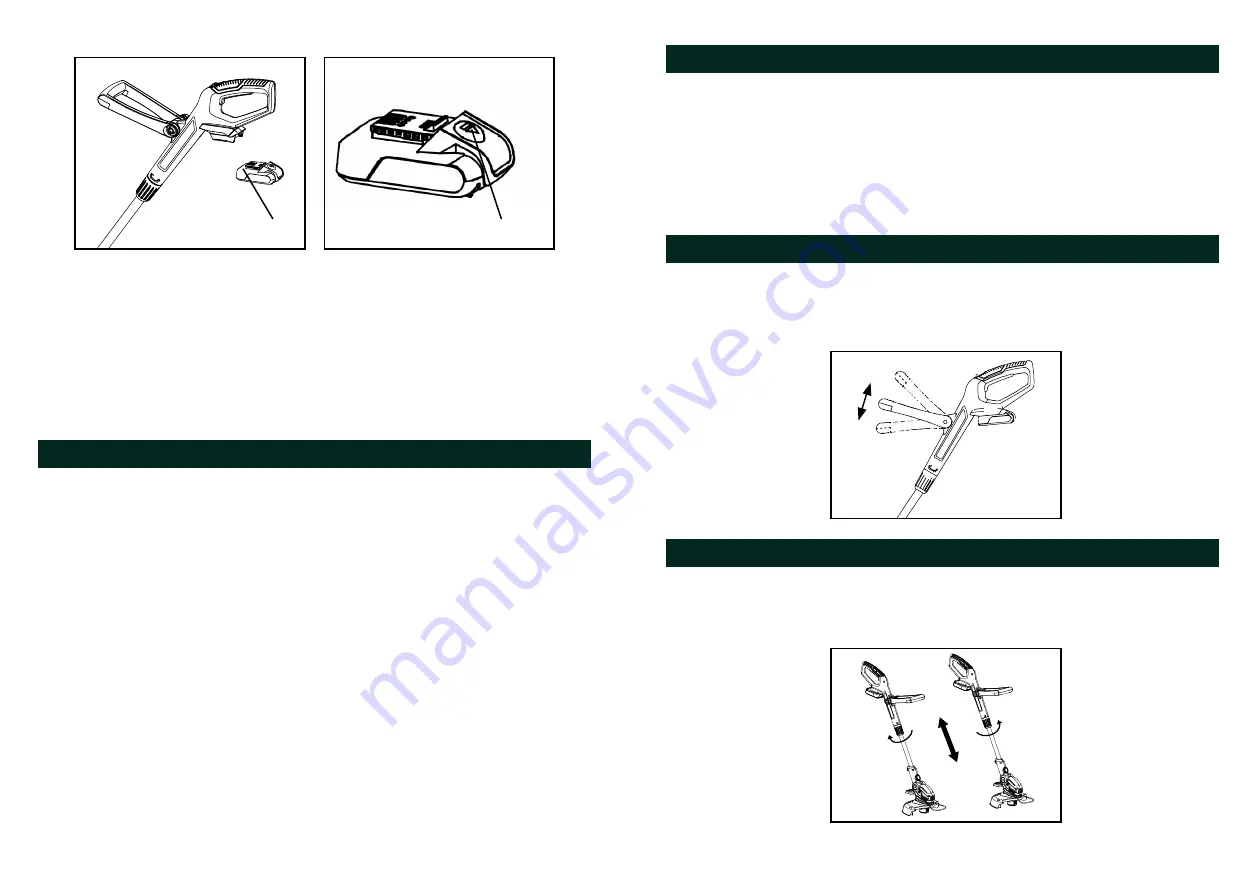
  Front handle adjustment

Adjust the angle of the auxiliary handle to ease operation and prevent loss of control: 
1.  Loosen the knob and move the handle up or downward. 
2.  Tighten the knob to secure the auxiliary handle in the adjusted position.

  Height adjustment

1.  Loosen the locking sleeve counter clockwise. 
2.  Adjust the pole length to fit your body height. 
3.  Tighten the locking sleeve anti-clockwise. 

A

B

Summary of Contents for QGTLi18

Page 1: ...ructions fully before starting assembly October 2017 GTLi18 These instructions contain important information that will help you get the best from your product ensuring it is assembled correctly and safely If you need help or have damaged or missing parts call the Customer Helpline on 01904 727 500 ...

Page 2: ...tions Failure to follow the warnings and instructions may result in electric shock fire and or serious injury IMPORTANT READ CAREFULLY BEFORE USE KEEP FOR FUTURE REFERENCE Training Read the instructions carefully Be familiar with the controls and the proper use of the machine Never allow children or people unfamiliar with these instructions to use the machine Local regulations can restrict the age...

Page 3: ...r supply i e remove the plug from the mains remove the disabling device or removable battery whenever the machine is left unattended before clearing a blockage before checking cleaning or working on the machine after striking a foreign object or whenever the machine starts vibrating abnormally Avoid injury to feet and hands from the cutting means Always ensure that the ventilation openings are kep...

Page 4: ...ort out the contacts of the battery or charger Respect the polarity when charging Do not open the unit and keep out of the reach of children Do not charge the batteries of other manufacturers or ill suited models Ensure that the connection between the battery charger and battery is correctly positioned and is not obstructed by foreign bodies Keep the battery charger s slots free of foreign objects...

Page 5: ... terminals with a clean dry cloth if they become dirty The battery pack needs to be charged before use Always refer to this instruction manual and use the correct charging procedure Do not keep the battery pack on charge when it is not in use After extended periods of storage it may be necessary to charge and discharge the battery pack several times to obtain maximum performance The battery pack g...

Page 6: ...derstood at all times Read the instruction manual before operating this machine Wear eye protection Wear ear protection Wear a dust mask Do not expose the machine to water or operate it in the rain Guaranteed sound power level Keep bystanders away Beware of thrown or flying objects Keep bystanders a safe distance away from the machine This symbol is known as the Crossed out Wheelie Bin Symbol When...

Page 7: ...ontains a Li ion battery Batteries must be recycled or disposed of properly Return exhausted batteries to your local collection or recycling point o C 45 Li Ion In the box Parts 1 Safety switch lock 2 Main switch 3 Front handle 4 Upper tube 5 Edge button 6 Battery pack 7 Charger 8 Charging station 9 LEDs indicators on charger 10 Telescopic knob 11 Motor housing 12 Tilt adjustment pedal 13 Protecti...

Page 8: ...mperature is between 18 24 C Do not charge the battery pack in a very low or very high air temperature This is important and will prevent serious damage to the battery pack When using your tool continuously the batteries in your battery pack will become hot You should let a hot battery pack cool down for approximately 30 minutes before attempting to recharge The charger and battery pack may become...

Page 9: ... to the end user where these four screws should be used 2 Fit the safety guard onto the motor housing 3 Fix the safety guard in place by using these four screws Front handle assembly 1 Loosen the knob and remove it together with the bolt from the front handle 2 Align the front handle to the support and place it onto it 3 Insert the bolt from the right through the opening Ensure that the bolt head ...

Page 10: ... During use the nylon line will become shortened or worn To automatically lengthen or advance the nylon cutting line tap the spool button lightly on the ground while the unit is running These operations should be repeated a few times before starting work to make sure that everything is functioning properly and to familiarise you with the grass trimmer Start off slowly when you have gained experien...

Page 11: ...lly cut to the correct length by the line cutter Cutting guide WARNING Always wear eye protection Never lean over the trimmer head Stones or debris can bounce or be thrown into the eyes and face and cause blindness or other serious injury When operating the unit Hold the front handle with one hand and auxiliary handles with the other hand Keep the unit below waist level Work only from your right t...

Page 12: ...line tight and evenly onto the spool in the direction of the arrow until the line builds up to the notches in the spool rim Do not overfill the spool The spool holds about 6 5m of line Cleaning and storage After use remove the battery pack from the trimmer When not in use store the machine in a dry safe place out of the reach of children Use only manufacturer recommended replacement parts and acce...

Page 13: ...ct the vibration values can differ from the declared total Adopt proper measures to protect yourself against vibration exposures Take the whole work process including times the product is running under no load or switched off into consideration Proper measures include among others regular maintenance and care of the product and cutting attachments keeping hands warm periodical breaks and proper pl...

Page 14: ...s and remedies you may have under law our goods come with guarantees which cannot be excluded under the UK Consumer Rights Act 2015 You are entitled to a replacement or refund for a major failure and to compensation for other reasonably foreseeable loss or damage You are also entitled to have the goods repaired or replaced if the goods fail to be of acceptable quality and the failure does not amou...

Reviews: