


13
12
Customer Helpline
0845 034 2279
www.gardenservicecentre.co.uk
Customer Helpline
0845 034 2279
www.gardenservicecentre.co.uk
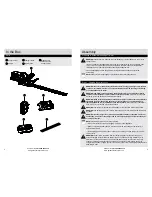
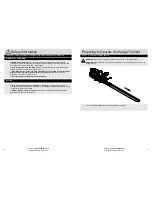
Storing and Transportation
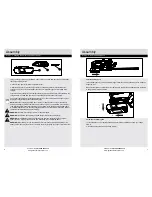
Maintenance and Repair
Maintenance and Repair
Transportation
1). Switch the product off and disconnect it from battery pack before transporting it anywhere.
2). Attach the blade cover.
3). Always carry the product on its gripping surfaces.
4). Protect the product from any heavy impact or strong vibrations which may occur during
transportation in vehicles.
WARNING!
Always switch the product off, disconnect it from the battery pack and let the product
cool down before performing inspection, maintenance and cleaning work!
General
1). Clean the product with a slightly damp cloth and pH-neutral soap. Use a brush for areas that
are hard to reach.
2). In particular clean the air vents after every use with a cloth and brush.
3). Remove stubborn dirt with high pressure air (max. 3 bar).
4). Check for worn or damaged parts. Replace worn parts as necessary or contact an authorised
service centre for repair before using the product again.
5). Regularly check for obvious defects such as loose, dislodged or damaged cutting device,
loose fixings and worn or damaged components.
6). Check that covers and guards are undamaged and correctly fitted. Carry out necessary
maintenance or repairs before using the product.
7). This product does not contain any parts that can be repaired by the consumer. Contact a
qualified specialist to have it checked and repaired.
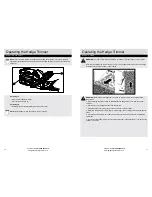
Cutting Device
WARNING!
Wear safety gloves when working on the cutting device and close to it! Use
appropriate tools to remove debris e.g. a brush or wooden stick! Never use your bare hands!
1). Keep the cutting blade clean and free of debris. Remove trimmings.
2). Apply a small amount of suitable lubricant along the edge of the cutting device to retain a
good cutting performance.
3). Keep the cutting blade sharp. Have a worn or damaged cutting device replaced with a new
one of the same type by a qualified specialist.
Storage and Transportation
Storage
1). Clean the product as described above.
2). Attach the blade cover.
3). Store the product and its accessories in a dark, dry, frost-free, well-ventilated place.
4). Always store the product in a place that is inaccessible to children. The ideal storage
temperature is between 10 and 30°C.
5). We recommend using the original package for storage or covering the product with a suitable
cloth or enclosure to protect it against dust.
6). To prolong battery life, recommend to charge the battery every 2 moths, which over extended
periods of time without use.
Troubleshooting
General Troubleshooting
WARNING!
Only perform the steps described within these instructions! All further inspection,
maintenance and repair work must be performed by an authorised service centre or a similarly
qualified specialist if you cannot solve the problem yourself!
Suspected malfunctions, disturbances or damages are often due to causes that the user can
fix themself. Therefore check the product using this section. In most cases the problem can be
solved quickly.
Fault
Possible Cause
Solution
Product does not
start
1. Not connected to battery pack
2. Power connection is loosen
3. Battery pack is lack of power
4. Battery too hot/too cold
1. Connect to battery pack
2.Connect the battery pack and tool
well
3. Fully charge the battery pack
4. Allow battery to cool down / warm
up battery slowly at a temperature of
15
o
C-25
o
C
Product does not
reach full power
1. Battery pack has too low
voltage
2. Air vents are blocked
1. Charge the battery pack to full
power
2. Clear the air vents
Unsatisfying result
1. Cutting device worn
2. Electrical malfunction
3. Fault in battery
1. Have a specialist to replace it
2. Have a specialist to replace it
3. Have a specialist to replace it


