background image

!

POWER PRODUCTS LLC.

3300ST

Filling Fuel

11.

WARNING: Move at least 9m away from the
refuelling site before starting the engine. Do not
smoke while filling the tank. Do not add fuel to the
tank close to an open fire or sparks. Never add fuel
to the tank in a closed or non-ventilated area.

!

WARNING: Check for fuel leaks. If you find any
leaks, correct the problem before using the product.

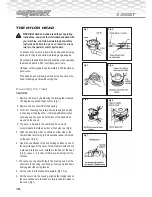
1.  Clean the surface around the fuel tank to prevent

contamination.

K

3.  Pour in the fuel carefully (L). Avoid spilling!

4. Screw the tank cap on firmly by hand.

2. Unscrew the tank cap and remove it (K).

Draining Fuel

1.  Hold a collection container beneath the fuel drain bolt.

2.  Unscrew the tank cap and remove it (M).

L

M

3.  Allow the fuel to drain completely.

4.  Screw the tank cap on.

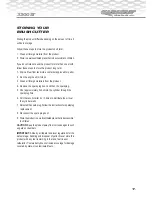
STARTING CHECKLIST

MPORTANT:

 Do not start the unit until it has been completely

assembled. Before switching on the unit, always checking the
oil.

Check Machine Before Use

Check the safety condition of the device:

1. Check the machine for leaks.

2. Check the machine for visual defects.

3. Check that all parts of the machine have been securely fitted.

4. Check that all safety devices are in proper condition.

!

WARNING: Do not operate this machine if you have
found any faults. To operate this machine with
faults could result in serious injury. Make sure to
replace faulty parts before using the machine again.

Adjusting the Harness

1. Adjust the harness so the quick-release latch is at your right

hip, as shown.

Summary of Contents for 3300ST

Page 1: ...POWER PRODUCTS LL C GARDEN MASTER SERIES OPERA TING INSTRUCTIONS 3300ST BRUSHCUTTER 33CC 3300ST BRUSHCUTTER...

Page 2: ...4 Effects of Vibration 6 Repetitive Strain Injury RSI 6 Safe Operating Practises 7 Thrown Debris 7 Blade Thrust Kickback 7 Personal Protective Equipment 4 Operating Tips 8 Assembly 9 Fuel and Lubricat...

Page 3: ...utions can result in serious injury Wear safety footwear Wear safety gloves Wear protective clothing Warning Safety alert Indicates danger warning or caution Attention is required in order to avoid se...

Page 4: ...9 Safe Guard Bracket 10 Fuel Mixing Bottle 11 Inner Flange 12 Outer Flange 3300ST BRUSHCUTTER PARTS DIAGRAM 13 Shield 14 Nut 15 Sparkplug Cover 16 Engine 17 Choke Lever 18 Recoil Starter Handle 19 Sh...

Page 5: ...ut weeds vines and light brush Shoulder Strap The brushcutter includes a shoulder strap with anti vibration pad that helps support the product and reduce wearer fatigue Bull bar Handles For greater co...

Page 6: ...ion while operating power tools may result in serious personal injury RECOMMENDED CUTTING ATTACHMENTS A variety of blades are available from your Qualcut Brushcutter servicing dealer Always use a debr...

Page 7: ...he cutting attach ment guard is properly installed and in the position recommended by the manufacturer NEVER use wire or wire rope which can break off and become a dangerous projectile 5 b Use safety...

Page 8: ...ess weakness or extreme pain in those areas Cerain repetitive hand activities may put you at a high risk for developing a Repetitive Stress Injury RSI An extreme RSI condition is Carpel Tunnel Syndrom...

Page 9: ...head has stopped turning before inspecting or handling the cutting lines or blade Immediately stop using all your power equipment and consult a doctor if you feel tingling numbness or pain in the fing...

Page 10: ...ith a smooth easy motion rather then moving the brushcutter with your arms Do not chop at tough weeds and brush let the cutting line or blade work through tough growths gradually To direct thrown debr...

Page 11: ...at you Do not raise the cutting attachment above waist level during operation because that would increase the risk of thrown objects striking your face Avoid steep slopes that would require holding th...

Page 12: ...extremely flammable and explosive A fire or explosion from petrol will burn you and others This product is powered by a 2 stroke engine and requires pre mixing petrol and 2 stroke oil The oil mix shou...

Page 13: ...th the fuel drain bolt 2 Unscrew the tank cap and remove it M L M 3 Allow the fuel to drain completely 4 Screw the tank cap on STARTING CHECKLIST MPORTANT Do not start the unit until it has been compl...

Page 14: ...USH CUTTER Starting the product depends on whether the engine is cold or warm WARNING The recoil starter can be damaged by abuse Never pull the starter cord to its full length Always engage the starte...

Page 15: ...ed Engine 1 Disconnect the spark plug boot and use the spark plug wrench supplied to remove the plug in a counter clockwise direction 2 If the spark plug is fouled or is soaked with fuel clean or repl...

Page 16: ...nnot be removed mark its location so that you can avoid it with the blade Wires can catch on the blade head and be thrown in the air MAINTENANCE WARNING Before performing any maintenance on this machi...

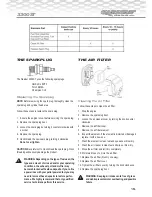
Page 17: ...emove the air filter element 6 Inspect the element If the element is distorted or damaged replace it with a new one 7 Wash the element in clean fuel and squeeze or blow dry 8 Wash the air cleaner in c...

Page 18: ...g line in two halves leaving one half 3 inches longer than the other the three additional inches will make the line even on both sides of the head when wound on the spool 4 The spool is divided in the...

Page 19: ...oot and then the sparkplug 5 Pour approximately 5ml oil into the cylinder through the sparkplug hole 6 Pull the recoil starter 2 or 3 times to distribute the oil over the cylinder walls 7 Reinstall th...

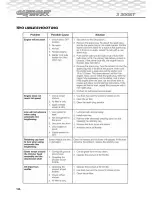
Page 20: ...POWER PRODUCTS LL C 3300ST 18 TROUBLESHOOTING...

Page 21: ...not been contacted and prior permission for repair replacement has been granted 8 WHEN WARRANTOR WILL PERFORM REPAIR OR REPLACEMENT UNDER THIS WARRANTY Repair or replacement will be scheduled and serv...

Page 22: ...POWER PRODUCTS LL C 3300ST 20...

Page 23: ...POWER PRODUCTS LL C 3300ST 21...

Page 24: ...e to provide you with the best service and reliability in the industry This product is backed by our extensive warranty and world wide service network EUROQUIP 109 Bolt Road Stoke Nelson New Zealand 7...

Reviews: