background image

INSTALLATION GUIDE

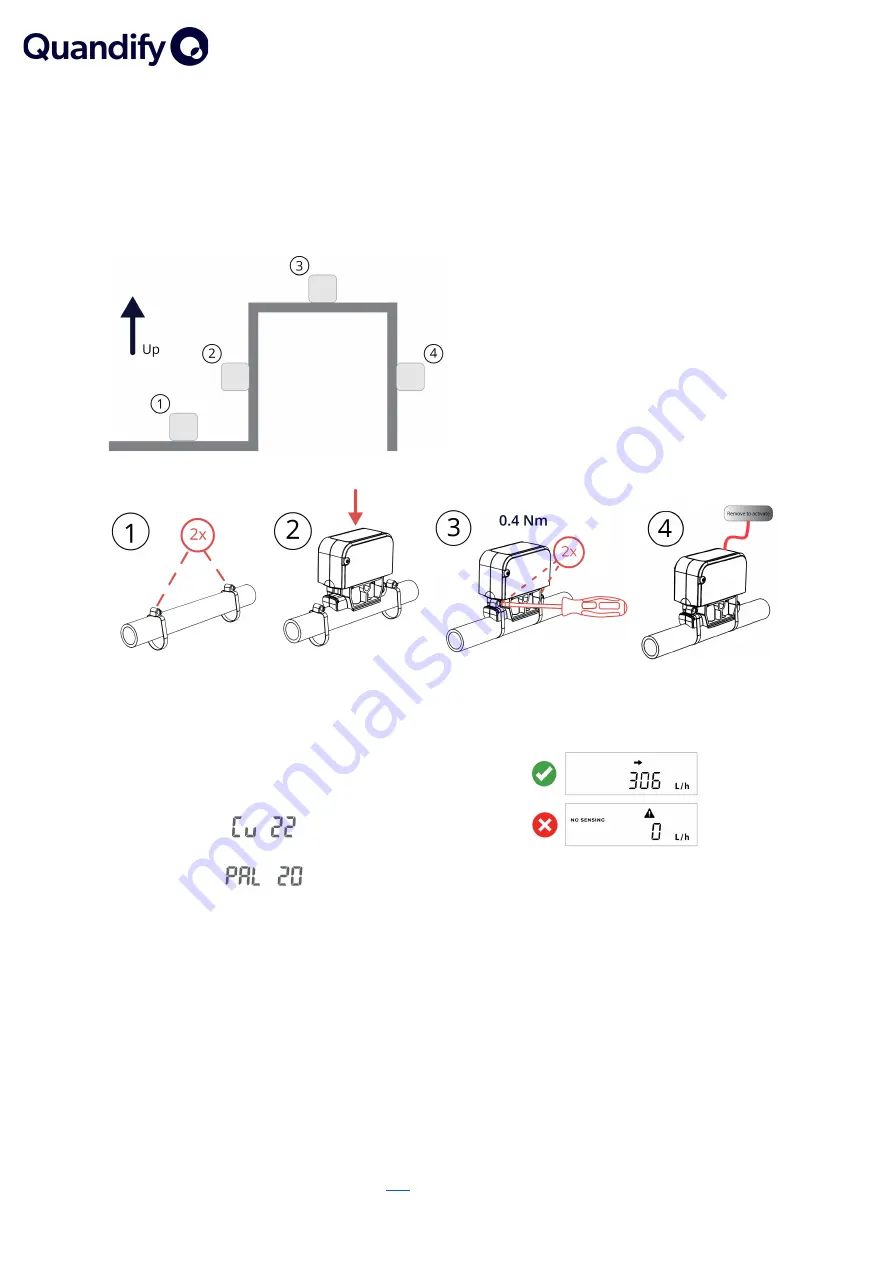
To install the CubicMeter, you must first locate the inlet pipe(s) to your home, before they branch out
to the different outlets, such as the shower, toilet, etc. Make sure that the water pipes are not bent
or damaged and do not contain any air bubbles. If the installation is not made correctly, Quandify
cannot guarantee metering accuracy.

1

- Acceptable position.

2

- Acceptable position.

3

- Not recommended, air build-up may occur.

4

- Acceptable position.

The device may be rotated vertically around the
pipe if needed.

4. Remove the activation sticker. Select pipe
setting by holding the sticker over the IR-eye and
releasing when on the correct pipe.

(See full pipe list on previous page).

Example of Copper 22mm pipe chosen

Example of PAL 20mm pipe chosen

5. Verify on the display that the device measures
correctly by turning on the water flow for at
least 60 seconds.

If symbol “no sensing” is shown, verify steps 1-4
or try another mounting position/rotation on
the pipe.

Note: The device will start saving data automatically after 1 hour in pipe selection mode. If the activation
sticker is put back on for 15s over the IR eye within 1 hour, after it has been removed, the device will
revert to its packaging state.

Details are subject to change, check the latest version

here

.

Page 6 of 11

The company is not liable for possible errors and/or misprints.

Summary of Contents for CubicMeter LTCM02-X

Page 1: ...ve water meter leakage detector Easy to install water and leak monitor Alerts if water leaks are detected Measures volume to increase awareness One design for multiple pipes No plumber required to ins...

Page 2: ...Plastic pipes version black 5 Metal pipes version white 5 INSTALLATION GUIDE 6 FUNCTIONAL WATER FLOW TEST 7 ANTI TAMPERING 7 WIRELESS CONNECTION 8 DISPLAY 9 SPECIFICATIONS 10 MAINTENANCE SERVICE 10 De...

Page 3: ...o improve the system s water flow analysis and predictions The CubicMeter is extremely easy to install and it requires no previous experience to perform Depending on the model It works on pipes betwee...

Page 4: ...clamps 2x Tamper Seal Covers 2x Tamper Seal Stickers Pipe 15 20 mm Pipe 20 26 mm 1x Remove to activate sticker Model versions LTCM02 P LTCM02 C Plastic pipes model Copper pipes model Details are subj...

Page 5: ...diameters __ __ Multi layered PEX Aluminum PEX 16 20 or 25 __ __ PEX or PE RT 16 20 or 25 LK Distance pipe 110 plastic spacer Plastic version PEX Aluminium PEX PEX Distance Pipe Metal pipes version wh...

Page 6: ...g by holding the sticker over the IR eye and releasing when on the correct pipe See full pipe list on previous page Example of Copper 22mm pipe chosen Example of PAL 20mm pipe chosen 5 Verify on the d...

Page 7: ...you followed the installation and pipe setup instructions correctly You can also try to rotate the device around the pipe in case the pipe has been deformed Note that if the meter has been activated...

Page 8: ...reate an account on the Quandify portal https portal quandify com and register your device s You will then also be able to integrate the data into your own application using our API https quandify com...

Page 9: ...code Indicates successful radio transmissions A single dot indicates a faulty radio module Low battery less than 180 days remaining The units perform an LCD check every 5 minutes where all segments ar...

Page 10: ...5 l h Small leak detection 1 9 l h over several days Only using Quandify platform Medium leak detection 10 l h for at least 40 min Large leak detection 1500 l h for at least 5 min Weight 280 grams exc...

Page 11: ...ia the meter s built in optical eye or LoRaWAN by authorized personnel If external parts need to be replaced such as pipe clamps and covers only original manufacturer spare parts should be used Replac...

Reviews: