QUANTECH
47
SECTION 3 - HANDLING, STORAGE, INSTALLATION, AND REASSEMBLY
FORM QWC4-NM1 (221)
ISSUE DATE: 02/28/2021
3
PROCEDURES
Cleaning
Clean the parts visually contaminated with oil, grease,
or dirt with a generous spray of cleaner 7070. Wipe
them dry with a clean towel while they are still wet.
Priming
Use the following steps to prime the joints.
1. If required, use N7649 general purpose primer.
Primers are generally required when assembling
dissimilar metals. In this case, apply primer to the
inactive surface.
a. Active surfaces (Primer optional): Brass,
copper, bronze, iron, soft steel, and nickel.
b. Inactive surfaces (Primer required): Alumi-
num, stainless steel, magnesium, zinc, black
oxide, cadmium, titanium, and others.
2. After application, allow the primer to visibly dry
(3-5 minutes) before assembling the joint.
3. Primer can also be used at the discretion of the
facility to accelerate curing of sealer on any sur-
face, which is often helpful in low temperature
conditions.
Primer will accelerate the cure time for
the sealant. Complete joint assembly
quickly, if primer is used.
GASKET JOINTS
Assembling Gasket Joints
Use the following instructions to assemble the gasket
joints.
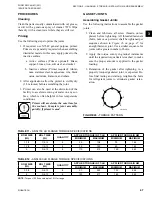
1. Clean and lubricate all screw threads, unless
plated, before tightening. All threaded fasteners
(bolts, nuts or cap screws) shall be tightened per
sequence shown in
for
an eight fastener joint. Use a similar sequence for
joints with a greater number of bolts.
2. Apply the torque evenly in gradual increments
until the required torque limit is reached, to make
sure the proper amount is applied to the gasket
loading.
3. Relaxation of the gasket after tightening, in a
properly torqued gasketed joint, is expected. Be-
fore final testing and start-up, retighten the bolts
for refrigerant joints to eliminate gasket relax-
ation.
1
2
7
4
6
5
8
3
FIGURE 26 -
TORQUE PATTERN
LD16438
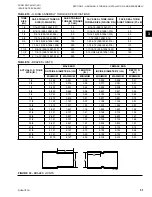
TABLE 11 -
ANSI 150 LB FLANGE TORQUE SPECIFICATIONS
NOM. SIZE
(IN.)
BOLT SIZE
(IN.)
QUANTITY
APPLIED TORQUE IN FT-LB
APPLIED TORQUE IN NM
MINIMUM
MAXIMUM
MINIMUM
MAXIMUM
1-1/4
1/2-13
4
24
108
33
146
1-1/2
1/2-13
4
32
120
43
163
5
3/4-10
8
110
415
149
563
TABLE 12 -
ANSI 300 LB FLANGE TORQUE SPECIFICATIONS
NOM. SIZE
(IN.)
BOLT SIZE
(IN.)
QUANTITY
APPLIED TORQUE IN FT-LB
APPLIED TORQUE IN NM
MINIMUM
MAXIMUM
MINIMUM
MAXIMUM
3-1/2
3/4-10
8
97
329
132
446
4
3/4-10
8
122
417
165
565
NOTE:
Torque > 1000 use value plus 10% for range.
Summary of Contents for QWC4
Page 14: ...QUANTECH 14 FORM QWC4 NM1 221 ISSUE DATE 02 28 2021 THIS PAGE IS INTENTIONALLY LEFT BLANK...
Page 64: ...QUANTECH 64 FORM QWC4 NM1 221 ISSUE DATE 02 28 2021 THIS PAGE IS INTENTIONALLY LEFT BLANK...
Page 82: ...QUANTECH 82 FORM QWC4 NM1 221 ISSUE DATE 02 28 2021 THIS PAGE IS INTENTIONALLY LEFT BLANK...
Page 130: ...QUANTECH 130 FORM QWC4 NM1 221 ISSUE DATE 02 28 2021 THIS PAGE IS INTENTIONALLY LEFT BLANK...
Page 146: ...QUANTECH 146 FORM QWC4 NM1 221 ISSUE DATE 02 28 2021 THIS PAGE IS INTENTIONALLY LEFT BLANK...
Page 152: ...QUANTECH 152 FORM QWC4 NM1 221 ISSUE DATE 02 28 2021 THIS PAGE IS INTENTIONALLY LEFT BLANK...
Page 155: ...QUANTECH 155 NOTES...


