Routine Outdoor Helium Compressor Maintenance Instructions
Quantum Design
Service Note 1201-022, Rev. A0
5
November 2, 2011
VI.
Re-installing the compressor side panels
Once the compressor is cleaned you will need to re-install the compressor side panels.
Because of the large number of screws on the panels it will be important to start but not
tighten completely each screw to assure that the panels are aligned. This will avoid the
screws to be stripped and the PEM nuts on the frame to be damaged
1.
Hang the side panels to the compressor frame
2.
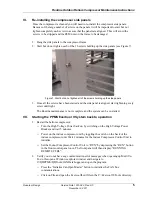
Start but do not tighten each of the 16 screws holding up the side panels (see Figure 7).
Figure 7. Start but do not tighten all of the screws holding up the side panels
3.
Once all the screws have been started and the side panel is aligned, start tightening every
screw until tight.
The Routine maintenance is now complete and the system can be re-started.
VII.
Starting the PPMS EverCool II System back to operation
1.
Restart the helium compressor:
o
Turn the High Voltage Power back on by switching on the High Voltage Power
Breaker and wait 5 minutes.
o
Power on the indoor compressor unit by toggling the switch on the back of the
indoor compressor unit. Wait 2 minutes for the Indoor Compressor Control Unit to
initialize.
o
Set the Indoor Compressor Control Unit to “RUN” by depressing the “RUN” button
in the front control panel once. The front panel will then display “RUNNING
REMOTE CTRL”.
2.
Verify you do not have any communication error messages when opening up MultiVu.
To do this open a Windows explorer window and navigate to
C:\QDPPMS\QDTools\CANDataLogger and open the program.
o
Press the “Initialize CanOpen Master” button to initialize the CAN bus
communications.
o
Click on File and open the EvercoolII.cdl file in the C:\Evercool II\Tools directory.


