background image

Quantum 600E

   www.quantumrehab.com

41

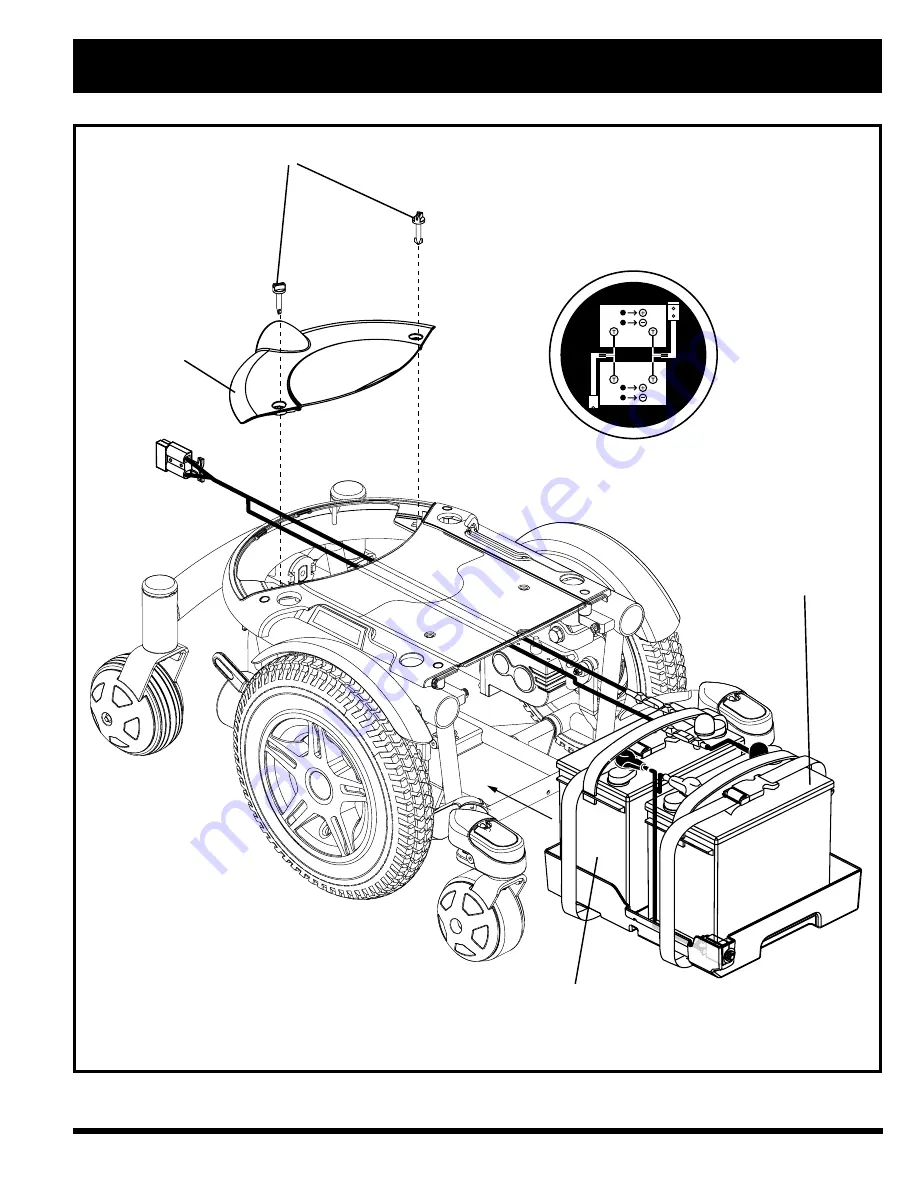
BATTERY WIRING DIAGRAM LABEL

V I I I .   C A R E   A N D   M A I N T E N A N C E

Figure 27. Battery Installation

REAR SHROUD FASTENERS

REAR SHROUD

FRONT BATTERY

REAR BATTERY

Summary of Contents for 600E

Page 1: ...Owner s Manual 1 800 800 8586 Exeter PA 1 888 570 1113 St Catharines ON www quantumrehab com ...

Page 2: ...ed procedures can cause either personal injury component damage or malfunction black symbol on yellow triangle with black border MANDATORY These actions should be performed as specified Failure to perform mandatory actions can cause injury to personnel and or damage to equipment white symbol on blue dot PROHIBITED These actions should be prohibited These actions should not be performed at any time...

Page 3: ...I OPERATION 33 VIII CARE AND MAINTENANCE 37 IX WARRANTY 43 C O N T E N T S Thisowner smanualiscompiledfromthelatestspecificationsandproductinformationavailableatthetimeofpublication Wereservetherighttomakechangesastheybecomenecessary Anychangestoourproductsmaycauseslightvariations betweentheillustrationsandexplanationsinthismanualandtheproductyouhavepurchased ...

Page 4: ...njury and ordamage to the power chair including voiding the warranty PURCHASER S AGREEMENT By accepting delivery of this product you promise that you will not change alter or modify this product or remove or renderinoperableorunsafeanyguards shields orothersafetyfeaturesofthisproduct fail refuse orneglecttoinstallany retrofit kits from time to time provided by Pride to enhance or preserve the safe...

Page 5: ... dedicated to current and potential Pride product owners You willgainaccesstointerviews stories recreationideas dailylivingtips productandfundinginformation andinteractive message boards These message boards invite you to communicate with other Pride customers as well as Pride represen tatives who are available to assist you with any questions or concerns you may have My Quantum Rehab Specialist N...

Page 6: ...ve mode Place unit on level ground and stand behind or to one side when changing from drive mode to freewheel mode or freewheel mode to drive mode Unlocked and in freewheel mode Battery Configuration T T T T T Terminal Post Connect Red wire to T T T T T with Connect Black wire to T T T T T with PRODUCT SAFETY SYMBOLS Thesymbolsbelowareusedonthepowerchairtoidentifywarnings mandatoryactions andprohi...

Page 7: ...ndition Removal of grounding prong can create electrical hazard If necessary properly install an approved 3 pronged adapter to an electrical outlet having 2 pronged plug access Failure to heed could result in personal injury and or property damage Prevent personal injury and equipment damage Do not connect an extension cord to the AC DC converter or the battery charger EMI RFI This product has bee...

Page 8: ...ce Simplytakeyourtimeandyouwillsoonbeinfullandconfidentcontrolasyoumaneuverthroughdoorways on and off of elevators up and down ramps and over moderate terrain Belowaresomeprecautions tips andothersafetyconsiderationsthatwillhelptheuserbecomeaccustomedtooperating the power chair safely Modifications Pridehasdesignedandengineeredyourpowerchairtoprovidemaximummobilityandutility Awiderangeofaccessorie...

Page 9: ...ccess Someramps may have turning switchbacks 180 degree turns that require you to have good cornering skills on your power chair Proceed with extreme caution as you approach the downgrade of a ramp or other incline Takewideswingswithyourpowerchair sfrontwheelsaroundanytightcorners Ifyoudothat thepowerchair srear wheels will follow a wide arc not cut the corner short and not bump into or get hung u...

Page 10: ...echanicallyafterregenerativebrakingslowsthevehicletonearstop orwhenpoweris removed from the system for any reason Cornering Information Whileyourpowerchairisequippedwithfourcasterwheels excessivelyhighcorneringspeedscanstillcreatethepossibil ityoftipping Factorswhichaffectthepossibilityoftippinginclude butarenotlimitedto corneringspeed steeringangle howsharplyyouareturning unevenroadsurfaces incli...

Page 11: ...ly on packed soil grass and gravel Feel free to use your power chair safely on lawns and in park areas Reduce your power chair s speed when driving on uneven terrain and or soft surfaces Avoidtallgrassthatcanentangletherunninggear Avoid loosely packed gravel and sand Ifyoufeelunsureaboutadrivingsurface avoidthatsurface Stationary Obstacles Steps Curbs etc Proceed with extreme caution when driving ...

Page 12: ...orward during transfer and causing injury WARNING Avoid using your armrests for weight bearing purposes Such use may cause the power chair to tip and cause personal injury WARNING Avoid putting all of your weight on the foot riggings Such use may cause the power chair to tip and cause personal injury Doors Determine if the door opens toward or away from you Driveyourpowerchairgentlyandslowlyforwar...

Page 13: ...rely Serious personal injury may result if you fall from the power chair WARNING The positioning belt is not designed for use as a seat belt in a motor vehicle Nor is your power chair suitable for use as a seat in any vehicle Anyone traveling in a vehicle should be properly belted into seats approved by the vehicle manufacturer Reaching and Bending Neverreach lean orbendwhiledrivingyourpowerchair ...

Page 14: ...vement from electromagnetic EM sources Failure to do so may result in personal injury Prescription Drugs Physical Limitations Usersmustexercisecareandcommonsensewhenoperatingapowerchair Thisincludesawarenessofsafetyissueswhen takingprescribedorover the counterdrugsorwhentheuserhasspecificphysicallimitations WARNING Consult your physician if you are taking prescribed or over the counter medication ...

Page 15: ...I This product has been tested and has passed at an immunity level of 20 V m WARNING Be aware that cell phones two way radios laptops and other types of radio transmitters may cause unintended movement of your electrically powered mobility vehicle due to EMI Exercise caution when using any of these items while operating your mobility vehicle and avoid coming into close proximity of radio and TV st...

Page 16: ...tassemblyincludesthearmrests seatback andseatbase Thepowerbaseassemblyincludestwomotor brakeassem blies two drive wheels four caster wheels two batteries and wiring harnesses See figure 5 6 and 7 SEATBACK DRIVE WHEEL CASTER WHEEL Figure 5 The Quantum 600E POWERBASE ASSEMBLY SEAT ASSEMBLY FOOTRIGGING FOOT PLATFORM SHOWN SEAT BASE CONTROLLER MANUALFREEWHEEL LEVER ARMREST ARMREST CASTER WHEEL ...

Page 17: ...ynergySeat SynergyManualTilt SynergyManualRecline High backContourSeat ManualReclineHigh backContourSeat TRU BalancePowerTilt Drivetrain Twomotor mid wheeldrive Batteries Two12 volt NF 22batteries Range Upto25miles BatteryCharger 5 amp off board Electronics 70 ampVSI WeightCapacity 300lbs 160lbs withSynergyManualTilt ComponentWeights Base 124lbs Medium backContourSeat 37lbs Batteries 38 lbs each V...

Page 18: ...donthepowerbaseassembly Thecontrollerislocatedontheseatassembly Connectivitybetweenthecontrol ler and the motors and the batteries is provided by a controller cable See figure 7 Motor Connectors This is where the controller connects to the motors Battery Connector This is where the controller connects to the batteries Figure 6 The Quantum 600E Power Base MOTOR BRAKE ASSEMBLY REARSHROUDFASTENERS TR...

Page 19: ...ripstopreventdamagetothemotorsand theelectronics Ifthecircuittrips allowyourpowerchairto rest forapproximatelyoneminute Next pushinthecircuit breaker button turn on the controller and continue normal operation If the main circuit breaker continues to trip repeat edly contactyourQuantumRehabSpecialist Figure 7 Quantum 600E Electrical Components BATTERY CONNECTOR CHARGERINHIBITCONNECTOR MAINCIRCUITB...

Page 20: ...n causing injury To engage or disengage the drive motors 1 Locate the lever on top of each motor 2 Pull the two levers upward to engage the drive motors See figure 8 3 Push the two levers downward to disengage the drive motors See figure 9 Ifaleverisdifficulttomoveineitherdirection slightlyrockthepowerchairbackandforth Thelevershouldthenmoveto thedesiredposition WARNING It is important to remember...

Page 21: ...Y ARMRESTANGLE ADJUSTMENT SEAT INSTALLATION Figure 10 Quantum 600E AssemblyView Standard Seating Shown FOOT PLATFORM HEIGHT DEPTH ADJUSTMENT SEATHEIGHT ANGLEADJUSTMENT CONTROLLER POSITION FOOT PLATFORM ANGLEADJUSTMENT NOTE Any nylon insert lock nut removed during the disassembly or adjustment of the power chair must be replaced with a new nut Nylon insert lock nuts should not be reused as it may c...

Page 22: ...t back and slide the rear extrusion onto the rear trapeze bar See figure 11 3 Lower the front extrusion onto the front trapeze bar until the seat locks into place 4 Flip the seat latch safety down WARNING Makesuretheseatlatchsafetyisflipped down before using your power chair Controller Installation Dependingonthevariousconfigurationsandoptionsyouhave chosenforyourpowerchair itmayhavebeenshippedwit...

Page 23: ...ing any adjustments Youmayneedthefollowingtomakecomfortadjustments metric standard socket set and ratchet adjustablewrench metric standard hex key set Seat Height and Seat Angle Adjustment Youcanchangetheseatheighttooneoffourpositionsin1 in increments by raising the front and rear trapeze bars If you raise or lower only one trapeze bar front or rear you can also change the seat base angle dump To ...

Page 24: ...of mounting holes You must move both extrusions the same number of holes either forward or backwards See figure 13 6 Fasten the extrusions back onto the bottom of the seat 7 Reinstalltheseat 8 Reconnectthecontroller Seatback Angle Adjustment If your power chair is equipped with an adjustable seatback youcanadjustittofour 4 differentangles 90 102 105 or 107 To adjust the seatback angle 1 Remove the...

Page 25: ...n You can position the controller for either left hand or right handuse WARNING Do not place the controller cable so that it can be pinched in the seat frame or the power base frame To change the controller position 1 Turn off the power to the controller 2 Loosen the rear shroud fasteners 3 Remove the rear shroud 4 Unplugthecontrollerconnector s fromthepowerbase 5 Cutthewiretie s securingthecontro...

Page 26: ...r out to the de siredheight 3 Reinstallthequickreleasefastenersintothefootplatform bracket and tighten QuickReleaseFasteners Thefootplatformisattachedtothe powerbasewithtwoquickreleasefasteners Seefigure18 Each quickreleasefastenerconsistsofabolt alever andanut Seefigure 16 Theleverhasacamontheendthatallowsittoclampintoplace Thequickreleasefastenerhastwostates clampedandunclamped Whentheleverisope...

Page 27: ...figure 19 To rotate the SFRs 1 Pushinthereleaselever 2 Rotate the SFRs To adjust the SFR length 1 Removethetwoadjustmentscrewsfromthebackofeach footrestextension 2 Slide the footrest up or down to the desired length 3 Reinstallthetwoadjustmentscrews Elevating Leg Rests Optional ElevatingLegRests ELRs offeraninfiniterangeofadjust mentforthelegangleandafootrestadjustmentrangeof12 19 in See figure 20...

Page 28: ...alltheadjustmentscrews Multi Axis Foot Plates Themulti axisfootplateassemblycanbeinstalledoneither a swing away footrest or an elevating leg rest The multi axisfootplatehasfouradjustments legrestlength A po sition B tilt C and angle D See figure 22 To change leg rest length A 1 Remove the hardware 2 Move the leg rest to the desired position 3 Reinstallthehardware To change foot plate position B 1 ...

Page 29: ...an automotive type battery charger WARNING Prevent injury and or equipment damage Read the battery charging instructions in this manual and in the manual supplied with the battery charger before charging the batteries WARNING Prevent injury and or equipment damage Do not expose the off board battery charger to rain or other sources of moisture unless it has been tested for outdoor use Refer to the...

Page 30: ...ndlastforanextendedperiod Frequently Asked Questions FAQs Howdoesthechargerwork The battery charger takes the standard electrical outlet voltage of 120 VAC alternating current and converts it to 24 VDC direct current The power chair batteries use direct current to run your power chair When the battery voltage is low the charger works harder to charge the battery As the battery voltage approaches f...

Page 31: ...ive chemicals contained in batteries Use only AGM or Gel Cell batteries to reduce the risk of leakage or explosive conditions Whydomynewbatteriesseemweak Deep cyclebatteriesemployamuchdifferentchemicaltechnologythanthatusedincarbatteries nickel cadmium nicads or in other common battery types Deep cycle batteries are specifically designed to provide power drain down their charge and then accept a r...

Page 32: ...nect thebatteryharnessesandstorethepowerchairinawarm dryenvironment Avoidtemperatureextremes suchasfreezing and excessively hot conditions and never attempt to charge a frozen battery Acold or frozen battery should be warmed for several days prior to recharging Whataboutpublictransportation AGMandGel Cellbatteriesaredesignedforapplicationinpowerchairsandothermobilityvehicles Thesebatteriesare Fede...

Page 33: ...eleration deceleration and braking If it is programmed incorrectly or outside of the safe limits as determined by your healthcare profes sional it can create a dangerous situation Only the power chair manufacturer an authorized representative of the manufacturer or a trained service technician should program the control ler The VSI consists of 1 joystick 2 keypad 3 off boardcharger programmingsock...

Page 34: ...SI operational and electrical system OK NOTE When the batteries approach a discharged state the first red light will begin to slowly flash remind ing you the batteries need to be charged immediately Rapid flash of lights Indicates a fault in the VSI or the electrical system Refer to VSI Error Codes Ripple side to side of lights The joystick was not in the neutral position when the controller was t...

Page 35: ...icator should ripple up and down 2 Push the joystick to the full forward position until the VSI beeps 3 Pull the joystick to the full rearward position until the VSI beeps 4 Release the joystick There should be a long beep 5 The VSI is now unlocked NOTE If the above procedure fails to either lock or unlock the VSI contact your Quantum Rehab Specialist Off board Charger Programming Socket Theoff bo...

Page 36: ...oblem TheVSIisdesignedtomaximizetheuser ssafetyunderallnormalconditions Thetablebelowidentifies theindividualerrorcodes Errorcodesaredisplayedasarapidflashingofthebatteryconditionmeterlights Ifyougetone of these error codes contact your Quantum Rehab Specialist FLASHING LIGHTS DIAGNOSIS AND SOLUTION 1 The batteries need charging or there is a bad connection to the batteries Check the connections t...

Page 37: ...ain 4 If any inconsistencies are found take your power chair to your Quantum Rehab Specialist Temperature Someofthepartsofyourpowerchairaresusceptibletoextremechangesintemperature Alwayskeepyourpowerchairbetween thetemperaturesof18 Fand122 F Inextremelycoldtemperaturesthebatteriesmayfreeze Thespecifictemperatureatwhichtheyfreezedependsonanumberof factors suchasbatterycharge usage andcompositionoft...

Page 38: ...rateproperly Tocalibrate thejoystick powerofftheunit placethejoystickintheneutralposition andpowertheunitbackon Ifaproblemstillexistswithyour joystick sperformance contactyourQuantumRehabSpecialist Checkthebrakes Thistestshouldbecarriedoutonalevelsurfacewithatleastthreefeetofclearancearoundyourpowerchair To check the brakes 1 Turn on the controller and turn down the speed level of your power chair...

Page 39: ...painted ABS plastic body shroud that allows it to be easily wiped clean with a damp cloth WARNING Never use any chemicals to clean a vinyl seat as they may cause the seat to become slippery or dry out and crack Use soapy water and dry the seat thoroughly Wheel Replacement If you have pneumatic tires and you have a flat tire you can replace the tube If your chair is equipped with a solid tire inser...

Page 40: ...al injury WARNING Prevent injury and or equipment damage Do not mix or match new and old batteries If you encounter a situation where one battery needs to be replaced then replace both batteries Refer to the specifications table in this manual and the manual suppled with the battery charger for recommended type and capacities To replace the batteries 1 Turn off the power to the controller 2 Make s...

Page 41: ...Quantum 600E www quantumrehab com 41 BATTERYWIRINGDIAGRAMLABEL V I I I C A R E A N D M A I N T E N A N C E Figure 27 Battery Installation REARSHROUDFASTENERS REARSHROUD FRONT BATTERY REAR BATTERY ...

Page 42: ... or broken wheel assemblies Does not power up Powers up but does not move Corrective Maintenance If the battery condition meter does not light up when you turn on the power Check the harness connections Make sure they are tight Check the circuit breaker Reset it if necessary Check the battery connections If the above conditions prove normal you can load test the batteries with a battery load teste...

Page 43: ...unting brackets 18 MONTH LIMITED WARRANTY Foreighteen 18 monthsfromthedateofpurchase Pridewillrepairorreplaceatouroptiontotheoriginalpurchaser free of charge any of the following parts found upon examination by an authorized representative of Pride to be defective in materialand orworkmanship Motor gearboxassembly Power seat actuator ONE YEAR LIMITED WARRANTY For one 1 year from the date of purcha...

Page 44: ...ough heavy use is not covered SERVICE CHECKS AND WARRANTY SERVICE Warranty service must be performed by a Quantum Rehab Specialist Do not return faulty parts to Pride without prior writtenauthorization Alltransportationcostsandshippingdamageincurredwhilesubmittingpartsforrepairorreplacement aretheresponsibilityofthepurchaser Failuretofollowtheinstructions warnings andnotesintheowner smanualandthos...

Page 45: ...Quantum 600E www quantumrehab com 45 N O T E S ...

Page 46: ...46 www quantumrehab com Quantum 600E N O T E S ...

Page 47: ...our choice in power chairs We have thoroughly inspected your Quantum 600E The following check marks indicate that it has been tested driven and inspected 1 In Quality QualityControl Quantum600E INFMANU3269 Serial Inclusion of all Parts JoystickSerialNumber ControllerSerialNumber LeftMotorSerialNumber RightMotorSerialNumber Fit and Finish Performance ...

Reviews: