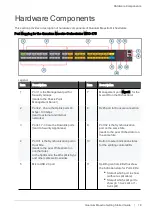
MHO-140 Front Panel
Quantum Maestro Getting Started Guide | 23
MHO-140 Front Panel
Important - This section describes the default configuration. It is possible to change the
port type (Management, Uplink, and Downlink) in the Gaia Operating System on the
Quantum Maestro Orchestrator. See the
Maestro Administration Guide for your
> Chapter
Configuring Security Groups
> Section
Configuration Procedure
>
Section
Configuring Security Groups in Gaia Clish
> Section
Configuring the Port
Settings
.
Item
Description
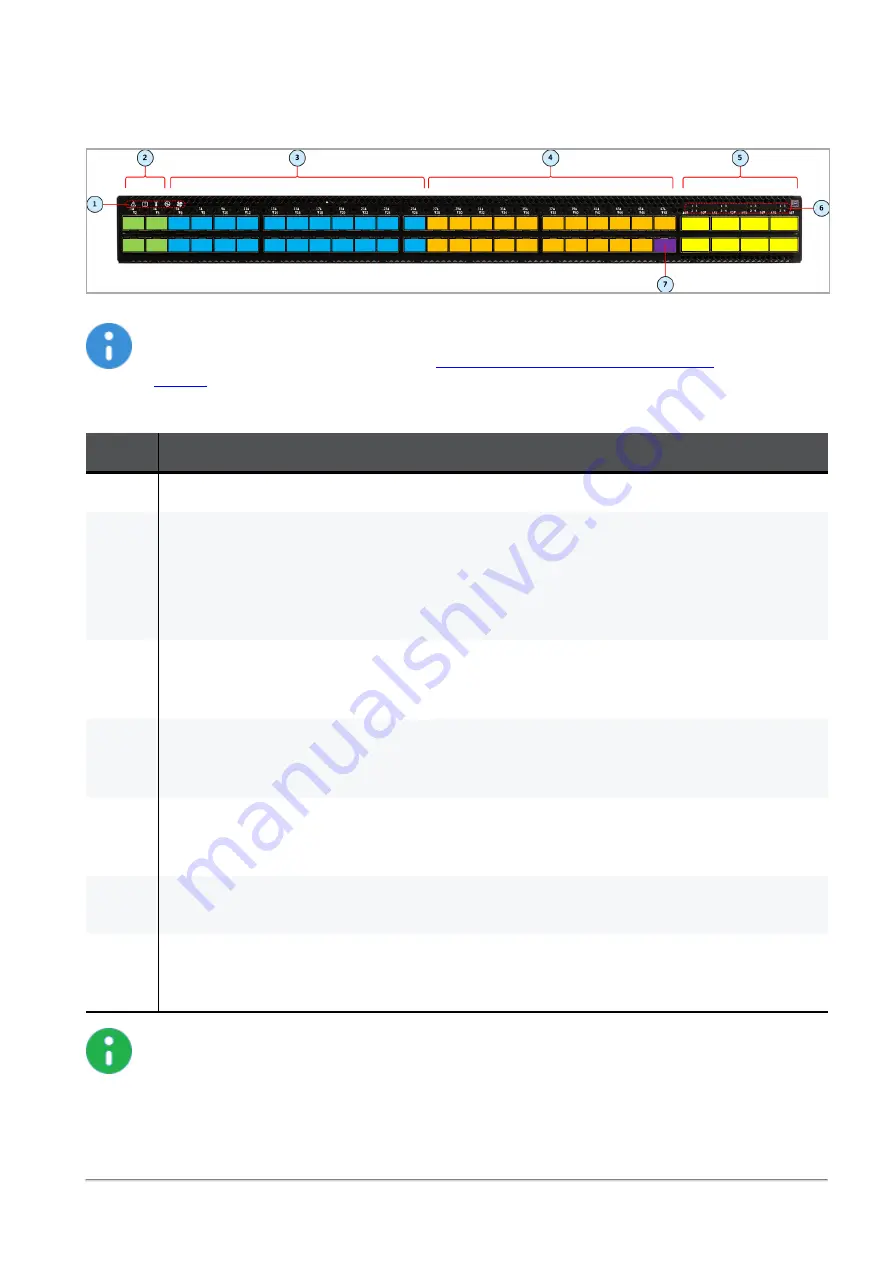
1
LEDs. See
2
Ports from 1 to 4 (colored green), through which you manage the Security Groups.
To these ports you connect:
n
Check Point Management Servers.
n
Clients, from which you connect to the Gaia Operating System (Gaia Portal and Gaia
Clish) on the Security Appliances connected to the Downlink ports (
4
).
3
1 Gbps / 10 Gbps Uplink ports 5 to 26 (colored blue).
To these ports you connect your external traffic and internal traffic networks.
You use DAC or Fiber cables (with transceivers).
4
Downlink ports 27 to 47 (colored orange).
To these ports you connect your Check Point Security Appliances.
You use DAC or Fiber cables (with transceivers).
5
40 Gbps / 100 Gbps Uplink ports 49 to 56 (colored yellow).
To these ports you connect your external traffic and internal traffic networks.
You use DAC or Fiber cables (with transceivers).
6
LEDs that show the state of the split interfaces when you connect with Breakout cables to the
40 / 100 GbE Uplink ports (
5
).
7
Synchronization port 48 (colored purple).
You connect a DAC cable between ports 48 on two Quantum Maestro Orchestrators MHO-140
for redundancy on the same site.
Notes:
n
It is possible to connect DAC or Fiber cable (with transceivers) to each port (from 1
to 56).
n
It is possible to connect Breakout cables only to the top ports 49, 51, 53, and 55.
In this case, the bottom ports 50, 52, 54, and 56 are disabled.
See


