Using the Rack Mount Kit To Install the
DLT Rack2 Chassis in an Equipment Rack
Step 1
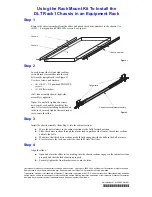
Remove the chassis members from the slides and attach the chassis members to the chassis. Use
(6) M3 × 4 mm pan-head PHILLIPS
®
screws. See Figure 1.
Step 2
Loosely mount the left and right cabinet
section/bracket assemblies into the rack
between the upright rails (see Figure 2).
Use these screws and washers:
•
(4) #10–32 × 3/8 pan-head PHILLIPS
screws
•
(4) #10 flat washers.
(Left-side assembly shown; right-side
assembly is opposite.)
Note:
Do not fully tighten the screws
between the rack and the bracket at this
time. After loosely installing both brackets
in the rack, securely tighten the rear bracket
screws onto the slide.
Step 3
Install the chassis assembly (from Step 1) into the cabinet sections:
a.
Move the ball retainers in the cabinet sections to the fully forward position.
b.
Slide the chassis sections through the plastic lead-in guides at the front of the cabinet sections
and into the balls.
c.
Make sure that the chassis sections are both fully engaged with the balls in the ball retainers.
d.
Press to release the lock on each slide, then fully close the slides.
Step 4
Align the slides:
a.
Open and close the slides twice, making sure the chassis sections engage in the cabinet sections
properly and that the locks function properly.
b.
Securely tighten the front bracket screws onto the slide.
Chassis member
Chassis
Figure 1
Chassis member
Figure 2
Upright rails
Cabinet section/bracket assembly


