Installing the DXi4700 System in the Rack
Quantum DXi4700 Installation Guide
47
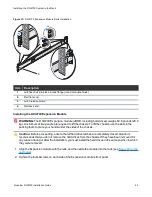
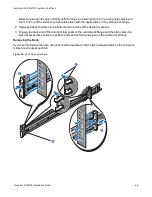
Item
Description
1
Latches click into place in rack flange (round or square holes)
2
Rail front end
3
Latch release button
4
Rail back end
Installing the DXi4700 Node
WARNING:
The DXi4700 G1 Node and Expansion module (JBOD) weigh 61.0 pounds (27.7 kg) and
62.6 pounds (28.4 kg) respectively. A minimum of two people are required to lift either chassis.
WARNING:
The DXi4700 G2 Node and Expansion module (JBOD) weigh 49.4 pounds (22.4 kg) and
59.2 pounds (26.8 kg) respectively. A minimum of two people are required to lift either chassis.
Caution:
Before proceeding, ensure that all hard drive latches are completely closed. Quantum
recommends that you do not remove the hard drives from the chassis. If they have been removed for
any reason during or after the installation, you must install the hard drives in the same position in which
they were removed.
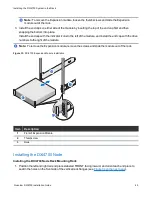
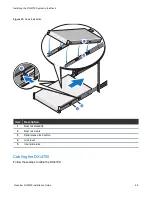
1. Pull the inner slide rails out of the rack until they lock into place (see
).
2. Locate the rear rail standoff on each side of the system and lower them into the rear J-slots on the slide
assemblies.
3. Rotate the Node downward until all the rail standoffs are seated in the J-slots.
4. Press the slide-release lock buttons on both rails and slide the system into the rack. (Make sure the
Node is squarely aligned with the rack as you slide it in.)
Note:
To remove the Node, locate the lock levers on the sides of the inner rails. Unlock each lever by
rotating it up to its release position. Grasp the sides of the system firmly and pull it forward until the rail
standoffs are at the front of the J-slots. Lift the system up and away from the rack and place it on a level
surface.


