STEP 2:
INSTALL THE FC310
a.
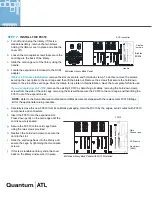
Turn off and unplug the library. (If this is a
standalone library, remove the two screws
holding the library cover in place and slide the
cover off.)
b.
Loosen the two captive screws that secure the
card cage to the back of the library.
c.
Slide the card cage out of the library using the
handle.
d.
Locate the expansion slot closest to the SCSI
adapter.
If this is a first-time installation,
remove the slot cover plate and hold-down clamp. To do this, remove the screws
securing the cover plate to the card cage and then lift the plate out. Remove the screws that secure the hold-down
clamp to the side of the card cage. Save the clamp for use later in this installation. Save the cover plate for future use.
If you are replacing an FC310,
remove the existing FC310 by detaching all cables, removing the hold-down clamp
screws from the side of the card cage, removing the screws that secure the FC310 to the card cage, and then lifting the
FC310 out of the expansion slot.
e.
Carefully remove the new FC310 from its antistatic packaging. Hold the FC310 by the edges; avoid contact with FC310
components and connectors.
f.
Insert the FC310 into the expansion slot.
Press down gently on the card edge until the
card is securely seated.
g.
Secure the FC310 to the card cage frame
using the two screws provided.
h.
Reattach the hold-down clamp to secure the
card in the slot.
i.
Slide the card cage back into the library and
secure the cage by tightening the two captive
screws.
j.
If this is a standalone library, slide the cover
back on the library and secure it in place.
NOTE: Refer to the Return Material Authorization (RMA) documents shipped with the replacement FC310 Bridge
kit for the appropriate return procedure.
Captive
screws
Handle
M-Series Library Back Panel
Slot for
FC310
SCSI controller
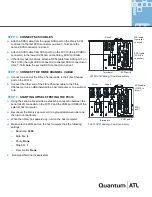
M-Series Library Back Panel with FC310 Installed
Fibre
Channel port
SCSI ports
Serial port
(RJ45)
FC310


