Locating Lattus Storage Nodes
Lattus Replace Decommissioned Disks
14
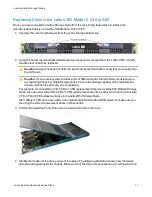
6. Lift up the failed hard drive and remove it from the chassis.
Note:
The drive can be removed by simply lifting it from the chassis. There are no screws to loosen
or remove.
7. Insert the replacement drive into the vacated HDD space.
Note:
The new drive should rest on the protective foam pieces. There are no screws to tighten.
8. Reconnect the SATA power and signal cables.
9. Replace the storage node’s top cover and tighten the thumbscrews.
Reinstalling a Lattus Storage Node in a Rack
1. Safely reinstall the Lattus Storage Node back into its position in the rack and slide the node all the way
into the rack.
Caution:
Do not leave the Lattus Storage Node partially installed in the rack. Slide it all the way
into the rack. Otherwise the rack rails might break.
2. Tighten the two front screws.
3. Reconnect the network cables to the ports from which you disconnected them.
4. Reconnect the power cables to the power supplies from which you removed them, and attach the
safety.
Booting the Lattus Storage Node
1. Push the power button on the front of the Lattus Storage Node to boot it.
2. Check if the node has successfully booted and if the disks have been initialized by doing the following:
a. Look in the Events section of the
Dashboard
. When the machine has booted, you will see the two
events listed below:
l
Machine was rebooted
l
New empty disk(s) detected.
This event may take up to 15 minutes to appear in the Events
list. If you insert a disk that does have data on it, you will see the “New non-empty disk(s)
detected” event.
b. After the second event appears, go to
Dashboard > Administration > Lattus Management >
Logging > Jobs
.


