background image

26

ENGLISH

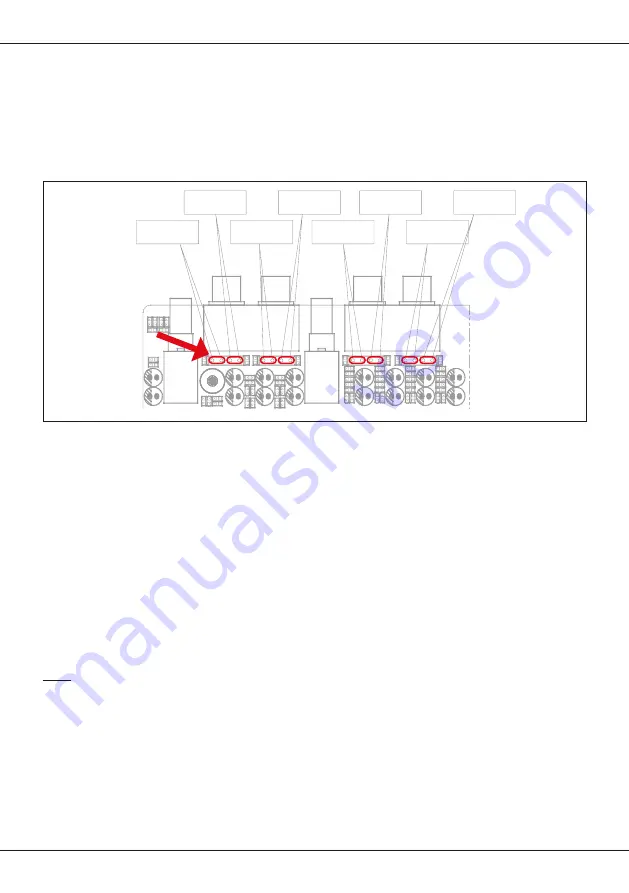
The input sensitivity of the High Level Input is set to 15 ~ 45 V ex factory. If necessary, the input sensitivity for 

each input channel can be changed to 2 ~ 15 V. To do this, you have to remove the respective jumper inside 

the housing on the circuit board. Proceed as follows:

HIGH LEVEL INPUT SENSITIVITY

IN CH7

IN CH8

IN CH5

IN CH6

IN CH3

IN CH4

IN CH1

IN CH2

First disconnect the device from the power supply. Then remove the housing cover and locate the six jumpers 

on the circuit board. These are located below the audio inputs.

Then carefully remove the jumper on the desired input channel to set it to an input sensitivity of 

„2 ~ 15 V”

Use suitable pliers for this.

You can determine the correct jumper position for your application with the following procedure:

•  Turn the input control 

„LEVEL INPUT“

 of the respective channel pair group on the device to 

„MIN“

. Then set 

the volume level of the outputs to around “75%” in the DSP software or DSP app. If you then hear distortions 

from the loudspeakers, the factory setting 

„15 ~ 45 V“

 is suitable in this case. Then turn the „LEVEL INPUT“ 

controller back a bit until the distortions are no longer audible.

•  If no distortion can be heard from the loudspeakers, you can remove the jumpers of the respective channel 

pair group in order to achieve a higher power reserve with the 

„2 ~ 15 V”

 setting. Then gradually increase 

the input sensitivity of the respective channel pair group using the 

„LEVEL INPUT“

 controller until slight 

distortions can be heard. Then turn the controller back a bit until they are no longer audible.

Note:

 Depending on the structure of the sound system, the signal outputs can be operated with different output 

voltages. Use a multimeter to check the resistance of the connected speakers. If the resistance is over 5 ohms, 

the associated high-level input should be operated with a higher voltage, i.e. 

„15 ~ 45 V“

. If the resistance is 

around 4 ohms or less, the associated high-level input should be operated with a lower voltage, i.e. 

„2 ~ 15 V”

.

Summary of Contents for QL812SP

Page 1: ...BENUTZERHANDBUCH OWNER S MANUAL BENUTZERHANDBUCH OWNER S MANUAL QL812SP DIGITAL FULL HD AUDIO 12 CHANNEL SIGNAL PROCESSOR 2 x 32 Bit 295 MHz 96 kHz Sampling Rate VERS 1 4...

Page 2: ...2 DEUTSCH...

Page 3: ...ro und Elektro nikger te mindestens 400 m betragen oder die gesamten Lager und Versandfl chen mindestens 800 m betragen Vertreiber haben die R cknahme grunds tzlich durch geeignete R ckgabem glichkeit...

Page 4: ...em Stecker 1 x Bluetooth Antenne 1 x Benutzerhandbuch Deutsch Englisch BESTIMMUNGSGEM SSER GEBRAUCH Dieses Produkt ist f r den Betrieb in einem Fahrzeug mit einer Bordspannung von 12 V bei negativer M...

Page 5: ...Signalkonverter AKM Velvet Sound A D 32 Bit D A 32 Bit Frequenzgang 5 45 000 Hz Signalrauschabstand A bewertet Analoger Eingang 111 dB Digitaler Eingang 117 dB Klirrfaktor Analoger Eingang 0 001 Digi...

Page 6: ...an einen autorisierten H ndler oder den n chsten Kundendienst DIE INSTALLATION EINES PUFFERKONDENSATORS MIT AUSREICHENDER KAPAZTI T WIRD EMP FOHLEN Hochleistungsverst rker verursachen sehr hohe Spannu...

Page 7: ...eiten beschrieben damit diese beim Fahren nicht hinderlich sind Kabel die sich im Bereich des Lenkrads des Schalthebels oder im Bremspedal usw verfangen k nnen f hren zu u erst gef hrlichen Situatione...

Page 8: ...die Installation der Kabel vorhanden ist und diese nicht geknickt werden sowie eine ausreichende Zugentlastung gew hrleistet ist Legen Sie dann den Prozessor beiseite und bohren dann die L cher f r di...

Page 9: ...Wenn Sie die Funktion AUTO TURN ON verwenden siehe Seite 10 Abschnitt 11 muss der Anschluss REM IN nicht belegt werden 3 REM OUT Der Anschluss REM OUT kann an den REM Anschluss eines anderen Verst rk...

Page 10: ...sempfindlich keit Anpassung an das Ausgangssignal des Steuerger ts 7 POWER Leuchtet diese LED gr n ist das Ger t betriebsbereit 12 AUTO TURN ON Falls Ihr Steuerger t ber keine Einschaltleitung REM ver...

Page 11: ...ion oder eines Software Absturzes diese Taste mit einem geeig neten Gegenstand wie einem Stift oder einer Nadel um das Ger t zur ckzusetzen 13 OPTICAL IN Dieser Eingang akzeptiert PCM Stereosignale bi...

Page 12: ...ie dann den Lautst rkepegel der Ausg nge in der DSP Software oder DSP App auf etwa 75 Sollten dann Verzerrungen aus den Lautsprechern zu h ren sein ist in diesem Fall die Werkseinstellung 15 45 V geei...

Page 13: ...r mehr Speicherplatz Display 1024 576 oder h her OS Microsoft Windows 10 oder h her ESX DSP TOOLKIT www esxaudio de dsp BT ANT HIGH LEVEL INPUT POWER INPUT RESET USB OPTICAL IN COAXIAL IN REMOTE EXTEN...

Page 14: ...N Verbinden Sie das DSP Ger t ber Bluetooth mit Ihrem Smartphone oder Mobilger t Laden Sie die ESX DSP TOOLKIT APP und installieren diese auf Ihrem Smartphone oder Mobilger t Einstellen des Lautsprech...

Page 15: ...er t zum REM Anschluss des Ger ts gelegt haben Der AUTO TURN ON Schalter muss sich hierbei in Schalterstellung OFF befinden Sie k nnen jedoch testweise den AUTO TURN ON Schalter auf VOX stellen um zu...

Page 16: ...er t der Hochpassfilter oder Subsonicfilter h her als der Tiefpassfilter eingestellt Drehen Sie dann den Regler f r den Hochpassfilter oder Subsonicfilter langsam zur ck bis der Ton zu h ren ist Ist a...

Page 17: ...en ist W hlen Sie einen geeigneten Massepunkt an der Fahrzeugkarosserie zum Anschlie en aus Verwenden Sie gegebenenfalls Kontaktspray um die Leitf higkeit der Anschl sse zu verbessern Ist die Leitf hi...

Page 18: ...ecessary your local authority or dealer SCOPE OF DELIVERY 1 x QL812SP Processor 1 x Detachable Power Connector 1 x USB Cable Length 5 m 1 x Wire Harness with 16 pin Connector 1 x Bluetooth Antenna 1 x...

Page 19: ...Staging EQ 12 dB Balance and Level Mode Signal Converters AKM Velvet Sound A D 32 Bit D A 32 Bit Frequency Response 5 45 000 Hz Signal to Noise Ratio A weighted Analog Input 111 dB Digital Input 117...

Page 20: ...er in this case to the chapter TROUBLE SHOOTING Otherwise risk of injury and the damage of the device consists Commit the device to an authorized retailer INTERCONNECTION AND INSTALLATION SHOULD BE AC...

Page 21: ...ll all the wires and cables like described on the following pages therewith these may not hinder the driver Cables and wires which are installed close by the steering wheel gear lever or the brake ped...

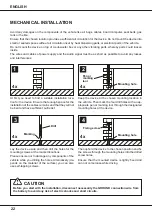
Page 22: ...erferences At first you need to find a suitable installation loca tion for the device Ensure that enough space for the installation of the cables remains and that they will not be bent and have suffic...

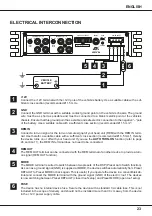
Page 23: ...se a suitable cable with a suf ficient cross section recommended 1 5 mm2 1 MODE The MODE terminal is suited to switch between two presets of the DSP Preset Auto Switch function As soon as a ground sig...

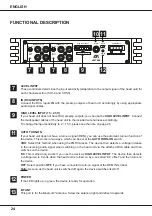
Page 24: ...en using the IN RCA jacks The device then detects a voltage increase in the incoming audio signal when switching on the head unit via the attached RCA cable and then switches on the device DC This met...

Page 25: ...ources such as the audio tracks of DVD movie can not be reproduced Connect a fiber optic cable with a TOSLINK connector 17 COAXIAL IN This input accepts PCM stereo signals up to a sampling rate of 192...

Page 26: ...the outputs to around 75 in the DSP software or DSP app If you then hear distortions from the loudspeakers the factory setting 15 45 V is suitable in this case Then turn the LEVEL INPUT controller bac...

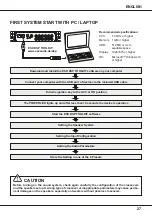
Page 27: ...12 MB or more available space Display 1024 576 or higher OS Microsoft Windows 10 or higher Before turning on the sound system check again carefully the configuration of the crossovers and the speakers...

Page 28: ...oogle Play Android smart phones and mobile devices Wireless Bluetooth Connection Device Name ESX QL812SP Start Bluetooth Before turning on the sound system check again carefully the configuration of t...

Page 29: ...al RCA you must have laid a remote turn on wire from the head unit to the REM terminal of the device The AUTO TURN ON switch must be in the OFF position However you can test the AUTO TURN ON switch to...

Page 30: ...r insulate the damaged area Is the high pass filter or subsonic filter set higher than the low pass filter on the device Then slowly turn down the controller for the high pass filter or subsonic filte...

Page 31: ...icle battery Select a suitable ground point on the vehicle body for connection If necessary use contact spray to improve the conductivity of the connections Is the conductivity of the ground cable fro...

Page 32: ...D E S I G N Audio Design GmbH Am Breilingsweg 3 D 76709 Kronau Germany Tel 49 7253 9465 0 Fax 49 7253 946510 www esxaudio de www audiodesign de Audio Design GmbH all rights reserved...

Reviews: