background image

Quatech SDS User’s Manual 


Installing the device drivers 

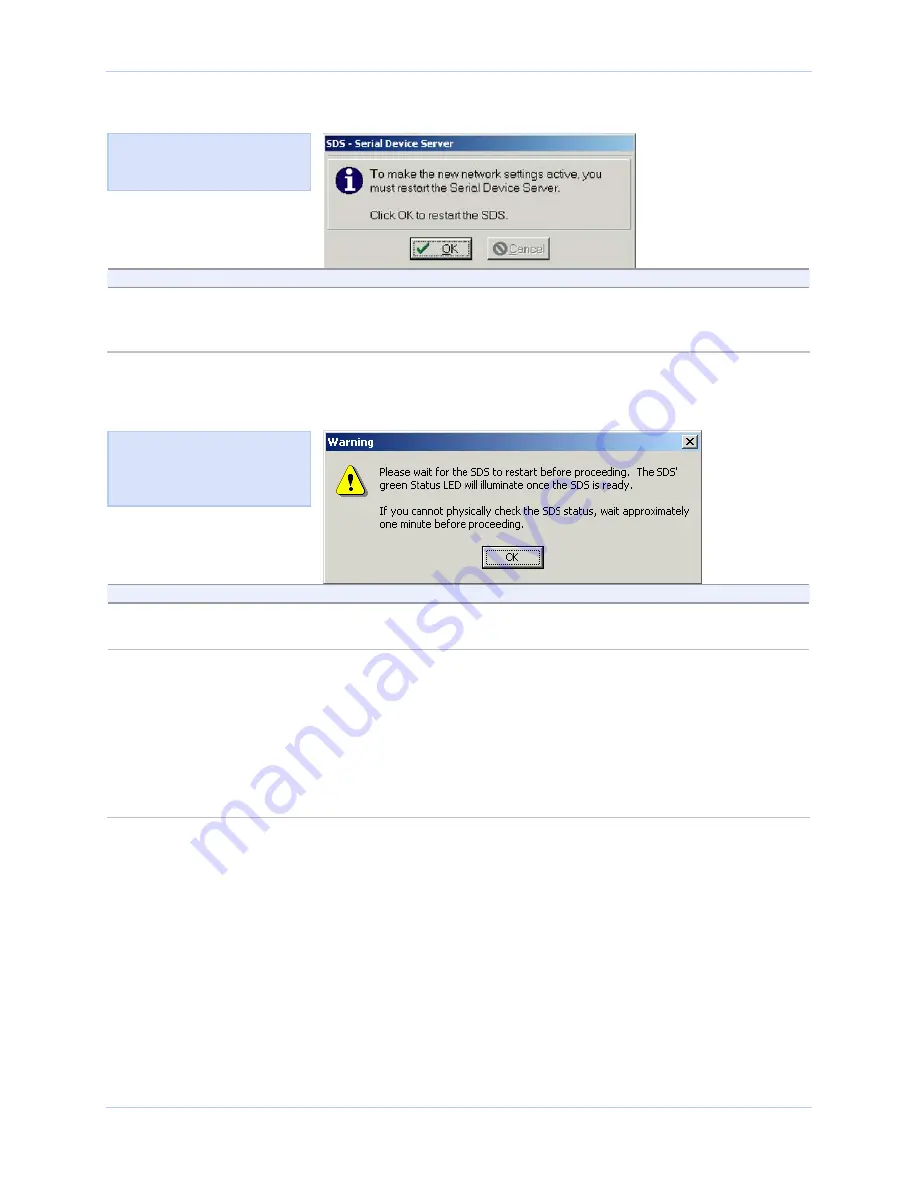
Figure 27 - Restart confirmation pop-up box 


Step 

Procedure 

Description 

 Step 35


Press OK to restart the SDS and make 

your changes active. 

The SDS reboots and takes on the new 

configuration. The Information pop-up 
box displays.

 Continue with 

 Step 36.


Figure 28 - Information pop-up box 


Step 

Procedure 

Description 

 Step 36


When the Status light glows green, press 
OK.  

This indicates that the SDS is ready.


Continue with 

 Step 37.


 Step 37


Depending on your path to this step, one 

of three possible screens will display: 

¾


TCP/IP Network Configuration 
Parameters 


¾


Reconfigure the Serial Device Server 
 

¾


SDS Wizard Information 


Continue with 

 Step 38.  


Go to 

 Step 30. 

 
Go to 

 Step 41.


Figure 29 warns you that the 

SDS needs time to reset. Wait 

until the status LED glows 
green before pressing OK.  

Figure 28 shows the Restart 

confirmation pop-up box. 

July 2005 

940-0183-153 

Page 33 

Summary of Contents for Serial Device Server

Page 1: ...Y Serial Device Server User s Manual QUATECH INC 5675 Hudson Industrial Parkway Hudson Ohio 44236 5012 Toll free 1 800 553 1170 http www quatech com Quatech Device Server User s Manual P N 940 0183 15...

Page 2: ...tion in this manual is believed to be accurate and reliable at the time of posting Notwithstanding the foregoing Quatech assumes no responsibility for any damage or loss resulting from the use of this...

Page 3: ...t numbers 28 Uninstalling your SDS 29 Uninstalling from Windows XP 2000 29 Uninstalling from Windows NT4 29 Alternative installation steps 30 Configuring the SDS using the Web interface 45 Setting net...

Page 4: ...up box 20 Figure 13 TCP IP Network Configuration Parameters screen 21 Figure 14 Internet Protocol TCP IP Properties dialog box 22 Figure 15 Restart confirmation pop up box 23 Figure 16 Information po...

Page 5: ...gure 52 Serial Port Setup screen for Normal mode 56 Figure 53 Serial Port Setup screen for Tunneling mode 59 Figure 54 Serial Port Setup screen for Raw TCP mode 62 Figure 55 Serial Port Setup screen f...

Page 6: ......

Page 7: ...cal COM port the network connection is invisible to the application After following the simple steps included in the Quick Start Guide to attach your network and serial devices to the appropriate conn...

Page 8: ...Your SDS uses the TCP IP protocol suite for network communications This means that communication through an SDS can actually be more reliable than communication over long serial lines which lacks the...

Page 9: ...llows two Device Servers and their Ethernet TCP IP connection to act like a direct cable connection between two serial devices No host computer is required Note In Tunneling a master sends out the con...

Page 10: ...option For example the 4 port RS 232 unit with DB 9 connectors and surge suppression would have a part number of QSE 100D SS RS 232 Device Ports RS 232 422 485 Device SSE 100 1 SSE 400 DSE 100 2 DSE 4...

Page 11: ...used to monitor and manage the elements comprising a network Managed system Composed of managed devices on the network running the agent process such as an SDS Management Information Base MIB Standar...

Page 12: ...port to an SDS a wireless PC can connect directly to the security camera through the SDS without ever going through an AP Before an SDS can communicate on an 802 11b wireless network the WLAN setting...

Page 13: ...ervice Step 3 Check the contents of the package to make sure you have received everything listed below SDS Power cable Power source Loopback connector s CD ROM containing the SDS device drivers and co...

Page 14: ...ates when a network link has been established located in the Ethernet connector Speed amber differentiates between 100Base T glowing and 10Base T off Ethernet connection speeds located in the Ethernet...

Page 15: ...ashing slowly and before it starts flashing rapidly release the button The SDS then restarts automatically If the Reset button is held during the first 10 seconds of bootup the Status LED flashes at a...

Page 16: ...DB 9 connector RS 232 signal description DB 9 Data Carrier Detect DCD 1 Receive Data RxD 2 Transmit Data TxD 3 Data Terminal Ready DTR 4 Signal Ground GND 5 Data Set Ready DSR 6 Request To Send RTS 7...

Page 17: ...you can use the center eight pins of the SDS RJ 45 connector for RS 232 communications You will lose access to the Ring Indicator signal Table 6 RS 422 485 signals on RJ 45 connector DB 9 to RJ 45 ada...

Page 18: ...RJ 45 Ethernet port pinout 1 2 3 4 5 6 7 8 Figure 5 and Table 7 show the Ethernet RJ 45 pinouts and signal descriptions Table 7 RJ 45 Ethernet port signals Ethernet signal description RJ 45 Transmit D...

Page 19: ...Step 2 Connect a serial cable between the SDS and your serial device See Serial port s on page 10 for pinout and connector information Step 3 Connect an Ethernet cable between your Ethernet outlet an...

Page 20: ...nd communicates with another device Note Wi Fi Device Servers link via an AP in Infrastructure mode they connect directly to another device in Ad hoc mode In Infrastructure mode you can use your wirel...

Page 21: ...SDS in the Web browser s URL address field The Quatech Device Server Home page displays Step 8 Click on Network in the selection bar Step 9 Select Infrastructure as the Access Mode Step 10 Configure...

Page 22: ...3 The CD ROM should launch automatically If the CD ROM does not launch automatically select Start Run from the Task bar browse to the CD ROM drive and select the ThinQ exe file Click OK in the Run wi...

Page 23: ...over patch cable If you cannot immediately attach the SDS to the target installation site temporarily attach it to the local hub or your computer s NIC for configuration purposes Notes Use a CAT5 or b...

Page 24: ...or device servers The Search network for Serial Device Servers screen displays and the Wizard searches the local subnet for active serial device servers Continue with Step 10 Figure 9 Search network f...

Page 25: ...f two options The SDS is attached to the location where it will be installed and used The SDS is plugged into a temporary location for configuration purposes Choose this option if the SDS is installed...

Page 26: ...h Step 15 Figure 12 Retrieving Unit Configuration pop up box Step Procedure Description Step 15 Depending on whether the test passes or fails one of two screens displays TCP IP Network Configuration P...

Page 27: ...nge the parameters press the Change Properties button If you are satisfied with the parameters press the Next button One of two possible screens displays depending on whether your address type is Stat...

Page 28: ...he configuration parameters consult your system administrator Note For reliable operation we recommend a static IP address Continue with Step 18 Go to Step 19 Step 18 Key in any necessary changes to t...

Page 29: ...the new configuration The Information pop up box displays Continue with Step 21 Figure 16 Information pop up box Figure 17 warns you that the SDS needs time to reset Wait until the Status LED glows g...

Page 30: ...ontinue with Step 23 Figure 18 Rerun network connectivity test pop up box Step Procedure Description Step 23 Press the OK button to continue The Network Connectivity Test screen displays Continue with...

Page 31: ...h Step 25 Figure 20 Retrieving Unit Configuration pop up box Step Procedure Description Step 25 Depending on whether the test passes or fails one of two screens displays TCP IP Network Configuration P...

Page 32: ...to continue The Install the Device Drivers screen displays Continue with Step 27 Figure 22 Install the Device Drivers screen Step Procedure Description Step 27 Press the Next button to continue The In...

Page 33: ...er and select Properties Click on the HTTP Connect button to launch the SDS Web interface The Installation Complete screen closes Windows briefly displays a Found New Hardware pop up screen as it inst...

Page 34: ...uding location and version Resources COM port enumeration and first port number SDS Configuration network information including MAS address IP address subnet mask and default gateway The SDS Configura...

Page 35: ...and select your Quatech Device Server 5 Right click and select Uninstall 6 At the Confirmation screen click OK 7 Click Finish at the Completing the Add Remove Hardware Wizard screen Uninstalling from...

Page 36: ...ing Next or you can change them by pressing Reconfigure SDS Step Procedure Description Step 30 The Reconfigure the Serial Device Server screen lets you change the SDS configuration so that it can oper...

Page 37: ...o the remote subnet Press Next to continue I ll move the SDS later and run the wizard again Press Next to continue The Network Connectivity Test screen displays Go to Step 14 The Wizard closes and ret...

Page 38: ...e of the following options Use the following static IP address Obtain an IP address automatically from the DHCP server If you are not sure of the configuration parameters consult your system administr...

Page 39: ...scription Step 36 When the Status light glows green press OK This indicates that the SDS is ready Continue with Step 37 Step 37 Depending on your path to this step one of three possible screens will d...

Page 40: ...rameters press Next to continue If you are not satisfied press Change Properties to change the TCP IP properties The Rerun network connectivity test pop up box displays Continue with Step 39 The Inter...

Page 41: ...press No If you answer Yes the DHCP server will assign the IP address for your SDS If this address changes communication with the SDS may fail The SDS Wizard Information DHCP screen displays Continue...

Page 42: ...t one of the following options Search for an SDS attached directly to my computer Recommended Press Next to continue Search for an SDS attached to a remote subnet Press Next to continue Manually selec...

Page 43: ...Description Step 43 Connect the Ethernet port on your SDS to the Network Interface Connection NIC on your computer Either a crossover patch cable or a straight through cable will work Continue with S...

Page 44: ...he SDS is preconfigured for the remote subnet Press Next to continue The SDS is set to use DHCP Press Next to continue Note If DHCP is disabled on the SDS press the Reset button on the back to enable...

Page 45: ...get subnet s default gateway address You can get this address from a device already on the target subnet Your system administrator should also be able to provide this information Step 47 Enter the tar...

Page 46: ...u can connect it directly to your computer Step Procedure Description Step 48 Select one of two options I ll plug the SDS unit into a local subnet hub or switch Press Next to continue I ll connect the...

Page 47: ...Plug the connector of the unattached power cable into the power source s socket Plug the other end of the cable into a power outlet The SDS powers up Step 51 Confirm that the SDS is ready to proceed...

Page 48: ...e Quatech serial device servers This list will change as the SDS family grows Step Procedure Description Step 53 Locate and highlight your SDS device Press the Next button to continue This screen show...

Page 49: ...for the IP address of your SDS Step Procedure Description Step 54 Enter the IP address for your SDS in the box provided Press the Next button to continue If you are not sure of the IP address see your...

Page 50: ...figuration and retest Press Next to continue Move the SDS to a different subnet and retest Press Next to continue Ignore the problem and continue installation Press Next to continue Click Back to rete...

Page 51: ...e misaligned Note We have eliminated the need to use console ports DOS shell commands Telnet and other complicated methods of configuration Just enter the IP address after the HTTP prefix in your Web...

Page 52: ...for an IP address is http followed by a series of numbers separated by periods such as http 123 456 789 123 The Quatech Serial Device Server Home page displays Figure 42 Home page screen Figure 43 sho...

Page 53: ...settings Note If you inadvertently lose contact with the SDS use the Installation Wizard to re establish contact See Setting TCP IP LAN and Wi Fi Wireless parameters below or see Setting SNMP paramete...

Page 54: ...rk Only let the DHCP server set the IP address if it is configured to always assign the same address to the SDS otherwise the connection will fail Note that the SDS MAC address is displayed The MAC ad...

Page 55: ...16 255 255 0 0 C 8 255 255 255 0 Address mask Host bits 255 255 255 252 2 255 255 255 248 3 255 255 255 240 4 255 255 255 224 5 255 255 255 192 6 255 255 255 128 7 255 255 255 0 8 255 255 254 0 9 255...

Page 56: ...e the Channel As with the SSID devices sharing a wireless link must be tuned to the same channel Note The Channel setting is only used in Ad hoc mode In Infrastructure mode the access point AP determi...

Page 57: ...for your changes to take effect If you press the browser s Back button your original settings remain unchanged Figure 44 IP Address Successful screen Step Procedure Description Step 13 Click on the l...

Page 58: ...shown on the following page displays Figure 47 SNMP Setup screen Step Procedure Description Step 1 Enable or disable SNMP in the SDS Select the Enable SNMP checkbox to enable SNMP Continue with Step 2...

Page 59: ...disable Security Check to allow the SDS to accept SNMP packets from any host in the same community group Clear the check box to allow the SDS to accept packets only from the host you specify in the M...

Page 60: ...Step Procedure Description Step 6 Click on the link to reset the SDS The Remote Reset screen displays Figure 49 Remote Reset screen Step Procedure Description Step 7 Press Reset to activate your sett...

Page 61: ...eters In configuring your Serial Device Server s serial port parameters there are two main considerations Which operating mode should you use Is your serial port connection RS 232 RS 422 or RS 485 Set...

Page 62: ...k to see a pop up help screen for that item Step Procedure Description Step 1 Click on the serial port you want to configure Clicking on a port number highlights and selects that port The selections o...

Page 63: ...et this timer to a longer value Steps 4a through 4d apply only to RS 232 422 485 MEI units Step 4a MEI only Configure the serial port interface Click on the desired interface selector This series of s...

Page 64: ...ommunicate with it Note A Tunnel master needs to know the slave s IP address and serial port number On the slave end all you have to do is click Slave and leave the rest of the Operating Mode settings...

Page 65: ...e previous section Directions for Raw TCP Auto TCP and Raw UDP modes are in the following sections Step 3a Configure the Operating mode Click on the desired data Rate Multiplier Your choices are Auto...

Page 66: ...etely configured Master ports must have the following parameters set Step 3e Set the Baud Rate The SDS and the serial device s to which it is attached must use the same serial connection speed Step 3f...

Page 67: ...ng mode Setting Raw TCP operating mode parameters Raw TCP mode allows an application to communicate with an SDS without any custom protocol overhead In this mode the only data sent over the TCP connec...

Page 68: ...ally populated with any existing parameters for the selected port Step 2 Click on the Raw TCP operating mode selector Raw TCP allows an SDS device to communicate without any protocol overhead You will...

Page 69: ...ncerned about network traffic set this timer to a longer value Step 3d Set the Baud Rate The SDS and the serial device s to which it is attached must use the same serial connection speed Step 3e Set t...

Page 70: ...TCP you must configure all the connection information baud rate data bits and so forth on the Serial Port Setup page There is no way for the application to tell the SDS what to use for that serial por...

Page 71: ...you have an RS 232 422 485 MEI SDS the Configure Serial Port Interface step will display so that you can select between RS 232 and RS 422 485 operation If you have an RS 232 SDS the Configure Serial P...

Page 72: ...d Raw TCP modes in the preceding sections Directions for Raw UDP mode are in the following section Step 3a Configure the Operating mode Click on the desired data Rate Multiplier Your choices are Auto...

Page 73: ...to stop the serial input output process Step 3i Click on the desired Auto TCP Mode selector Your choices are DSR Initiate the TCP connection when the SDS serial port s DSR becomes active Data Initiat...

Page 74: ...p 4 non MEI or Step 5 MEI only Repeat the steps above for each port you need to configure and then press Save to implement all of your changes Close and re open the port to activate your changes That...

Page 75: ...p Procedure Description Preliminary Step Select Serial Ports from the selection bar Note Setup screens vary slightly between RS 232 and RS 232 422 485 MEI units If you have an RS 232 422 485 MEI SDS t...

Page 76: ...vious sections Step 3a Configure the Operating mode Click on the desired data Rate Multiplier Your choices are Auto Recommended Force X2 mode Force X4 mode Force X8 mode The auto setting has no effect...

Page 77: ...serial device s to stop the serial input output process Step 3i Set the UDP IP Address These are your options Multicast Broadcast Point to point This selection determines the destination IP address wh...

Page 78: ...nable the transmit drivers only when the SDS is transmitting Step 4c MEI only Click on the desired connector setup Select Loopback All to internally loopback RTS and CTS in the SDS AuxIn and AuxOut ar...

Page 79: ...k Use this procedure to free a com port that locks up Note that the data trying to get through that port is lost and will need to be resent Running the Ping test Step Procedure Description Preliminary...

Page 80: ...escription Step 2 Press the Ping Test link to return to the Ping Test screen You can also press the Backspace key to return to the Ping Test screen Checking wireless status Step Procedure Description...

Page 81: ...S You can create users to restrict this type of access to approved personnel only Once you create a user only someone using that user ID and password has Web access to the SDS Showing users Step Proce...

Page 82: ...r the user name and password in the boxes provided If desired check the Remember my password box Be sure to key in the name and password in exactly as you did in the Add Del Users screen Both are case...

Page 83: ...Admin screen See below Figure 65 Show Users screen Giving the SDS a descriptive name Step Procedure Description Preliminary Step Click on Admin in the selection bar The Set Descriptive Name screen dis...

Page 84: ...of 5 0 and above can support SNMP Determine the revision level of an SDS check the bottom of the Home page in the Web based interface before upgrading the firmware Step Procedure Description Step 1 B...

Page 85: ...t Us screen displays Figure 69 Contact Us screen Step Procedure Description Step 2 Click on either the sales or support Email links to contact the Sales or Technical Support departments respectively T...

Page 86: ...serial device and to the SDS 3 Verify the cable pinouts 4 Try a different serial cable 5 Try a different port on the SDS 6 Review your serial device literature Make sure the settings it specifies mat...

Page 87: ...by running ipconfig in a command box against the IP address of another PC plugged into the same hub as SDS 3 If the PC and SDS are on same subnet but a search still fails connect the SDS directly to t...

Page 88: ...the MAC address IP address Subnet mask and gateway address are correct for the SDS being used If not click on the Advance button and use the search utility to select the correct SDS and set these par...

Page 89: ...oughly Handle it like any other piece of sensitive electronic equipment Moving the SDS Follow these steps if you need to move your SDS or prepare it for shipment Disconnect the power cable Disconnect...

Page 90: ...equipped with 802 11b wireless networking capability Hardware flow control Full modem control RS 232 EIA 232 RS 232 422 RS 485 RS 232 Serial ports RS 232 422 485 SSE 100 1 SSE 400 DSE 100 2 DSE 400 Q...

Page 91: ...AuxOut N C GND 4 GND Signal Ground GND TxD 5 TxD Transmit Receive Data Data RxD 6 RxD N C DCD 7 AuxIn N C DSR 8 RxD N C CTS 9 AuxIn N C N C 10 N C N C RS 232 signal Pin RS 422 485 signal 4 wire mode...

Page 92: ...2 485 and a peak energy dissipation of 0 1 Joules Note Units with the SS option are limited to 115 2 kbps due to capacitive loading Protocols and software Quatech provides several ways to manage and c...

Page 93: ...ork connection ON 100 Mbps OFF 10 Mbps Data Color RED if port is configured for RS 232 operation Color GREEN if port is configured for RS 422 485 operation Flashes when data is being sent or received...

Page 94: ...Ethernet connector Speed right side of Ethernet connector Data next to DB 9 serial port s Status next to power jack Power supply DC input with AC Adapters provided for 100VAC 240VAC 50Hz 60Hz Autosens...

Page 95: ...evice Server with DB 9 connector s SSEW DSEW QSEW ESEW 100D One two four eight port RS 232 Serial Device Server with DB 9 connector s and Wi Fi capabilities SSEW DSEW QSEW ESEW 400D One two four eight...

Page 96: ...ance of at least 20 cm must be maintained between the antenna of this device and all persons Canadian Notice This device complies with Industry Canada ICES 003 regulations Cet appareil est conform la...

Page 97: ...icense agreement that is part of the package Customer agrees that it will be bound by the license agreement once the package is opened or its seal is broken Quatech does not warrant any software under...

Page 98: ...MUST be assigned a Returned Material Authorization RMA number prior to shipment This RMA number must be clearly marked on the exterior of the product s return packaging and in any correspondence to en...

Reviews: