© Quatro Air Technologies| MAY 2019 | All rights reserved |
iVAC Premium Series Operation and Maintenence Manual
Page 24
Motor Service and Replacement
Replacement Instructions
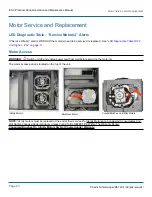
Refer to following figure when performing this procedure.
CAUTION:
ALLOW MOTOR(S) TO COOL FOR 45 MINS BEFORE SERVICING
1. Unplug power cord and open motor access panel.
2.
Disconnect wires (C,D,E), cut zip ties.
3.
Remove the retaining nuts (A) and lock washer holding the motor assemblies.
4.
Remove the motor retaining bracket (F) from the old motor by removing the 4 mounting screws (B).
Note the orientation of the bracket.
5.
Install the bracket on the new motor. See the installations pictures below.
WARNING:
THIS STEP IS PARTICULARLY IMPORTANT FOR “Infinity” MOTORS. If the bracket is installed
incorrectly it may result in a short to ground for the brush contacting the bracket. The curved brush must be visible in the
large cutout as per Figure 2 in "
6.
Install the assembly back into the unit, connect the wires, and install new zip ties.
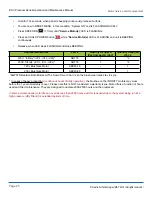
7. Plug in power cord and
Reset “Service Motor(s) Alert.
This MUST be done
EVEN IF L2 IS NOT ILLUMINATED
or
the motor(s) replacement alert will not function correctly. Follow the instructions below.
•
Ensure filter access door is closed.
•
Plug power back to the unit.
•
Press and hold SPEED UP and DN
simultaneously until unit BEEPS.
A.
Retaining nuts (4X)
B.
Motor-to-bracket
mounting screws (4x)
C.
Black wire terminal
D. Green wire terminal
E.
White wire terminal
F.
Motor retaining bracket

