background image

First steps

First dreams

Quax

®

First steps

First dreams

Quax

®

www

.quax.eu

info@quax.eu

17

4. Assembling the babybed

SOFIA


01 01 59xx

Lit bébé 120x60 cm

Baby bed 120x60 cm

Kinderbed 120x60 cm
Kinderbett 120x60 cm

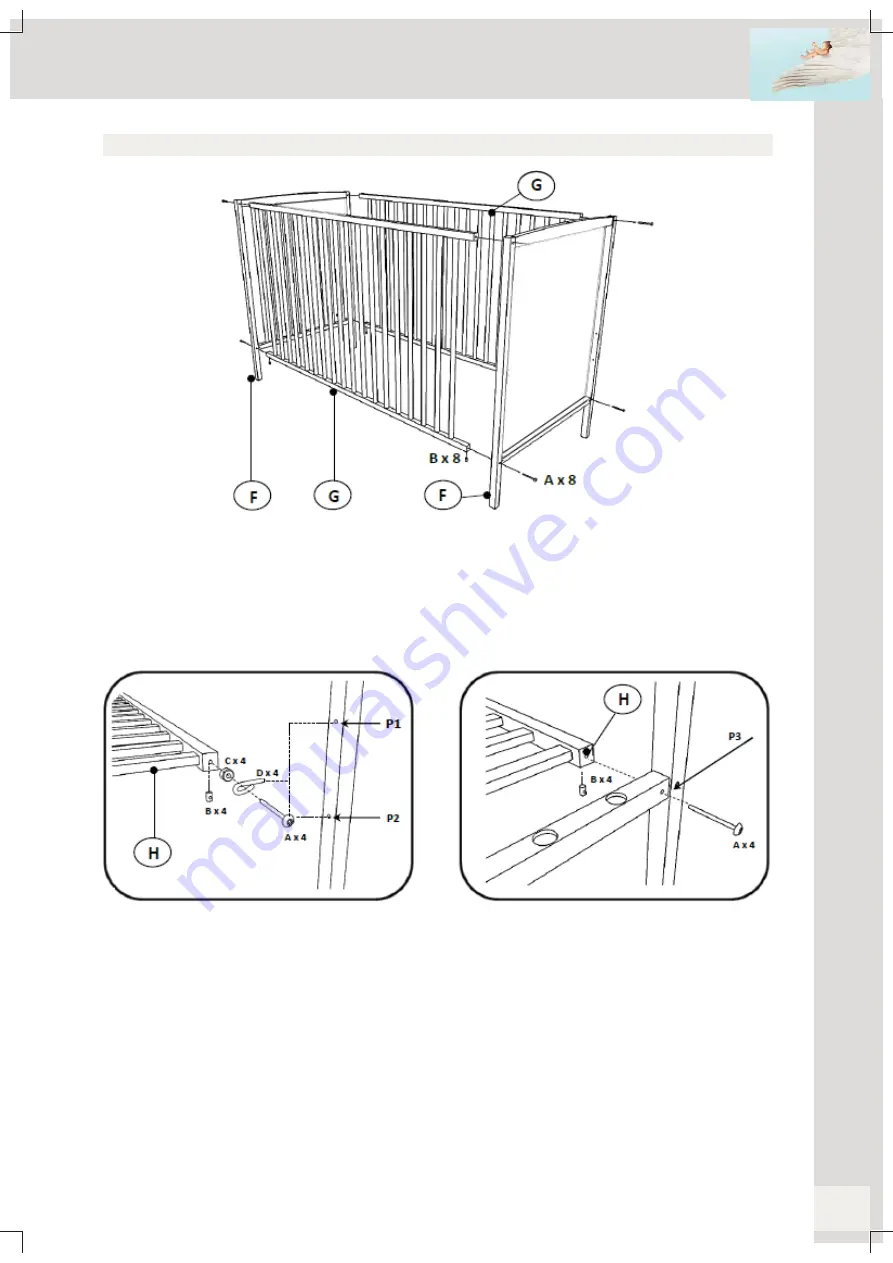
Step 1 

: Use both leg frames 

F

, both sides 

G

, eight bolts 

A

 and eight cylindrical nuts 

B

Place two bolts (

A

) in the provided openings on the upperside and the bottom of the leg frames (

F

). Insert 

the sides (

G

) between the legstructures and pull the bolts one by one backwards and push them back into 

the openings of the sides. The sides are now hanging free between the legs. Insert one by one the cylindri-
cal dowels (

B

) in the provided openings of the sides (

G

). Pay attention that the opening in the nut faces the 

bolt. Tighten slightly with the hexagonal key (

Ex1

). Repeat this action for the remaining bolts.

Step 2 

: Use the parts of step 

1

, the bottom 

H

, four bolts 

A

 and four cylindrical nuts 

B

 or four bolts 

A

, four 

plugs 

D

, four washers 

C

 and four cylindrical nuts 

E

Slide the bottom (

H

) in the bed. 

Lowest position

 : push a bolt (

A

) through the drilling of a leg frame into 

the bottom. Push a cylindrical nut (

B

) in a provided opening underneath the bottom. Check if the hole in the 

cylindrical nut faces the bolt. Tighten the bolt and repeat this operation for the remaining bolts. 

Middle and 

highest position

 : push a plug (

D

) in the desired drilling of a leg frame, push a bolt (

A

) through the plug, 

place a washer (

C

) and further into the bottom. Push a cylindrical nut (

B

) in a provided opening underneath 

the bottom. Check if the hole in the cylindrical nut faces the bolt. Tighten the bolt and repeat this operation 
for the remaining bolts 

Always fasten the bottom with the bolts in order to comply with the European 

legislation

. Finally tighten all bolts (

A

 - 

step 1

) fi rmly.

Step 3 : 

Changing the position of the bottom

Loosen all connections with the bolts (

A

 - 

step 1

). Unscrew the bottom, choose a new height and perform 

step 

2

. Tighten the connections (

A

 - 

step 1

) back again.

Summary of Contents for SOFIA

Page 1: ...tructure of the bed Handboek Manuel Handbuch Manual V1 1 Dec 2016 Tested by Notified Bodies For children who cannot climb out the bed by themselves Nederlands pagina 2 Fran ais page 6 Deutsch Seite 10...

Page 2: ...stand en minimaal 200 mm in de hoogste stand bedraagt en aangeduid door de markering op het bed De matras mag niet boven de bovenkant van de poten komen Wij raden een matras van 120x60 cm aan waarbij...

Page 3: ...odemposities 30 45 en 60 cm Beschikbare kleuren xx zie www quaxpro eu Nettogewicht 16 kg Garantie Dit meubel wordt twee jaar lang gewaarborgd op fabricagefouten en middels vertoon van een aankoopbewij...

Page 4: ...telbare bodem KInderbett mit verstelbarer Boden Quax First dreams First steps 3 Onderdelenlijst Controleer of je alle hieronder vermelde onderdelen terugvindt in de verpakking www quax eu info quax eu...

Page 5: ...sluitringen C en vier cylindrische moeren B Schuif de bodem H in het bed Laagste positie duw een bout A door de boring van een pootonder stel in de bodem Plaats een cylindrische moer B in een voorzien...

Page 6: ...tion la plus basse du sommier et au moins 200 mm dans la position la plus haute et indiqu par le marquage sur la t ti re du lit Utilisez un matelas de 120x60 cm La distance entre la t ti re et le mate...

Page 7: ...45 et 60 cm Coloris disponibles xx voir www quaxpro eu Poids net 16 kg Garantie Ce meuble b n ficie d une garantie de deux ans contre tout d faut de fabrication et sur pr sentation d une preuve d ach...

Page 8: ...er mit verstelbarer Boden Quax Quax First dreams First steps 3 Liste des pi ces d tach es du lit enfant Contr lez si vous retrouvez dans l emballage toutes les pi ces d tach es mentionn es ci dessous...

Page 9: ...us cylindriques B ou quatre boulons A quatre illets D quatre rondelles C et quatre crous cylindriques B Glissez le sommier C dans le lit Position la plus basse poussez un boulon A travers le trou d un...

Page 10: ...her ist als 200 mm in die h chste Bodenposition durch die Markierung auf dem Bett angedeutet und h her als 500 mm in die niedrigste Bodenposition Gebrauchen Sie eine Matratze von 120x60 cm Die Abstand...

Page 11: ...nd 60 cm Verf gbare Farben xx check www quaxpro eu Nettogewicht 16 kg Garantie F r dieses M bel gibt es eine zweij hrige Garantie angesichts Produktionsfehler mit tels Vorzeigung einer Einkaufsnachwei...

Page 12: ...terteileliste f r das Kinderbett berpr fen Sie die Vollst ndigkeit aller nachstehenden Unterteile in der Verpackung www quax eu info quax eu 12 SOFIA 01 01 59xx Lit b b 120x60 cm Baby bed 120x60 cm Ki...

Page 13: ...B oder vier Bolzen A vier Augenstifte D vier Unterlegscheiben C und vier zylindrische Muttern B Den Boden H in das Bett schieben Niedrigste Position dr cken Sie eine Bolze A durch die Bohrung einer G...

Page 14: ...side of the bed is minimally 500 mm with the base in the lowest position and minimally 200 mm in the highest position indicated by the marking on the bed We recommend a mattress of 120 60 cm whereby t...

Page 15: ...5 and 60 cm Available colors xx check www quaxpro eu Net weight 16 kg Guarantee This furniture comes with a two year guarantee on manufacturing defects and through a proof of purchase production numbe...

Page 16: ...lbare bodem Laufgitter mit verstelbarer Boden Quax Quax First dreams First steps 3 Parts list of the babybed Check whether all parts mentioned below are included in the packaging www quax eu info quax...

Page 17: ...ylindrical nuts B or four bolts A four plugs D four washers C and four cylindrical nuts E Slide the bottom H in the bed Lowest position push a bolt A through the drilling of a leg frame into the botto...

Reviews: