background image

41

Manual de utilizare

RO

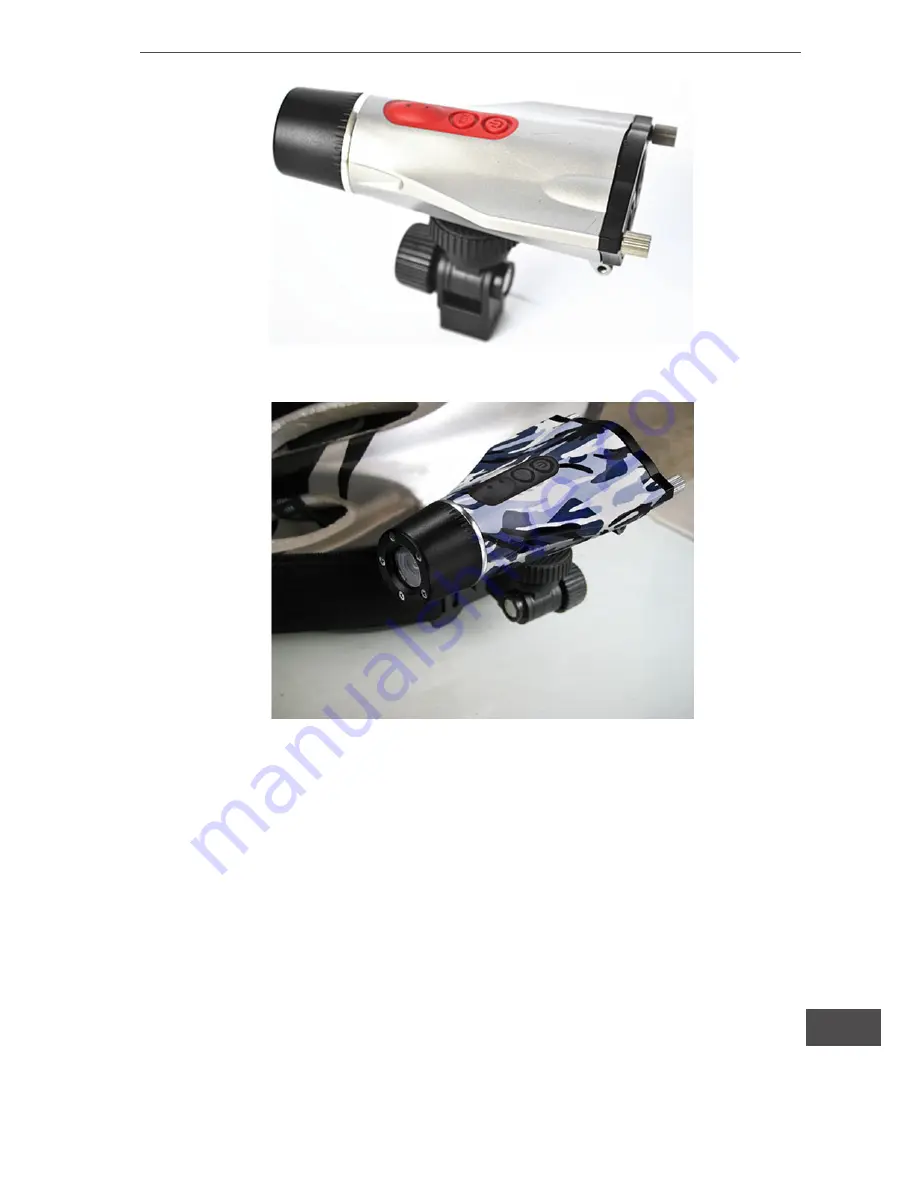
Pic. 6

Pic. 5

3. Montarea camerei pe bicicleta/motocicleta

Fixati camera pe suportul universal apoi conectati-l la suportul de 

bicicleta, pe ghidonul bicicletei, asa cum se arata in figura de mai 

jos.

Summary of Contents for KOM0558

Page 1: ...Instrukcja obsługi PL Manual de utilizare RO Owner s manual EN Bedienungsanleitung DE Sport camera KOM0558 ...

Page 2: ......

Page 3: ...en Temperaturen aussetzen wie z B direktes Sonnenlicht Dieses kann zur Beschädigung des Gehäuses oder der inneren Komponenten der Kamera führen Wir empfehlen die Kamera im Temperaturbereich zwischen 00 bis 400 zu benutzen Schalten Sie die Kamera aus bevor Speicherkarte entfernen Die Speicherkarte und die Daten können beschädigt werden beim ein setzen oder entfernen der Karte bei eingeschalteter Ka...

Page 4: ...Bedienungsanleitung 4 DE Kamerazubehör Bedienungsanleitung USB Kabel Helmbefestigung Universalhalterung Fahrradhalterung 3M Unterlagen Elastikgurt Klettband AC Ladegerät ...

Page 5: ...5 Bedienungsanleitung DE Kameraanschlüsse 4 1 3 2 8 6 5 7 1 Mini USB Steckplatz 2 Mikro SD Steckplatz 3 Reset Taste 4 Schraubanschluss 5 Netztaste 6 Taste Modus 7 Funktionsanzeige 8 Ladeanzeige ...

Page 6: ...en Sie die unteren Befestigungsmethoden 1 Befestigung der Kamera auf der Oberseite des Helms Führen Sie das Klettband durch den Helmgriff und befestigen die Kamera auf der Oberseite des Helms sichern Sie das Klettband durch Befestigung durch die Helmöffnungen dannach das Band fest anziehen siehe Abb 1 2 Abb 1 Abb 2 ...

Page 7: ...ra auf der Helmseite Führen Sie das Gummiband durch den Helmgriff und befestigen die Kamera an den Helm mit Gummiband befestigen Sie die Ka mera auf die universelle Halterung dann schieben Sie sie diese in die Helmhalterung siehe Abb 3 6 Abb 3 Abb 4 ...

Page 8: ...g 8 DE Abb 6 Abb 5 3 Befestigen der Kamera auf dem Fahrrad Mo torrad Befestigen Sie die Kamera auf der Universalhalterung und verbin den diese mit der Fahrradhalterung dann befestigen Sie diese auf den Lenker siehe Abb 7 ...

Page 9: ...de der Mikro SD Karte sie wird automa tisch ausgeworfen Hinweis Bitte beachten Sie die Richtung beim Einstecken der SD Karte da umgekehrtes Einstecken kann die Kamera sowohl wie die Spe icherkarte beschädigen Batterie aufladen Verbinden Sie den USB Steckplatz mit dem Ladegerät und stec ken dieses in eine Steckdose Während des Ladevorgangs leuch tet die rote Anzeige und erlischt wenn der Akku voll ...

Page 10: ... Wenn die Kamera nicht mehr funktioniert drücken Sie diese Taste um in den Normalmodus zurückzukehren Allgemeine Bedienung 1 Kamera ein ausschalten Kamera einschalten Drücken und halten Sie die Netztaste gedrückt zwei Anzeigen leuchten auf Sie hören einen Piepton die Kamera schaltet sich ein Kamera ausschalten Drücken und halten Sie die Netztaste gedrückt Sie hören einen Piepton die Funktionsanzei...

Page 11: ...nn die orange Anzeige blinkt beginnt die Kamera au tomatisch aufzuzeichnen voreingestellt 720P wird es die Aufnah men speichern alle 3 Minuten Wenn die Mikro SD Karte voll ist wird er die frühen Videoaufzeichnungen nach zeitlicher Reihenfol ge überschreiben und die Aufnahme fortzusetzen Drücken Sie er neut die Netztaste ein Piepton ertönt um die Aufnahme zu stop pen die Anzeige erlicht die Kamera ...

Page 12: ...ie Taste MODUS für 5 Sekunden gedrückt bis ein Piepton ertönt Die Kamera beginnt die Speicherkarte zu formatieren Wenn der Piepton nicht mehr er tönt ist der Formatierungsprozess abgeschlossen Wiedergabe der Videoaufnahmen am PC 1 Kamera einschalten und am PC mit dem USB Kabel anschlie ßen Arbeitsplatz Computer öffnen überprüfen Sie ob ein neues Ge rät mit Wechselmedien erscheint öffnen Sie dieses...

Page 13: ... Bildgröße 5 Mpx 2560x1920 Dateiformat H264 JPG Schleifenaufnahme Unterstützt USB 2 0 Schnittstelle Mini USB Steckplatz MicroSD Kartenleser Max 32 GB Eingebautes Mikrofon Wideraufladbare Lithiumbatterie 3 7 V 700 mAh Funktionszeit etwa 2 h unter 1080p Wasserfest bis zu 10 Meter Die Spezifikationen können ohne Ankündigung geändert werden ...

Page 14: ...sed to extremely high temperatures such as under direct sunlight for extended periods of time This may affect the camera housing and internal compo nents We recommend using the camera in temperatures between 00 to 400 Turn off the camera before removing the memory card The card and the data may be damaged if the memory card is inserted or re moved while the camera is still on Do not alter or disma...

Page 15: ...15 Owner s manual EN Camera accessories User manual USB cable Helmet grip Universal bracket Bicycle bracket 3M pads Elastic strap Velcro strap AC Charger ...

Page 16: ...Owner s manual 16 EN Camera interface 4 1 3 2 8 6 5 7 1 MiniUSB port 2 Micro SD port 3 Reset key 4 Screw port 5 Power key 6 Mode key 7 Working indicator 8 Charging indicator ...

Page 17: ...elow methods of mounting as suggested 1 Mounting the camera on the top of the helmet Thread the Velcro strap through the helmet grip and place the ca mera on the top of the helmet secure the Velcro strap by faste ning it through the helmet vents then tighten the strap to lock it refer to pic 1 2 Pic 1 Pic 2 ...

Page 18: ... the camera on the helmet side Thread the elastic strap through the helmet grip and mount it to the helmet using elastic strap mount the camera to the universal bracket then slide it into the helmet grip refer to pic 3 6 Pic 3 Pic 4 ...

Page 19: ... s manual EN Pic 6 Pic 5 3 Mounting the camera on the bicycle motorcycle Place the camera on the universal bracket and connect it to the bicycle bracket then mount them onto the handlebar refer to the picture 7 ...

Page 20: ... Press the end of Micro SD card slightly it will automatically eject Notice Please confirm the inserting direction of Micro SD card because re versed inserting may cause damage to the camera and card Battery Charging Connect the charger to the USB port and plug in the power During charging the red indicator on when fully charged the indicator off Pic 7 ...

Page 21: ...l Basic Operation 1 Turning On Off the Camera Turn On the Camera Press and hold power key working indicator light up you will hear beep sound the camera will turn on Turn Off the Camera Press and hold the power key you will hear beep sound and the working indicator off then it will turn off Note Under standby mode If no any operations for long period of time the camera will turn off automatically ...

Page 22: ...fault 720P it will save the footage of recording every other 3 minutes When Micro SD card is FULL it will overwrite the early videos footage by time sequence and continue recording Press Power key again you will hear beep sound to stop recor ding the indicator off the camera shuts off 3 Taking photos Press MODE key to switch to Camera mode the indicator is blue Under camera mode aim at the object ...

Page 23: ...e stamp File Format Under standby mode press and hold MODE key for 5 seconds lo ose MODE key when you hear beep sound then the camera starts to format files when the beep sound disappear formatting finish Playing back video footage on PC 1 Turn the camera on Connect the camera to PC via the USB cable Open My computer check a new disk on your computer open it you will see the video footages you rec...

Page 24: ...degree under 720P Resolution 1080P 1920 1080 720P 1280 720 Image size 5 Mega 2560 1920 File Format H264 JPG Storage Micro SD card support up to 32G not included Audio Built in MIC USB port USB2 0 Loop recording Supported Battery Rechargeable lithium battery 3 7V 700mAh working about 2 hrs under 1080P Waterproof Waterproof to 10 meters ...

Page 25: ...łuższy czas Nie należy przechowywać kamery w miejscach gdzie będzie ona narażona na bezpośrednie padanie promieni słonecznych lub wy soką temperaturę Zaleca się używanie kamery w temperaturze 00 C 400 C Przed wyjęciem karty pamięci należy wyłączyć kamerę Wyjęcie karty pamięci w czasie pracy kamery może spowodować utratę da nych lub uszkodzenie karty Nie należy samodzielnie rozkręcać naprawiać kame...

Page 26: ...trukcja obsługi 26 PL Zawartość zestawu Instrukcja obsługi Kabel USB Uchwyt do kasku Uchwyt uniwersalny Uchwyt rowerowy Podkładki samoprzylepne 3M Pasek elastyczny Pasek z zatrzaskami Ładowarka sieciowa AC ...

Page 27: ...27 Instrukcja obsługi PL Opis kamery 4 1 3 2 8 6 5 7 1 Port miniUSB 2 Gniazdo kart MicroSD 3 Przycisk Reset 4 Gniazdo śrub 5 Przycisk Power 6 Przycisk Mode 7 Wskaźnik trybu pracy 8 Wskaźnik ładowania ...

Page 28: ...lu różnych konfiguracjach Poniżej przedstawione zostały najbardziej popularne sposoby 1 Montaż kamery na górze kasku Używając paska z zatrzaskami należy przymocować uchwyt do kasku pasek należy przełożyć przez otwory wentylacyjne kasku jak pokazano na rys 1 i 2 Rys 1 Rys 2 ...

Page 29: ...kcja obsługi PL 2 Montaż kamery z boku kasku Używając paska elastycznego należy przymocować uchwyt do kasku Następnie należy użyć uchwytu uniwersalnego aby zamo cować kamerę w żądanej pozycji rys 3 6 Rys 3 Rys 4 ...

Page 30: ...Instrukcja obsługi 30 PL Rys 6 Rys 5 3 Montaż kamery na kierownicy roweru motocy kla Używając uchwytu do kierownicy należy przymocować kamerę do roweru motocykla jak pokazano na rys 7 ...

Page 31: ...delikatnie nacisnąć słyszany będzie dźwięk kliknięcia Uwaga Należy zwrócić szczególną uwagę na kierunek wkładania karty Odwrotne włożenie karty może spowodować uszkodzenie karty lub kamery Ładowanie baterii Po podłączeniu ładowarki do zasilania na urządzeniu zaświeci się czerwona dioda informująca o ładowaniu baterii Po pełnym nała dowaniu baterii dioda zgaśnie Rys 7 ...

Page 32: ...DE Zmiana trybu pracy nagrywanie filmów robie nie zdjęć Przycisk Reset Przywrócenie ustawień fabrycznych w przypad ku problemów z kamerą Podstawowe operacje 1 Włączenie wyłączenie kamery Włączenie kamery Aby włączyć kamerę należy nacisnąć i przytrzymać przycisk Po wer zaświeci się wskaźnik trybu pracy Wyłączenie kamery Aby wyłączyć kamerę należy nacisnąć i przytrzymać przycisk Po wer zgaśnie wskaź...

Page 33: ...wania Nagrywanie w pętli przy podłączeniu do źródła zasilania Po podłączeniu do źródła zasilania kamera włączy się automa tycznie i rozpocznie nagrywanie zacznie migać pomarańczowa dioda Pliki z nagraniami będą zapisywane co 3 minuty Po zapeł nieniu karty Micro SD nadpisywane będą najstarsze nagrania Aby wyłączyć nagrywanie należy nacisnąć przycisk Power 3 Robienie zdjęć Aby przejść do trybu apara...

Page 34: ...0319084456N Formatowanie Aby sformatować kartę pamięci należy w trybie gotowości naci snąć i przytrzymać przycisk MODE przez 5 sekund Zawartość karty zostanie usunięta Odtwarzanie nagrań na komputerze PC 1 Aby odtworzyć nagranie na komputerze należy podłączyć ka merę bezpośrednio do komputera za pomocą kabla USB lub wy jąć kartę z kamery i podłączyć ją do komputera używając czytni ka kart 2 Odłącz...

Page 35: ...20x1080 720p 1280x720 Rozmiar obrazu 5 Mpx 2560x1920 Format plików H264 JPG Nagrywanie w pętli tak Interfejs USB 2 0 port MiniUSB Gniazdo kart MicroSD max 32 GB Wbudowany mikrofon tak Akumulator 3 7 V 700 mAh Czas pracy ok 2 godzin 1080p Wodoszczelność do 10 metrów Specyfikacja produktu może ulec zmianie bez powiadomienia ...

Page 36: ...f temperaturi ridicate sau in bataia directa a soarelui Domeniul temperaturilor de utilizare este cuprins intre 00 C si 400 C Opriti camera inainte de a schimba cardul de memorie Cardul de memorie se poate deteriora daca este scos cand camera este in functiune Cand camera este utilizata un timp mai indelungat este normal ca temperatura ei sa creasca Nu deschideti si nu dezmembrati camera Nu atinge...

Page 37: ...37 Manual de utilizare RO Accesorii Manual de utilizare Cablu USB Curea pentru casca Suport universal Suport pentru bicicleta Banda adeziva 3M Banda elastica Banda Velcro Incarcator de retea ...

Page 38: ...Manual de utilizare 38 RO Interfata camera 4 1 3 2 8 6 5 7 1 Port miniUSB 2 Slot micro SD 3 Reset 4 Orificiu surub 5 Comutator pornire 6 Comutator mod 7 Indicator functionare 8 Indicator incarcare ...

Page 39: ... multe moduri Va rugam sa urma riti urmatoare figuri ca sugestii pentru montare 1 Montarea camerei pe casca de protectie Strangeti banda Velcro pe casca de protectie si amplasati came ra deasupra castii fixand bine suportul si camera asa cum se ara ta in figurile de mai jos Pic 1 Pic 2 ...

Page 40: ... de utilizare 40 RO 2 Montarea camerei pe laterala castii Strangeti banda elastica de laterala castii impreuna cu suportul universal apoi fixati ferm camera asa cum se arata in figurile de mai jos Pic 3 Pic 4 ...

Page 41: ... de utilizare RO Pic 6 Pic 5 3 Montarea camerei pe bicicleta motocicleta Fixati camera pe suportul universal apoi conectati l la suportul de bicicleta pe ghidonul bicicletei asa cum se arata in figura de mai jos ...

Page 42: ... de intro ducere in slot o orientare gresita si fortarea cardului poate duce la deteriorarea cardului si a slotului 3 Pentru scoaterea cardului apasati capatul cardului si acesta va iesi automat din slot Incarcarea bateriei Conectati incarcatorul la portul USB si introduceti alimentatorul in priza Pe durata incarcarii indicatorul de culoare rosie este pornit iar cand baterie este incarcata indicat...

Page 43: ... bate riei si daca to nu reusiti sa o porniti utilizati acest buton pentru re setarea camerei Operare 1 Pornire oprire Apasati si tineti apasat butonul de pornit oprit cele 2 indicatoare se aprind se va auzi si un sunet camera se porneste opreste Nota Daca se afla in stand by dupa un anumit timp de inactivita te camera se opreste automat 2 Inregistarre video Camera are 2 setari pentru modul video ...

Page 44: ...pe modul 720p Se vor salva flimulete la fiecare 3 minu te Cand cardul microSD este plin va suprascrie fisierele deja in registrate Apasati butonul de pornire veti auzi un sunet pentru a opri inregistrarea indicatorul si camera se opresc 3 Inregistare fotografii Apasati butonul de mod pentru a comuta camera pe modul foto grafie indicatorul va fi albastru Pentru efectuarea de fotografii apasati buto...

Page 45: ...ru 5 secunde si eliberati butonul cand auziti un sunet In acest moment camera incepe sa formateze fisierele iar cand sunetul dispare pro cesul de formatare s a incheiat Redarea pe calculator a fisierelor inregi strate 1 Porniti camera Conectati camera la calculator prin intermediul cablului USB Deschideti fisierul My computer de pe desktop ul calculatorului si discul nou care a aparut pentru a viz...

Page 46: ...une imagine 5 Mpx 2560x1920 Format fisier H264 JPG Inregistrare in bucla da Interfata USB 2 0 port miniUSB Cititor de carduri microSD max 32 GB Microfon incorporat Baterie reincarcabila litiu de 3 7 V 700 mAh Functioneaza aproximativ 2h la 1080p Rezistent la apa pana la 10 de metri Specificatiile sunt supuse schimbarilor fara notificare prealabila ...

Page 47: ......

Page 48: ...www quer pl ...

Reviews: