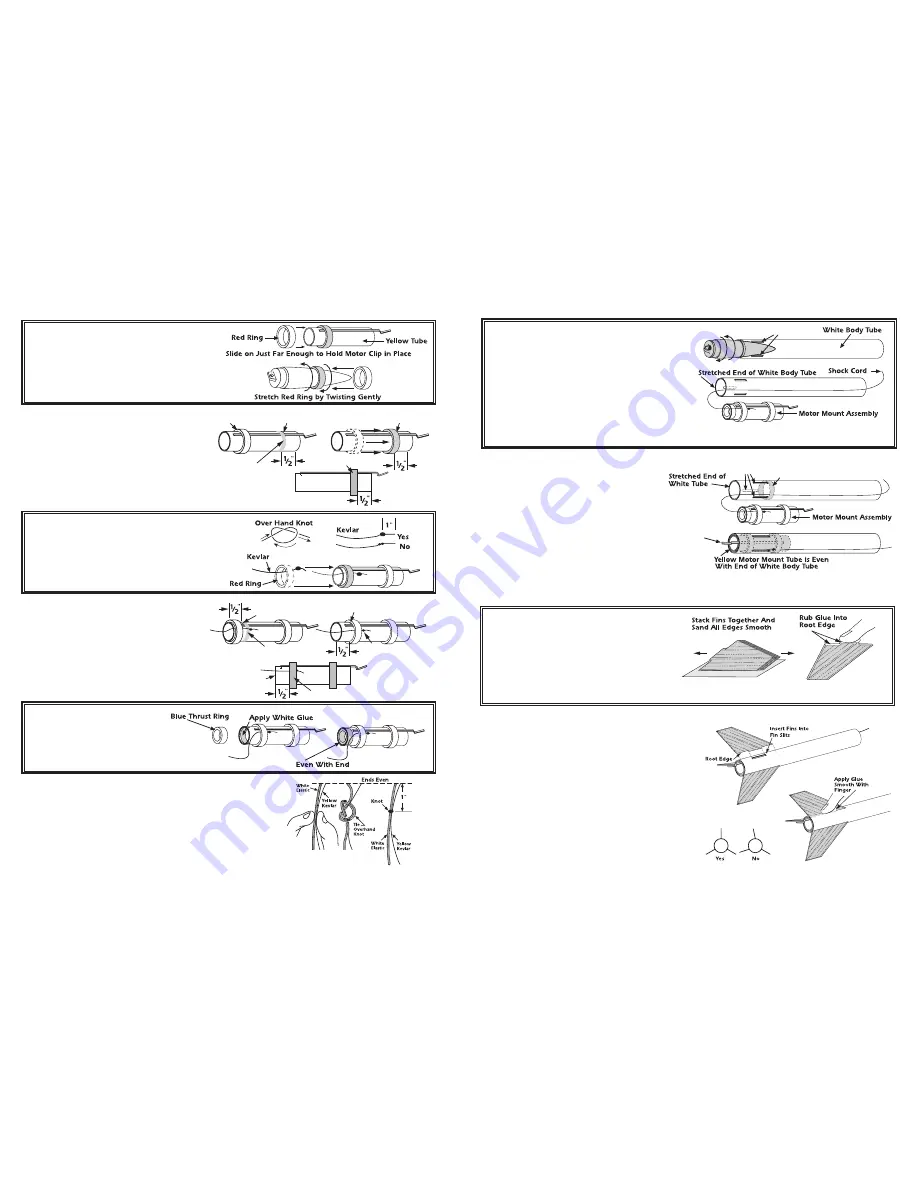
STEP 10
A.
Carefully remove each of the three die-cut balsa
fins from the sheet with a sharp hobby knife.
B.
Stack the fins together and sand all edges
smooth.
C.
Rub a small line of white glue into the root
edge of each fin and set aside to dry.
STEP 12
A.
Apply a small line of white glue along the root edge of a fin
and position it into one of the fin slits in the body tube. Adjust the
fin so that it projects straight away from the body tube as shown.
Allow the glue to set for a few minutes before attempting to glue
on the remaining fins. Repeat this step for the remaining two fins.
B.
After the glue is completely dry apply a small bead of white
glue to both sides of a fin-body tube joint. Smooth out the glue
with your finger. Wipe excess glue off your finger onto a tissue or
paper towel.
C.
Repeat the above step for the remaining fin-body tube joints.
Set aside to dry.
Pencil Mark
Slide Ring Into Glue Until
Pencil Mark i s Expos ed
Pull Knot in
Kevlar Tight
Again st Red Ring
Bea d of
W hite Glue
Yellow Tube
Red Ring
STEP 2
A.
Test fit one of the Red Centering Rings onto the
Yellow Motor Mount Tube. If it does not slide on
easily, stretch the Red Ring by sliding it over the
Nose Cone and gently twisting it back and forth a
few times. Slide the Red Ring onto the Yellow Tube
just far enough to hold the Motor Clip in place.
STEP 6
A.
Apply white glue around inside edge of Yellow
Motor Mount Tube as shown,
B.
Insert the Blue Thrust Ring into the Yellow Motor
Mount Tube so it is even with the end of the Yellow
Motor Mount Tube.
STEP 3
A.
Apply a bead of white glue around the Yellow
Motor Mount Tube on the inside of the pencil mark
made in Step 1, one half inch from the end as shown.
B.
Slide the Red Ring into the bead of glue and up
to the pencil mark. The edge of the Red Ring must be
1/2” from end of the Yellow Motor Mount Tube. Wipe
away any excess glue.
STEP 4
A.
Tie two overhand knots 1 inch in from the end of
the Kevlar Cord.
B.
Pass the end of the Kevlar with the knot through
the remaining Red Centering Ring.
C.
Slide the Red Centering Ring with the Kevlar under
it onto the Yellow Motor Mount Tube.
STEP 5
A.
Apply a bead of white glue around the Yellow Motor
Mount Tube on the inside of the pencil mark made in
Step 1, one half inch from the end as shown.
B.
Slide the Red Ring into the bead of glue until the pencil
mark is exposed. If the Red Ring is tight, stretch it as in step 2
above. The edge of the Red Ring must be 1/2” from end of
the Yellow Motor Mount Tube. Wipe away any excess glue.
C.
Pull the Yellow Kevlar Shock Cord up tight against
the Red Centering Ring.
Red Ring
Pen cil Mark
Slide Ring Into Glue
And Up To Pen cil Mark
Bead of
Wh ite Glue
Yellow Tu be
Red Ring
STEP 7
A.
Hold the Yellow Kevlar Shock Cord and the White Elastic Shock Cord
side by side. Pull one end of each cord so that they are even with each
other. While holding the two cords together, tie a single parallel
overhand knot approximately one inch in from the even ends as shown.
B.
Gently pull on both cords to set the knot and prevent it from slipping.
C.
Apply a small amount of white glue on the ends of both cords to prevent them from fraying.
NOTE: THIS IS A VERY IMPORTANT STEP. IF YOU TIE A DIFFERENT TYPE OF KNOT THE SHOCK CORDS MAY SEPARATE DURING FLIGHT.
STEP 9
A
. Hold the Motor Mount Assembly and the Body
Tube in one hand.
B
. Apply White Glue around the inside of the Body
Tube just beyond the Fin Slits.
C.
Allign the Motor Mount Assembly so the Motor Clip
is centered between two of the Fin Slits.
D. Immediately insert the Motor Mount Assembly and
PUSH IT INTO THE BODY TUBE WITH ONE FAST &
SMOOTH MOTION until the Yellow Motor Mount Tube
is even with the end of the Body Tube.
STEP 8
A.
Stretch the end of the Body Tube that has the Fin Slits
in it slightly by inserting the nose cone into the tube and
gently twisting it back and forth a few times.
B.
Hold the Body Tube with the stretched end facing up
and “feed” the shock cord into the tube until the cord
comes out the other end.
C.
Grab the end of the shock cord and pull it all the way
through the tube until the Motor Mount assembly that is
attached to the other end pulls up against the tube.
Fin Slits
App ly Wh ite Glue Insi de of
Tube on Th is Si de of Fin Slits
Center Motor
Clip Betw een
Fin Slits
Fin Slits


