1-800-533-7533
Quest
DRY
70
Installation, Operation and Maintenance Instructions
7
www.QuestProtect.com
sales@QuestProtect.com
quest
quest
Quest
DRY
70
Installation, Operation and Maintenance Instructions
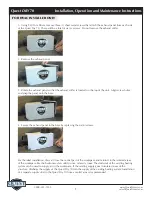
1. Using T-20 Torx Driver, remove three (3) sheet metal screws that attach the exhaust panel from each side
of the Quest Dry 70. There will be a total of six (6) screws. Do not remove the exhaust collar.
2. Remove the exhaust panel.
3. Rotate the exhaust panel so that the exhaust collar is located on the top of the unit. Align screw holes
and snap the panel onto the base.
4. Secure the exhaust panel to the base by replacing the six (6) screws.
For the ideal installation, draw air from the central part of the workspace and return it to the isolated areas
of the workspace like the bedrooms, den, utility room, or family room. The ductwork of the existing heating
system can be used to supply air to the workspace. If the existing supply goes to isolated areas of the
structure, discharge the supply of the Quest Dry 70 into the supply of the existing heating system. Installation
of a separate supply duct to the Quest Dry 70 from a central area is recommended.
FOR HVAC INSTALLER ONLY


