background image

19

GP2 SERIES GENIUS 1500/2000  - REV001B

EN

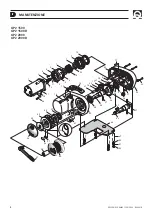
MAINTENANCE

WARNING:

 make sure the electrical power to the motor is 

switched off when working manually on the windlass. Careful-
ly remove the chain from the gypsy.

Quick

®

 windlasses are manufactured with materials resistant to ma-

rine environments. In any case, any salt deposits on the outside must 
be removed periodically to avoid corrosion and damage to the equip-
ment. The parts where salt may have built up should be washed 
thoroughly with fresh water.

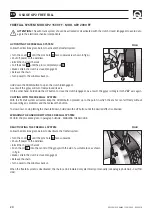
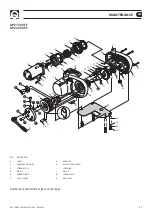
Once a year, the drum and the gypsy are to be taken apart as follows:

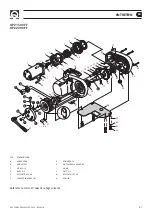
VERSION WITH FREEFALL SYSTEM 

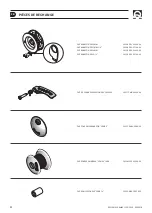
Use the handle (37) to unscrew the gypsy cover (

F

); loosen screw 

(

H

) and take off the gypsy cover. Loosen the screws (33) of the chain 

stripper (32) and remove it; remove the gypsy (35).

NO-DRUM VERSION

Use the handle (37) to remove the gypsy cover (36); remove the top 
clutch cone (34); loosen the fixing screws (33) of the chain stripper 
(32) and remove it and pull off the gypsy (35). 

DRUM VERSION

Use the handle (37) to loosen the bush (49); pull off the drum (48) and 
the top clutch cone (34); loosen the fixing screws (33) of the rope/
chain stripper (32) and remove it. Pull off the gypsy (35). 

Clean all the parts removed to avoid corrosion, and grease the shaft 
thread (28, 46 or 

A

) and the gypsy (35) where the clutch cones rest 

(use grease suitable for marine environment) (34). 

Remove any oxide deposits from the terminals of the electric motor 
and the reversing contactor unit; grease them. 

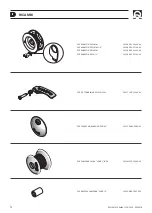
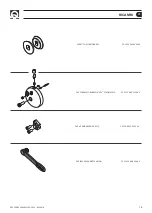
POS.

DENOMINAZIONE

1A

ELECTRIC MOTOR 800W 12V

1B

ELECTRIC MOTOR 800W 24V

1C

ELECTRIC MOTOR 500W 12V

2

SUN GEAR

3

PLUG

4

FIXED GEAR

5

SCREW

6

RING Ø 80

7

FIFTH WHEEL

8

PLANT GEAR

9

MOVABLE GEAR

10

BEARING

11

CIRCLIP

12

KEY

13

SCREW

14

PRESSURE LEVER

15

SPRING FOR PRESSURE LEVER

16

SCREW FOR  PRESSURE LEVER

17

PLUG

18

WASHER

19

IDLER GEAR

20

BEARING

21

PLUG

22

SCREW

23

WINDLASS BASE

24

BEARING

25

CIRCLIP

26

OUTPUT GEAR

27

PLUG

28

SHORT SHAFT

29

OIL SEAL

30

WINDLASS COVER

31

ASSEMBLED SENSOR

32

ROPE/CHAIN STRIPPER

33

SCREW

34

WINDLASS CLUTCH

35A

GYPSY “GP2” 

35B

GYPSY “GP2” 7 MM - 1/4”

35C

GYPSY “GP2” 8 MM

35D

GYPSY “GP2” 5/16”

36

GYPSY COVER

37

WINDLASS LEVER - NYLON

38

GASKET/JIG

39

STUD

40

WASHER

41

SPRING WASHER

42

NUT

43

CABLE

44

SCREW

45

GASKET WATERTIGHT

46

GASKET WATERTIGHT

47

KEY

48

DRUM

49

BUSH

50

PLUG

51

GROWER

52

PLUG

53

CABLE OUTLET

Summary of Contents for GP2 1500

Page 1: ...h HORIZONTAL ANKERWINDEN Manual de instalaci n y uso MOLINETES HORIZONTALES GP2 GENIUS SERIES 1500 2000 GP2 1500 GP2 1500 D GP2 1500 F GP2 2000 GP2 2000 D GP2 2000 F REV 001b High Quality Nautical Equ...

Page 2: ......

Page 3: ...Spare parts Pag 24 Caract ristiques techniques Pag 25 Installation Pag 26 Schema de cablage Pag 27 Utilisation Avvertissements importants Pag 28 29 Entretien GP2 Pag 30 Utilisation GP2 Free Fall Pag...

Page 4: ...il testo tradotto e quello originario in italiano fare riferimento al testo italiano o inglese F MODELLO GP2 1500 D GP2 1500 FF GP2 2000 D GP2 2000 FF POTENZA MOTORE 500W 800W Tensione motore 12V 12V...

Page 5: ...erruttore di pro tezione del motore e bloccare la catena ad un punto fisso dell imbarcazione LA CONFEZIONE CONTIENE salpa ancora cassetta teleinvertitori guarnizione della base dima di foratura leva v...

Page 6: ...6415 24 24V C A2 PULSANTI A PIEDE MOD 900U E 900D NERO MARRONE BLU MARRONE NERO BLU A1 FUSIBILE 4A 12V 2A 24V SISTEMA BASE CON ACCESSORI QUICK CONSIGLIATI PER IL FUNZIONAMENTO DEL SALPA ANCORA L L1 L2...

Page 7: ...ruttore magneto idraulico o magnetotermico sia scattato attendere qualche secondo e riprovare evitare una pressione continuata del pulsante Se l interruttore magneto idrau lico o magnetotermico scatta...

Page 8: ...IT MANUTENZIONE 3 22 17 50 45 23 17 53 24 25 24 30 15 46 47 3 26 28 21 18 20 19 27 18 27 27 10 9 7 8 7 1 43 12 11 3 5 6 5 4 3 2 52 13 51 38 39 40 41 42 14 48 44 32 31 35 34 34 49 36 51 33 29 16 37 GP...

Page 9: ...ola 49 estrarre la campana 48 ed il cono frizione superiore 34 svitare le viti di fissaggio 33 dello stacca catena 32 e rimuoverlo estrarre il barbotin 35 Pulire ogni parte smontata affinch non si ver...

Page 10: ...ione ed il barbotin torna solidale all asse A PER CALARE CON SISTEMA AUTOMATICO DI CADUTA LIBERA Con il sistema automatico attivato mantenere premuto il pulsante DOWN del comando a vostra disposizione...

Page 11: ...5 4 2 A 27 52 13 51 38 39 40 41 42 30 16 14 31 15 34 35 37 51 33 M D N C B E H 29 F I L G 32 GP2 1500 FF GP2 2000 FF Riferimento numeri alle pagine 8 9 POS DENOMINAZIONE A ALBERO B GUIDA PERNO C VITE...

Page 12: ...OTIN GP2 7MM 1 4 FVSSBGP20714A00 OSP BARBOTIN GP2 6MM FVSSBGP20006A00 OSP BARBOTIN GP2 5 16 FVSSBGP20516A00 OSP KIT TENDICIMA GP2 1500 2000 FVSSTCGP2200A00 OSP COPERCHIO BARBOTIN SERIE 2 FVSSCPBBASG0A...

Page 13: ...IUS 1500 2000 REV001B IT RICAMBI OSP LEVA SALPA DRITTA NYLON FVSSLVSDN000A00 OSP KIT CONI FRIZIONE GP2 FVSSCFG00000A00 OSP COPERCHIO BARBOTIN GP2 FF COMPLETO FVSSCPBBGFF0A00 OSP KIT GUIDA PERNO GP2 FF...

Page 14: ...ion and the original text in the Italian language reference will be made to the Italian or English text F MODELS GP2 1500 D GP2 1500 FF GP2 2000 D GP2 2000 FF MOTOR OUTPUT 500W 800W Motor supply volta...

Page 15: ...k the chain securing it to a fixed point of the boat THE PACKAGE CONTAINS windlass reversing contactor unit base gasket drill template handle bolts and screws for assembly user s manual conditions of...

Page 16: ...6415 12 12V MOD T6415 24 24V C A2 FOOT SWITCHES MOD 900U AND 900D BLACK BROWN BLUE BROWN BLACK BLUE A1 FUSE 4A 12V 2A 24V BASIC SYSTEM WITH RECOMMENDED QUICK ACCESSORIES FOR WINDLASS OPERATION L L1 L2...

Page 17: ...ded If the windlass stops and the hydraulic magnetic switch or thermal cutout has not tripped wait a few seconds and try again avoid keeping the button pressed If the hydraulic magnetic switch has tri...

Page 18: ...B EN MAINTENANCE 3 22 17 50 45 23 17 53 24 25 24 30 15 46 47 3 26 28 21 18 20 19 27 18 27 27 10 9 7 8 7 1 43 12 11 3 5 6 5 4 3 2 52 13 51 38 39 40 41 42 14 48 44 32 31 35 34 34 49 36 51 33 29 16 37 GP...

Page 19: ...lutch cone 34 loosen the fixing screws 33 of the rope chain stripper 32 and remove it Pull off the gypsy 35 Clean all the parts removed to avoid corrosion and grease the shaft thread 28 46 or A and th...

Page 20: ...t the gypsy is integral to the A axis again CASTING WITH THE FREEFALL SYSTEM With the freefall system activated keep the DOWN button pressed up to the point in which the anchor can fall freely without...

Page 21: ...18 20 19 27 18 10 9 7 8 7 53 1 43 12 11 3 5 6 5 4 2 A 27 52 13 51 38 39 40 41 42 30 16 14 31 15 34 35 37 51 33 M D N C B E H 29 F I L G 32 GP2 1500 FF GP2 2000 FF POS DESCRIPTION A SHAFT B WINDLASS PI...

Page 22: ...GYPSY GP2 7MM 1 4 FVSSBGP20714A00 OSP GYPSY GP2 6MM FVSSBGP20006A00 OSP GYPSY GP2 5 16 FVSSBGP20516A00 OSP KIT GP2 500 1200 PRESSURE LEVER FVSSTCGP2200A00 OSP GYPSY COVER SERIES 2 FVSSCPBBASG0A00 OSP...

Page 23: ...2000 REV001B EN SPARE PARTS OSP STRAIGHT WINDLASS LEVER NYLON FVSSLVSDN000A00 OSP KIT GP2 WINDLASS CLUTCH CONE FVSSCFG00000A00 OSP COMPLET FF GP2 GYPSY COVER FVSSCPBBGFF0A00 OSP KIT GP2 FF WINDLASS P...

Page 24: ...ces ou d erreurs ventuelles entre la traduction et le texte original en italien se r f rer au texte italien ou anglais F MODELE GP2 1500 D GP2 1500 FF GP2 2000 D GP2 2000 FF PUISSANCE DU MOTEUR 500W 8...

Page 25: ...et bloquer la cha ne un point fixe du bateau L EMBALLAGE COMPREND guindeau bo tier relais inverseur joint de la base gabarit de per age levier diff rentes vis pour l assemblage livret d instructions c...

Page 26: ...415 24 24V C A2 BOUTONS PIED MOD 900U ET 900D NOIR MARRON BLEU MARRON NOIR BLEU A1 FUSIBLE 4A 12V 2A 24V SYSTEME DE BASE AVEC ACCESSORIES QUICK RECOMMANDES POUR ACTIONNER LE GUINDEAU L L1 L2 L3 L4 L5...

Page 27: ...to thermique se soit d clench attendre quelques secondes et r essayer viter de presser le bouton en continu Si le disjoncteur magn to ther mique s est d clench r activer le disjoncteur et attendre que...

Page 28: ...1B FR ENTRETIEN 3 22 17 50 45 23 17 53 24 25 24 30 15 46 47 3 26 28 21 18 20 19 27 18 27 27 10 9 7 8 7 1 43 12 11 3 5 6 5 4 3 2 52 13 51 38 39 40 41 42 14 48 44 32 31 35 34 34 49 36 51 33 29 16 37 GP2...

Page 29: ...de l embrayage sup rieur 34 desserrer les vis de fixation 33 du dispositif qui lib re la cha ne 32 et le retirer enlever le barbotin 35 Nettoyer chaque pi ce qui a t d mont e afin d viter tout effet d...

Page 30: ...le barbotin tourne de mani re soli daire l axe A POUR JETER L ANCRE AVEC MECANISME AUTOMATIQUE A CHUTE LIBRE Avec le m canisme automatique enclench maintenir la touche DOWN de la commande votre dispo...

Page 31: ...27 18 10 9 7 8 7 53 1 43 12 11 3 5 6 5 4 2 A 27 52 13 51 38 39 40 41 42 30 16 14 31 15 34 35 37 51 33 M D N C B E H 29 F I L G 32 GP2 1500 FF GP2 2000 FF POS DENOMINATION A ARBRE S RIE B GUIDE PIVOT C...

Page 32: ...BOTIN GP2 7MM 1 4 FVSSBGP20714A00 OSP BARBOTIN GP2 6MM FVSSBGP20006A00 OSP BARBOTIN GP2 5 16 FVSSBGP20516A00 OSP KIT LEVIER DE PRESSION GP2 500 1200 FVSSTCMG0000A00 OSP COUVERCLE BARBOTIN S RIE 2 FVSS...

Page 33: ...500 2000 REV001B FR PI CES DE RECHANGE OSP LEVIER DROIT EN NYLON FVSSLVSDN000A00 OSP KIT C NE DE FRICTION GP2 FVSSCFG00000A00 OSP COUVERCLE BARBOTIN GP2 FF COMPLET FVSSCPBBGFF0A00 OSP KIT GUIDE PIVOT...

Page 34: ...en Unstimmigkeiten zwischen der bersetzung und dem Ausgangstext ist der Ausgangstext in Italienisch oder Englisch ma geblich F MOTORLEISTUNG GP2 1500 D GP2 1500 FF GP2 2000 D GP2 2000 FF Spannung Moto...

Page 35: ...rauch ist DIE PACKUNG ENTH LT Ankerwinde Umpolrelaisbox Basisdichtung Bohrschablone Hebel Schrauben f r den Zusam menbau Betriebsanleitung Garantiebedinungen NOTWENDIGE WERKZEUGE F R DIE INSTALLATION...

Page 36: ...CHALTER MOD 900U UND 900D SCHWARZ BROWN BLAU BROWN SCHWARZ BLAU A1 SICHERUNG 4A 12V 2A 24V BASISSYSTEM MIT EMPFOHLENE QUICK ZUBEH RTEILE F R DIE BET TIGUNG DER ANKERWINDE L L1 L2 L3 L4 L5 L3 L2 L1 L4...

Page 37: ...t oder thermomagnetische Schalter ausgel st wurde einige Sekunden warten und nochmals probieren die Taste sollte nicht lange gedr ckt werden Falls der Schutzautomat ausgel st wurde den Schalter r ckst...

Page 38: ...01B DE WARTUNG 3 22 17 50 45 23 17 53 24 25 24 30 15 46 47 3 26 28 21 18 20 19 27 18 27 27 10 9 7 8 7 1 43 12 11 3 5 6 5 4 3 2 52 13 51 38 39 40 41 42 14 48 44 32 31 35 34 34 49 36 51 33 29 16 37 GP2...

Page 39: ...4 herausnehmen Die Befestigungs schrauben 33 der Kettenabweiser 32 l sen und entfernen Das Kettennuss 35 ausbauen Alle ausgebauten Teile kontrollieren um eventuelle Korro sion festzustellen Das Gewind...

Page 40: ...ieder hergestellt ZUM HERABLASSEN MIT AUTOMATISCHEM FREIFALLSYSTEM Die Taste DOWN der Ihnen zu Verf gung stehenden Bedieneinheit bei eingeschaltetem automatischen System dr cken und so lange gedr ckt...

Page 41: ...1 18 20 19 27 18 10 9 7 8 7 53 1 43 12 11 3 5 6 5 4 2 A 27 52 13 51 38 39 40 41 42 30 16 14 31 15 34 35 37 51 33 M D N C B E H 29 F I L G 32 GP2 1500 FF GP2 2000 FF POS BEZEICHNUNG A WELLE B F HRUNG B...

Page 42: ...TTENNUSS GP2 7MM 1 4 FVSSBGP20714A00 OSP KETTENNUSS GP2 6MM FVSSBGP20006A00 OSP KETTENNUSS GP2 5 16 FVSSBGP20516A00 OSP KIT CONTROLL HEBEL GP2 500 1200 FVSSTCMG0000A00 OSP KETTENNUSSDECKEL SERIE 2 FVS...

Page 43: ...500 2000 REV001B DE ERSATZTEILE OSP ANKERWINDENHEBEL GERADE NYLON FVSSLVSDN000A00 OSP KIT KUPPLUNGSKEGEL GP2 FVSSCFG00000A00 OSP KETTENNUSSDECKEL GP2 FF KOMPLET FVSSCPBBGFF0A00 OSP KIT F HRUNG BOLZEN...

Page 44: ...entuales errores entre el texto traducido y el texto original en italiano remitirse al texto en italiano o en ingl s F MOD LO GP2 1500 D GP2 1500 FF GP2 2000 D GP2 2000 FF POTENCIA MOTOR 500W 800W Ten...

Page 45: ...otecci n del motor y bloquear la cadena en un punto fijo de la embarcaci n LA REFERENCIA CONTIENE molinete caja teleinvertidores guarnici n de la base plantilla palanca tornillos para el ensamblaje ma...

Page 46: ...4V C A2 MANDOS DE PIE MOD 900U Y 900D NEGRO MARR N AZUL MARR N NEGRO AZUL A1 FUSIBLE 4A 12V 2A 24V SISTEMA BASE CON ACCESSORIOS QUICK ACONSEJADOS PARA EL ACCIONAMIENTO DEL MOLINETE L L1 L2 L3 L4 L5 L3...

Page 47: ...co o magnetot rmico haya saltado esperar algunos segundos y volver a probar evitar presionar continuamente el pulsador Si el interruptor magnetot r mico ha saltado volver a activar el interruptor y es...

Page 48: ...ES MANTENIMIENTO 3 22 17 50 45 23 17 53 24 25 24 30 15 46 47 3 26 28 21 18 20 19 27 18 27 27 10 9 7 8 7 1 43 12 11 3 5 6 5 4 3 2 52 13 51 38 39 40 41 42 14 48 44 32 31 35 34 34 49 36 51 33 29 16 37 G...

Page 49: ...alanca 37 desatornillar la br jula 49 extraer la campana 48 y el cono embrague superior 34 desatornillar los tornillos de fijaci n 33 del dispositivo de desenganche de la cadena 32 y qui tarlo extraer...

Page 50: ...del embrague y el barboten regresa al eje A PARA BAJAR CON SISTEMA AUTOM TICO DE CA DA LIBRE Con el sistema autom tico activado mantener presionado el pulsador DOWN del mando a su disposici n hasta e...

Page 51: ...20 19 27 18 10 9 7 8 7 53 1 43 12 11 3 5 6 5 4 2 A 27 52 13 51 38 39 40 41 42 30 16 14 31 15 34 35 37 51 33 M D N C B E H 29 F I L G 32 GP2 1500 FF GP2 2000 FF POS DENOMINACI N A EJE B GU A PERNO C T...

Page 52: ...ARBOTEN GP2 7MM 1 4 FVSSBGP20714A00 OSP BARBOTEN GP2 6MM FVSSBGP20006A00 OSP BARBOTEN GP2 5 16 FVSSBGP20516A00 OSP KIT PESTA A GP2 500 1200 FVSSTCMG0000A00 OSP TAPA BARBOTEN SERIE 2 FVSSCPBBASG0A00 OS...

Page 53: ...1500 2000 REV001B ES REPUESTOS OSP PALANCA LEVAR ANCLA RECTA NYLON FVSSLVSDN000A00 OSP KIT CONO FRICCI N NE GP2 FVSSCFG00000A00 OSP TAPA BARBOTEN GP2 FF COMPLETO FVSSCPBBGFF0A00 OSP KIT GU A PERNO GP...

Page 54: ...24 Piangipane RA ITALY Tel 39 0544 415061 Fax 39 0544 415047 www quickitaly com Codice e numero seriale del prodotto Product code and serial number Code et num ro de s rie du produit Code und Seriennu...

Reviews: