background image

10

ENGLISH

Argon

2

 Rev.1.0

1.0 General safety notes and driving limits

The engineering and construction of this wheelchair has 

been designed to provide maximum safety. International 

safety standards currently in force have either been 

fulfilled or exceeded in parts. Nevertheless, users may 

put themselves at risk by improperly using their 

wheelchairs. For your own safety, the following rules 

must be strictly observed.

Unprofessional or erroneous changes or adjustments 

increase the risk of accident. As a wheelchair user, you 

are also part of the daily traffic on streets and pavements, 

just like anyone else. We would like to remind you that 

you are therefore also subject to any and all traffic laws.

Be careful during your first ride in this wheelchair. Get to 

know your wheelchair.

Before each use, the following should be checked:
• Quick-release axles on the rear wheels

• Velcro on seats and backrests

• Tyres, tyre pressure and wheel locks.
Before changing any of the adjustments of this 

wheelchair, it is important to read the corresponding 

section of the user’s manual.

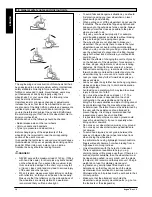
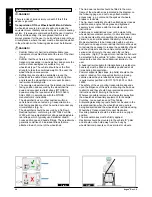
It is possible that potholes or uneven ground could cause 

this wheelchair to tip over, especially when riding uphill or 

downhill. When riding over a step or up an incline 

frontally, the body should be leaning forward.

DANGER!

NEVER exceed the maximum load of 140 kg, (100kg 

• 

with hand bike axle), for driver plus any items carried 

on the wheelchair. If you exceed the maximum load, 

this can lead to damage to the chair, or you may fall 

or tip over, lose control and may lead to serious injury 

of the user and other people.

When it is dark, please wear light clothing or clothing 

• 

with reflectors, so that you can be seen more easily. 

Make sure that the reflectors on the side and back of 

the wheelchair are clearly visible. We would also 

recommend that you fit an active light..

To avoid falls and dangerous situations, you should 

• 

first practice using your new wheelchair on level 

ground with good visibility.

When getting on or off the wheelchair, do not use the 

• 

footboards. These should be flipped up beforehand 

and swung to the outside as far as possible. Always 

position yourself as close as possible to the place 

where you wish to sit.

Only use your wheelchair properly. For example, 

• 

avoid travelling against an obstacle without braking 

(step, kerb edge) or dropping down gaps.

The wheel locks are not intended to brake your 

• 

wheelchair. They are only there to ensure that your 

wheelchair does not begin rolling unintentionally. 

When you stop on uneven ground, you should always 

use the wheel locks to prevent such rolling. Always 

apply both wheel locks; otherwise, your wheelchair 

could tip over.

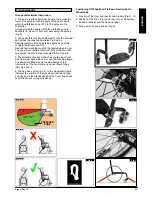
Explore the effects of changing the centre of gravity 

• 

on the behaviour of the wheelchair, for example on 

inclines, slopes, all gradients, or when overcoming 

obstacles. Do this with the secure aid of a helper.

With extreme settings (e.g. rear wheels in the most 

• 

forward position) and less than perfect posture, the 

wheelchair may tip over even on a level surface.

Lean your upper body further forward when going up 

• 

slopes and steps.

Lean your upper body further back when going down 

• 

slopes and steps. Never try to climb and descend a 

slope diagonally.

Avoid using an escalator which may lead to serious 

• 

injury in the event of a fall.

Do not use the wheelchair on slopes > 10°. The 

• 

Dynamic safe slope is dependant on the chair 

configuration, the users abilities and the style of 

riding. As the users abilities and style of riding cannot 

be pre-determined then the max safe slope cannot 

be determined. Therefore this must be determined by 

the user with the assistance of an attendant to 

prevent tipping. It is strongly recommended that 

inexperienced users have Ant-tips fitted.

It is possible that potholes or uneven ground could 

• 

cause this wheelchair to tip over, especially when 

riding uphill or downhill.

Do not use your wheelchair on muddy or icy ground. 

• 

Do not use your wheelchair where pedestrians are 

not allowed.

To avoid hand injuries do not grab in between the 

• 

spokes or between the rear wheel and wheel lock 

when driving the wheelchair.

In particular when using lightweight metal handrims, 

• 

fingers will easily become hot when braking from a 

high speed or on long inclines.

Only attempt stairs with the help of an attendant. 

• 

There is equipment available to help you, e.g. 

climbing ramps or lifts, please use them. If there is no 

such equipment available, then the wheelchair must 

be tipped and pushed, never carried, over the steps 

(2 helpers). We recommend that users over 100 kg in 

weight do not use this stairway manoeuvre!

In general, any anti-tip tubes fitted must be set 

• 

beforehand, so that they cannot touch the steps, 

as otherwise this could lead to a serious tumble. 

Afterwards the anti-tip tubes must be set back to their 

correct position.

Make sure that the attendant only holds the 

• 

wheelchair using securely mounted parts (e.g. not on 

the footrests or the sideguards).

Summary of Contents for Argon2

Page 1: ...Argon2 DIRECTIONS FOR USE NOTICE D UTILISATION GEBRUIKERSHANDLEIDING WHEELCHAIR FAUTEUIL ROULANT ROLSTOEL 000690386 01...

Page 2: ...passant par la recherche et le d veloppement Ce produit est conforme aux directives de la Communaut europ enne Les options ou accessoires illustr s sont disponibles moyennant un co t suppl mentaire F...

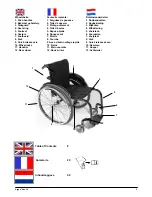
Page 3: ...e 2 Toile de dossier 3 Prot ge v tement 4 Toile d assise 5 Repose pieds 6 Roues avant 7 Palette 8 Fourche 9 Axe d verrouillage rapide 10 Freins 11 Main courante 12 Roue arri re Rolstoelonderdelen 1 D...

Page 4: ...0 760 560 1120 690 MAX mm MIN mm 520 440 500 300 365 230 567 540 10 0 10 0 15 0 15 31 100 92 500 220 450 250 500 300 10 0 6 9 MAX kg MIN kg 140 15 0 9 0 10 0 710 510 MAX MIN MAX MIN 325 275 11 100 2 1...

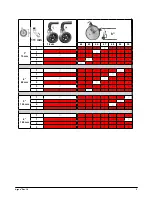
Page 5: ...5 Argon2 Rev 1 0 44 45 46 47 48 49 50 3 75 mm 1 1 2 2 3 4 98 mm 1 1 2 2 3 3 5 124 mm 1 1 2 3 6 140 mm 1 1 2 3 3 2 1 111 mm h 1 0 cm...

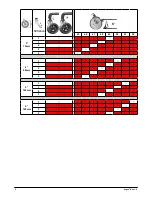
Page 6: ...6 Argon2 Rev 1 0 45 46 47 48 49 50 51 52 3 75mm 1 1 2 2 3 4 98mm 1 1 2 3 3 5 124mm 1 1 2 3 6 140mm 1 1 2 3 3 2 1 h 123 mm...

Page 7: ...9 A2 48 A3 A4 47 A4 45 A5 A6 44 A6 A7 43 24 540 6 9 A7 0 3 42 A8 41 A9 40 B2 39 B3 37 B4 36 B5 50 A2 49 A3 48 A4 47 A5 45 A6 A7 44 6 9 A7 0 3 43 25 559 A8 42 A9 A8 41 B2 39 B3 38 B4 37 B5 52 A2 A4 50...

Page 8: ...el However all instructions are completely relevant regardless of possible detail differences The manufacturer reserves the right to alter without notice any weights measurements or other technical da...

Page 9: ...ety of your wheelchair In case there is no authorised dealer in your area or you have any questions contact Sunrise Medical either in writing or by telephone Use Wheelchairs are exclusively for a user...

Page 10: ...ot intended to brake your wheelchair They are only there to ensure that your wheelchair does not begin rolling unintentionally When you stop on uneven ground you should always use the wheel locks to p...

Page 11: ...you must use anti tip tubes Before setting off check that your tyre pressure is correct For rear wheels it should be at least 3 5 bar 350 kPa The max pressure is indicated on the tyre The knee lever...

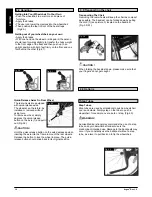
Page 12: ...to the backposts may occur if you constantly use the backpost without a step tube as a lever to pull back on to tip the wheelchair Fig 2 2 1 Transporting The Chair Removing the rear wheels will keep...

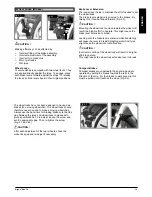
Page 13: ...hten the screw Fig 4 1 and 4 2 CAUTION After each adjustment of the rear wheels check the wheel lock gap and re adjust if necessary Brake Lever Extension The longer lever helps to minimise the effort...

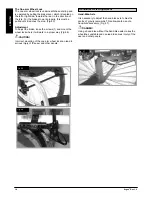
Page 14: ...ake loose the screws 1 and mount the wheel lock where it will work in a proper way Fig 4 6 CAUTION Incorrect mounting of the one arm wheel lock can lead to serious injury of the user and other people...

Page 15: ...to transfer to from the chair Fig 4 11 Footrest Plastic Footplates The footplates can be flipped up to make it easier to transfer to from the chair Fig 4 15 Fig 4 11 1 Fig 4 12 1 Fig 4 13 2 2 5cm 15...

Page 16: ...e castor angle has not been adjusted properly Castor and or rear wheel air pressure is incorrect wheels do not turn smoothly The optimum adjustment of the castors is required for the wheelchair to run...

Page 17: ...armrests has to be created Fig 4 24 NOTE When adjusting the rear wheelbase adjust first one wheel then the other If both sides are loosened at the same time this will alter the toe in toe out adjustm...

Page 18: ...mpost into the receiver mounted to the wheelchair frame b The armrest will automatically lock into place 2 Height Adjustment a Rotate height release lever 2 to second stop b Slide armrest pad up or do...

Page 19: ...can now easily position the push handle as desired The nut on the tension lever determines how tightly the push handles are clamped into place If the nut is loose after adjusting the tension lever th...

Page 20: ...g anti tip tubes use a torque of 7 Nm 1 Slotting The Anti Tip Tubes Into The Clamp a Press the rear button on the anti tip tube on the anti tip tube adapter so that both release pins are drawn inwards...

Page 21: ...To reduce the belt length To increase the belt length Feed free belt back through male buckle and slide adjusters Ensure belt is not looped at male buckle Feed free belt through slide adjusters and ma...

Page 22: ...advertently re adjusting the belt to an excessive length Fig 4 44 5 0 Tyres and Mounting Solid rubber tyres are standard With pneumatic tyres always make sure that the tyres have the correct air press...

Page 23: ...If it is no longer required then follow the instructions to return it as given by the organisation that made the wheelchair available to you In the following section there is a description of the mate...

Page 24: ...e fitted to the main frame of the wheelchair as indicated in the diagram on the following page and not to any attachments or accessories e g not around the spokes of wheels brakes or footrests The tie...

Page 25: ...r torso restraint belt must fit over the shoulder and across the chest as illustrated Fig d and e Restraint belts must be adjusted as tightly as possible consistent with user comfort Restraint belt we...

Page 26: ...strated All weight dimensions and performance data are approximate and provided solely for guidance Sunrise Medical complies with the EU Medical Devices Directive 93 42 EEC All wheelchairs must be use...

Page 27: ...er NOTE This guarantee cannot be transferred 4 The guarantee also covers all repaired or replaced parts for the remaining period of the guarantee for the wheelchair 5 For spare parts which are fitted...

Page 28: ...chnical Data The Wheelchair Conforms To The Following Standards a Requirements and tests for static strength impact resistance and fatigue strength ISO 7176 8 Yes b Drive and control systems for power...

Page 29: ...tructions fournies dans le pr sent manuel sont valables pour votre mat riel malgr d ventuelles diff rences minimes Le fabricant se r serve le droit de modifier sans pr avis les poids mesures et autres...

Page 30: ...uteuil roulant S il n y a aucun revendeur pr s de chez vous ou si vous avez des questions contactez nous par courrier ou par t l phone l adresse suivante Utilisation Les fauteuils roulants sont exclus...

Page 31: ...e plus possible Placez vous toujours le plus pr s possible de l endroit o vous voulez vous asseoir Utilisez toujours votre fauteuil de mani re ad quate Evitez par exemple de franchir des obstacles san...

Page 32: ...l La pr sence d une charge suppl mentaire sac dos ou objets similaires sur les montants arri re du dossier peut avoir un impact sur la stabilit de votre fauteuil surtout si le dossier est inclin en ar...

Page 33: ...ra l utilisateur principal En l absence de levier arri re de basculement l utilisation r p t e du dossier et la force exerc e dessus pour incliner le fauteuil aura pour effet d endommager les montants...

Page 34: ...s roues arri re v rifiez toujours l intervalle avec les freins d immobilisation R ajustez si n cessaire Rallonge du levier de frein La rallonge vous permet de d ployer moins d efforts pour actionner l...

Page 35: ...nctionner de mani re optimale Fig 4 6 ATTENTION Le montage incorrect du frein unilat ral peut entra ner de graves blessures pour l utilisateur et toute autre personne Fig 4 5 Fig 4 6 Support d axe pou...

Page 36: ...nt du fauteuil Fig 4 11 Palette Composite Palettes Les repose pieds peuvent tre rabattus pour monter et descendre plus facilement du fauteuil Fig 4 15 Fig 4 11 1 Fig 4 12 1 Fig 4 13 2 2 5 cm 36 FRAN A...

Page 37: ...n est pas adapt La pression et la souplesse des roues arri re et des roues avant ne sont pas adapt es Les roues avant doivent tre r gl es de fa on optimale pour que le fauteuil roule de fa on rectili...

Page 38: ...il convient d augmenter l empattement arri re Fig 4 24 REMARQUE R glez une roue apr s l autre pour d finir l empattement arri re Le resserrage simultan des deux roues a pour effet de d r gler le pince...

Page 39: ...accoudoir s enclenche automatiquement 2 R glage de la hauteur a Pivotez le levier de d verrouillage de r glage de la hauteur 2 jusqu la deuxi me but e b Montez ou baissez l accoudoir la hauteur d sir...

Page 40: ...vous indiquera que vous pouvez mettre ais ment la poign e de pouss e dans la position souhait e L crou du levier de serrage d termine le serrage au niveau du support de la poign e de pouss e Apr s en...

Page 41: ...pour fixer les roulettes anti bascule 1 Insertion des roulettes anti bascule dans le collier a Appuyez sur le bouton situ l arri re de la roulette anti bascule sur l adaptateur de la roulette anti bas...

Page 42: ...afin de convenir aux besoins de l utilisateur comme ci apr s Pour r duire la longueur de la ceinture Pour augmenter la longueur de la ceinture Passez la ceinture par l attache male et le dispositif de...

Page 43: ...rise Medical recommande que la longueur et l ajustement de la ceinture soient v rifi s r guli rement afin de r duire les risques de r ajustement de la ceinture une longueur excessive caus s par inadve...

Page 44: ...n en avez plus usage veuillez le rendre l organisation qui vous l a fourni La section suivante d crit les diff rents mat riaux composant le fauteuil en vue de la mise au rebut ou du recyclage du faute...

Page 45: ...t comme indiqu dans le sch ma sur la page suivante et non pas tout points d attache ou accessoires ex pas autour des rayons des roues freins ou repose pied Le syst me de fixation doit tre attach le pl...

Page 46: ...ceinture thoracique doit passer par dessus l paule et en travers de la poitrine comme illustr aux Fig D et E Les ceintures de retenue doivent tre serr es le plus possible tout en respectant le confort...

Page 47: ...mance sont approximatives et fournies titre d information uniquement Les fauteuils de Sunrise Medical sont fabriqu s conform ment la directive 93 42 CEE relative aux dispositifs m dicaux Tous les faut...

Page 48: ...ut tre c d e 4 La garantie couvre galement toutes les pi ces r par es ou remplac es pour la p riode restante de la garantie du fauteuil 5 Toute pi ce d tach e install e apr s le d but de la garantie d...

Page 49: ...Le fauteuil est conforme aux normes suivantes a Exigences et m thodes d essai pour la r sistance statique la r sistance aux chocs et la r sistance la fatigue ISO 7176 8 Oui b Syst mes d alimentation e...

Page 50: ...n uw eigen model afwijken Alle instructies zijn echter belangrijk ongeacht de verschillen in detail De fabrikant houdt zich het recht voor zonder opgaaf gegevens met betrekking tot gewicht maten of an...

Page 51: ...of hebt u vragen neem dan schriftelijk of telefonisch contact op met Sunrise Medical Gebruik Rolstoelen zijn uitsluitend bedoeld voor gebruikers die niet of verminderd mobiel zijn De rolstoel is bedo...

Page 52: ...evoren omhoog worden geklapt en zo ver mogelijk naar buiten worden gedraaid Plaats uzelf altijd zo dicht mogelijk bij de plek waar u wilt gaan zitten Gebruik uw rolstoel alleen voor het daarvoor beste...

Page 53: ...ls u het zwaartepunt verandert bestaat het gevaar dat u omkantelt of omver rolt Als u extra belasting rugzak of gelijksoortige voorwerpen aan de buizen van de rugleuning hangt kan dit van invloed zijn...

Page 54: ...ruik van een trapdop Er kan schade ontstaan aan het rugframe wanneer u deze voortdurend gebruikt als hendel om de rolstoel naar achteren te trekken of zonder trapdop te kantelen Fig 2 2 1 De rolstoel...

Page 55: ...s de schroeven weer aan Fig 4 1 en 4 2 OPGELET Telkens wanneer u de achterwielen hebt bijgesteld moet u nagaan of de afstand tot de wielvergrendelingen in orde is Pas die indien nodig aan Verlenging v...

Page 56: ...n draait u de schroeven 1 los en monteert u de wielvergrendeling daar waar deze goed functioneert Fig 4 6 OPGELET Een onjuiste montage van de eenarmige wielvergrendeling kan leiden tot ernstig letsel...

Page 57: ...of uit de rolstoel te komen Fig 4 11 Voetsteun Plastic Voetenplaten De voetplaten kunnen worden opgeklapt om makkelijker in en uit uw rolstoel te komen Fig 4 15 Fig 4 11 1 Fig 4 12 1 Fig 4 13 2 2 5 c...

Page 58: ...is niet goed afgesteld De luchtdruk van het voorwiel en of van het achterwiel is niet goed de wielen draaien niet soepel genoeg Als de voorwielen niet goed afgesteld zijn zal de rolstoel niet in een r...

Page 59: ...eerst n wiel en daarna het tweede aan Als beide kanten tegelijkertijd worden losgedraaid wordt de aanpassing van de inspoor uitspoor veranderd Voor het aanpassen van de achterwielbasis bewegen de dele...

Page 60: ...het frame van de rolstoel is gemonteerd b De armleuning klemt automatisch vast 2 Aanpassing hoogte a Draai de ontgrendelingshendel 2 tot een tweede stop b Plaats het kussen van de armleuning naar wen...

Page 61: ...andvat nu makkelijk in de gewenste positie brengen De moer bepaalt hoe stevig de duwhandvatten op hun plaats gehouden worden Als de moer losgedraaid is zal ook het duwhandvat te los zitten Draai het d...

Page 62: ...zetmoment van 7 Nm 1 De anti tip wielen in de klem schuiven a Druk op de knop aan de achterkant van het anti tip wiel op de veiligheidswieladapter zodat beide ontsluitingspennen naar binnen worden get...

Page 63: ...gte van de gordel te verkleinen Om de lengte van de gordel te vergroten Haal vervolgens het niet gebruikte deel van de gordel door de gesp en geleiders Controleer of de gordel niet om de sluiting is g...

Page 64: ...44 5 0 Banden en montage Standaard wordt de rolstoel met massieve rubberbanden geleverd Wanneer de rolstoel is voorzien van luchtbanden controleer dan regelmatig of de banden op de juiste spanning zi...

Page 65: ...ren Hieronder staan de materialen omschreven zoals deze worden gebruikt in de rolstoel met betrekking tot de verwerking tot afval en recycling van de rolstoel en zijn verpakking Geldende specifieke we...

Page 66: ...s aangegeven in de tekening op de volgende pagina Ze mogen niet worden bevestigd aan accessoires wielen remmen voetsteunen en dergelijke De verankeringsbanden dienen in een hoek van 45 graden zo dicht...

Page 67: ...borst worden gedragen zoals op de afbeelding weergegeven Fig D en E De gordels moeten zo strak mogelijk worden gebruikt maar moeten altijd comfortabel zijn voor de gebruiker Veiligheidsnetten mogen ni...

Page 68: ...betreffende prestaties zijn bij benadering en dienen slechts als richtlijn Sunrise Medical voldoet aan de Europese Richtlijn betreffende Medische hulpmiddelen 93 42 EEC Alle handbikes moeten worden ge...

Page 69: ...et worden overgedragen 4 Deze garantie dekt eveneens alle gerepareerde of vervangen onderdelen voor de resterende garantieperiode van de rolstoel 5 Wij geven een extra 24 maanden garantie voor reserve...

Page 70: ...voldoet aan de volgende vereisten a Vereisten en tests voor statische kracht botsweerstand en vermoeiingsweerstand ISO 7176 8 Ja b Besturings en controlesystemen voor elektrische rolstoelen vereisten...

Page 71: ......
Page 72: ...3 570060 www SunriseMedical com Sunrise Medical A G L ckhalde 14 3074 Muri bei Bern Switzerland Tel 41 0 31 958 3838 Fax 41 0 31 958 3848 www SunriseMedical ch Sunrise Medical AS Dynamitveien 14B 1400...

Reviews: