Page 35 of 69
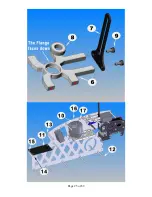
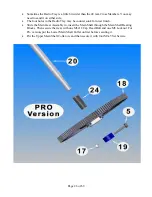
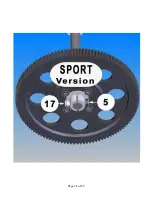
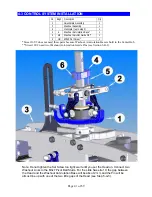
3-3 TAIL ROTOR INSTALLATION
No.
Bag#
Description Qty
No.
Bag#
Description Qty
1
3
Dual Bearing Tail Rotor
1
10 3
Vertical Fin Mount B**
1
2
HB
M3x20 Cap Head Bolt
2
11
Tail Rotor Subassembly
1
3 3
Tail
Blade
2
12
3 Horizontal
Fin
1
4 3
Tail Blade Spacer
4
13
3 Vertical
Fin**
1
5
HB
M2x8 Phillips Screw
2
14 HB
M3 Locknut**
4
6 HB
Shim
Ball
2
15
3
Horizontal Fin Mount
1
7
HB
M3x10 Cap Head Bolt*
2
16
HB
M3x30 Cap Head Bolt**
2
8
HB
M3x5 Set Screw
1
18*****
3 Electric
Tape
1
9 3
Vertical Fin Mount A**
1
Carbon Fin Set is also available for option.
*Little Sweetie 10 uses two M3x16 Cap Head Bolts.
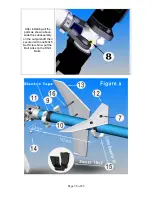
Wrap the electric tape around the boom couple rounds before you install the fins.
**Sometimes for the Vertical Fin Set, you may have one piece of Vertical Fin Mount and
one Vertical Fin molded with other mount. It works same as the other but the way you
install is a little bit different (see figure b). The Cap Head Bolt for this version should be
M3x16; the Locknuts are not needed.
Summary of Contents for Little Sweetie 10 Pro
Page 1: ...Page 1 of 69...
Page 7: ...Page 7 of 69 REQUIRED TOOLS Dremel Tools and Sandpapers would be helpful for building...
Page 13: ...Page 13 of 69 ASSEMBLY SECTION 1 REAR FRAMES Bag 1...
Page 17: ...Page 17 of 69 SECTION 2 MAIN FRAMES Bag 2...
Page 25: ...Page 25 of 69...
Page 27: ...Page 27 of 69...
Page 28: ...Page 28 of 69...
Page 37: ...Page 37 of 69...
Page 42: ...SECTION 5 A ROTOR HEAD for Little Quickie 10 Bag 5 Page 42 of 69...
Page 44: ...Page 44 of 69...
Page 53: ...Page 53 of 69...
Page 54: ...Page 54 of 69...
Page 55: ...Page 55 of 69...


