Page 41 of 69
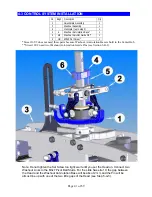
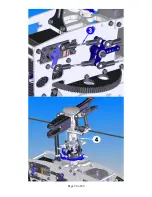
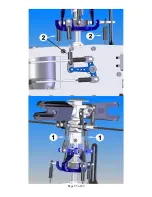
4-3 CONTROL SYSTEM INSTALLATION
*Sweet 16V2 does not need these parts because Washout Anti-rotation Base is built in the Center Hub.
No. Bag# Description
Qty
1 Swashplate Assembly
1
2 Washout
Assembly
1
3
Helicopter (up to step 3)
1
4
4
Washout Anti-rotation Base*
1
5
4/5
Washout Anti-Rot Guide Pin**
1
6 HB
M3x5 Set Screw*
1
**Sweet 16V2 need two Washout Anti-rotation Guide Pins (see Section 5-B-2).
Note: Do not tighten the Set Screw too tight; wait until you put the Head on. Connect two
Washout Links to the M3x7 Pivot Ball Studs. For the Little Sweetie 10, the gap between
the Head and the Washout Anti-rotation Base will be about 2 mm and the Pin will be
almost line up with one of the two little gaps of the Head (see Step 5-A-3).
Summary of Contents for Little Sweetie 10 Pro
Page 1: ...Page 1 of 69...
Page 7: ...Page 7 of 69 REQUIRED TOOLS Dremel Tools and Sandpapers would be helpful for building...
Page 13: ...Page 13 of 69 ASSEMBLY SECTION 1 REAR FRAMES Bag 1...
Page 17: ...Page 17 of 69 SECTION 2 MAIN FRAMES Bag 2...
Page 25: ...Page 25 of 69...
Page 27: ...Page 27 of 69...
Page 28: ...Page 28 of 69...
Page 37: ...Page 37 of 69...
Page 42: ...SECTION 5 A ROTOR HEAD for Little Quickie 10 Bag 5 Page 42 of 69...
Page 44: ...Page 44 of 69...
Page 53: ...Page 53 of 69...
Page 54: ...Page 54 of 69...
Page 55: ...Page 55 of 69...


