©2020 QNC, Inc. 0720 GF5 OM
26
7.
Remove the
Drip Tray
by pushing it fully into the unit, lifting the rear of the tray
upwards and sliding it forward.
8.
Use oven mitts to lift the
Removable Front Panel
located directly above the Cooking
Basket by applying slight upward pressure.
9.
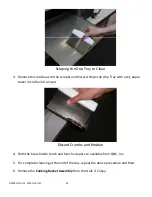
Pull the
Air Plenum
out of the cooking chamber. This is the Left and Right Sides, Top
Piece, and two tray guides of the Oven Interior.
Air Plenum Pulled Out of Oven Chamber
10.
Slide out the
Rear Splashguard
from the back of the cooking chamber.
11.
Disassemble the Air Plenum into three separate pieces; the top and two sides. Place the
plenum on a countertop and lift the top center of the plenum upwards approximately
1/2". Fold the two sides of the plenum inwards and remove them from the top plenum
piece.
12.
Please note the flanges on the front of the sides of the air plenum are taller than the
flanges on the rear. It is important when reassembling the Air Plenum that they be
placed together properly.
13.
There are two alternatives for cleaning the Cooking Basket, Drip Tray, Splashguard, the
two‐piece Removable Front Panel, and Air Plenum.
14.
Place the pieces into either a sink containing a pre‐soak solution with a commercial
degreaser, or a commercial dishwasher.
We suggest that the use of a wire brush for
cleaning the Cooking Basket and green scrubbing pad for other stainless steel items.
The items should then be cleaned according to local health department guidelines. This

