background image


©2006 QNC, Inc. 0106 Operator’s Manual 

30 


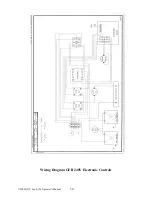
Wiring Diagram GFII 240V Electronic Controls 


Summary of Contents for GF - II

Page 1: ... 2004 QNC Inc 0404 Operator s Manual MODEL GF II OPERATOR S MANUAL Covering Quik n Crispy Part Numbers 600000 600005 600010 600015 600020 600025 ...

Page 2: ...on Instructions Mechanical Control Models 10 Initial Operation Electronic Control Models 12 Operation Instructions Electronic Control Models 13 Reprogramming the Electronic Controller 15 Cooking Procedures 17 Cleaning Procedures 20 Product Registration and Service 24 Appendix Wiring Diagrams 25 GFII 120V Mechanical Controls 26 GFII 240V Mechanical Controls 27 GFII 120V Electronic Controls 28 GFII ...

Page 3: ...oods This easy to use countertop greaseless fryer safely and efficiently eliminates the health concerns expense and operating difficulties inherent with hot oil cooking processes PACKING LIST Included in the Quik n Crispy packing carton are the following items 1 Quik n Crispy Greaseless Fryer 1 Cooking Basket Assembly 1 Cooking Basket Bracket Handle Mounting Screws 1 Drip Tray 1 Separation Wall Pa...

Page 4: ...will not have to work in a confined location We recommend a minimum of 1 of space between the rear sides and top of the Quik n Crispy and the walls ceiling or other structural surfaces of your facility In addition to suitable locations accommodation must be made for the necessary electrical hookups The Quik n Crispy is available with either mechanical or electronic programmable controls Both mecha...

Page 5: ...idual branch circuit Please insure that the Quik n Crispy is installed on an electrical circuit conforming to the specifications above and that this circuit has been installed and certified by a licensed electrician When ordering parts or accessories for your Quik n Crispy please specify voltage or part number ...

Page 6: ...the fryer into position on the designated counter Again we recommend a minimum of 1 inch clearance from any adjacent walls or equipment 9 Adjust the legs to balance the fryer on the designated counter 10 Attach the Cooking Basket handle bracket to the Cooking Basket A 2 Phillips head screwdriver and a 5 16 wrench are recommended to insure proper mounting Please check the other four screws and acor...

Page 7: ... 2006 QNC Inc 0106 Operator s Manual 6 14 At this point be sure that the On Off Switch for the Quik n Crispy is in the center Off Position Plug in your Quik n Crispy ...

Page 8: ... chamber When inserted into the cooking chamber the surface of the splashguard should be in contact with the ceiling of the chamber The splashguard should be removed daily for cleaning with the other removable items located in the inner chamber Separation Wall Cutaway View 3 The Separation Wall was positioned properly in the rear of the inner chamber of your Quik n Crispy prior to shipping It is h...

Page 9: ...traight back into the Quik n Crispy until you touch the rear wall of the cooking chamber keeping the Separation Wall parallel to the floor of the Quik n Crispy 6 Angle the top portion of the Separation Wall upward towards the ceiling of the inner chamber until it comes in contact with the ceiling Slide the Separation Wall further back into the inner chamber so that it comes in contact with the rea...

Page 10: ...his will not damage the timer Set the thermostat to 400 F If the fryer is operating properly you should be able to hear the fan circulating air and feel heat emanating from the fryer If you are uncertain that they are working properly partially slide out the cooking basket and look into the fryer The fan should be turning at a high rate of speed and the heating element should be glowing If the the...

Page 11: ...e Quik n Crispy in this position is to insure that the Quik n Crispy turns off when the cooking cycle is completed providing additional time for the operator to remove the food from the cooking basket If the Quik n Crispy continues to operate after the cooking cycle is completed an order of cheese sticks can be overcooked in just 20 to 30 additional seconds With the Quik n Crispy turning off at th...

Page 12: ...lement is only engaged when both the timer is on and the thermostat is at a setting other than 0 Therefore the thermostat cannot be considered an ON OFF switch Setting the thermostat to a temperature other than 0 will not turn on the fryer 6 When you have finished using the Quik n Crispy Greaseless Fryer for the shift or day we recommend that you place the power switch to the Switch On position tu...

Page 13: ...rE HEAt and will then display the temperature of the Quik n Crispy in 5 F increments When it gets to within 20 F of the temperature setting for the menu you activated it will show rEAdY In addition the small light above menu buttons 1 and 2 will illuminate whenever the heating element is engaged This light should stay on until the cooking chamber reaches the temperature set point and will then cyc...

Page 14: ...menu buttons The Quik n Crispy will start to heat and after first displaying pre heat it will then display the temperature of the interior chamber in 5 F increments When the temperature reaches 20 F of the programmed temperature it will show rEAdY The heating element will continue to be engaged until the interior chamber temperature reaches the preset cooking temperature Now push the same menu but...

Page 15: ...sh a menu button and start running a menu program the small red light indicator light on the menu button selected will illuminate It will indicate one of the following Slow flash Preheating Rapid flash Ready Solid light Cooking Rapid flash Done No light No menu selected When you have finished using the Quik n Crispy for the shift or day we recommend that you pull out the Cooking Basket to admit co...

Page 16: ...odify With the appropriate menu displayed press button 1 the Edit key The menu selected will now flash back and forth between StPt 1 temperature set point and the temperature programmed for the selected menu The controller is now ready to be reprogrammed Step 5 If you wish to change the individual menu cooking times and not the cooking temperatures please skip to Step 6 If you wish to change the c...

Page 17: ...f you inadvertently change this setting to Off neither of the blowers will engage when a menu is started In addition we recommend that you use only one time and one temperature setting for each menu The controller has four submenus within each menu program These submenus run consecutively one after the other If you inadvertently enter a time other than 0 into tinE 2 Time 2 tinE 3 Time 3 or tinE 4 ...

Page 18: ...testing contact your food distributor and have them send you the correct version of the menu item that you wish to prepare If your food distributor sales person is not sure of the menu items that can be prepared in the Quik n Crispy have them review the 35 page menu found with this Operator s Manual or have them either contact your Quik n Crispy distributor or contact QNC Inc To prepare breaded it...

Page 19: ...emove the product you wish to cook from the freezer or refrigerator Note Please be aware that similar product will vary in cooking time depending on its internal temperature at the time of cooking In other words frozen fried chicken will take longer to cook than the same fried chicken that has been thawed in the refrigerator 3 If this is the first cooking cycle of the day the Quik n Crispy needs t...

Page 20: ...nical controls set the timer for 7 minutes When the timer bell rings check the product and either remove the food if it is ready or reset the timer for the desired additional cooking time If you are using a Quik n Crispy with electronic controls Menu button 2 which was programmed at the factory to 7 minutes could be used providing you have not re programmed it Review the enclosed menu for suggeste...

Page 21: ...duct with spatula or tongs or in the case of food products like french fries remove the Cooking Basket with both hands on the handle and dump the food product into a foil pan or holding container CAUTION DO NOT INSERT TONGS OR SPATULA INTO THE COOKING CAVITY This is extremely dangerous and could result in injury to the operator Emptying the Cooking Basket ...

Page 22: ... product to the next This is accomplished by using the following procedure 1 After preparing menu items in the Quik n Crispy a layer or coating of sauce crumbs or batter may be deposited on the Cooking Basket or Drip Tray You should remove these deposits before cooking another batch of food Pull back on the Cooking Basket and with it still over the Drip Tray brush the inside of the basket with a b...

Page 23: ...trokes of the scraper from the rear to the front and one scrape from one side to the other should place all of the crumbs and excess oil to one of the front corners of the Drip Tray Scraping the Drip Tray to Clean 3 Remove this residue with the scraper and discard Wipe the Drip Tray with a dry paper towel or cloth and re insert Discard Crumbs and Residue Both the brass bristle brush and bench scra...

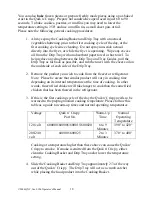
Page 24: ...should then be cleaned according to local health department guidelines This usually requires the steps of washing rinsing sanitizing and air drying An alternative to cleaning these 4 parts in your sink is to soak them overnight in a solution of Dip Tank Cleaner DTC 2 and water CAUTION ALWAYS WEAR RUBBER GLOVES AND EYE PROTECTION WHEN HANDLING CAUSTIC CHEMICALS DTC 2 is a caustic chemical available...

Page 25: ...the unit will be left clean and streak free The Quik n Crispy is now ready for the next use Please note that we recommend the replacement of the Quik n Crispy Dip Tank Cleaner solution every 30 days During this 30 day time period the DTC 2 solution will start to neutralize and loose its effectiveness The chemical reaction of the active chemicals in the DTC 2 in conjunction with the grease or carbo...

Page 26: ...isplaced or one was not included with your Quik n Crispy go online as described above contact your distributor or call QNC Inc at 888 NO VENTS 668 3687 or 972 669 8993 Fax at 972 669 8990 or e mail at sales q n c com for a replacement registration form Your Quik n Crispy has a limited warranty of 2 years on the Electronic Controller 1 year on all other parts and 90 days on labor from the date of i...

Page 27: ... 2006 QNC Inc 0106 Operator s Manual 26 Appendix Wiring Diagrams ...

Page 28: ... 2006 QNC Inc 0106 Operator s Manual 27 Wiring Diagram GFII 120V Mechanical Controls ...

Page 29: ... 2006 QNC Inc 0106 Operator s Manual 28 Wiring Diagram GFII 240V Mechanical Controls ...

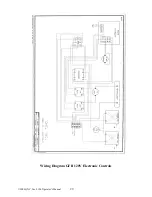
Page 30: ... 2006 QNC Inc 0106 Operator s Manual 29 Wiring Diagram GFII 120V Electronic Controls ...

Page 31: ... 2006 QNC Inc 0106 Operator s Manual 30 Wiring Diagram GFII 240V Electronic Controls ...

Reviews: