Section IV - Installation
Pre-start Inspection
Before starting the DEFENDER™, check
the following:
1. If DEFENDER™ is supplied with
a built-in analyzer, install a 9 volt
battery on the back of the analyzer
PCB board and verify it operates by
powering it on.
2. Check that the DEFENDER™ has
been installed according to the
Installation Instructions (above).
3. Ensure the tank is mounted to a
level surface that can support the
DEFENDER™’s weight.
Initial Start-up & Adjustment
Nitrogen System Setup -
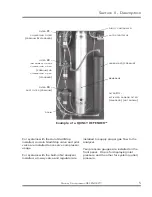
1. If the unit is supplied with the built-
in analyzer, turn the analyzer on by
pressing the POWER button. The
analyzer has a 90% response in
the first 6 seconds, allow a total of
30 seconds for 100% response. If
the gas being analyzed has been
flowing over the sensor for more then
30 seconds, then the analyzer will
have already reached the actual gas
percentage. The display will show the
gas content in percent. The analyzer
is calibrated at the factory and will
not need recalibrating unless delivery
time is longer than two weeks. If
calibration is necessary, follow the
instructions below in Nitrogen Purity
Sampling Setup
2. The tank should be purged to remove
oxygen from the tank. This process
can take several hours depending
on the capacity of the unit. A rule of
thumb is to fill the tank and purge two
times to near atmospheric pressure,
allowing the tank to re-pressurize
after each purge. The nitrogen can
be delivered to the system after the
initial purging procedure.
Nitrogen Purity Sampling Setup
1. If the unit is equipped with the built-in
analyzer, make sure the analyzer is
calibrated before using the generated
nitrogen. The analyzer uses the
compressed air coming into the unit
to calibrate the sensor.
2. Make sure the Purity Sampling
System is properly set so that
damage to the oxygen analyzer does
not occur and a proper reading can
be obtained. A regulator with a flow
restrictor orifice is installed before the
oxygen sensor and is preset at the
factory for 7-10 psig. The regulator
controls the flow and pressure of
gas going over the sensor in order
to limit the amount of gas used by
the analyzer and to protect the life
of the sensor. Over pressurizing can
damage the sensor and/or shorten
sensor life.
3. Set the analyzer pressure regulator to
10 psig, by pulling on the yellow knob
and turning clockwise to increase,
and counter-clockwise to decrease,
pressure. This is done before
shipping and should not need to be
adjusted.
4. To calibrate with compressed air,
move the selector switch, below the
analyzer, to the CALIBRATE position.
Let the compressed air flow through
the system until the analyzer’s display
equalizes (takes approx. 30 seconds).
After the display has equalized, adjust
the CAL ADJUST screw as needed
to obtain 20.9% for Oxygen Analyzers
and 79.1% for Nitrogen Analyzers
5. The unit is now calibrated. Move the
selector switch to the MONITOR N2
position.
Quincy Compressor-DEFENDER™
9


