Section VI - Servicing
32
Quincy Compressor
®
- QSB/T
™
Belt Replacement/Tension Adjustment
15 through 30 HP
1)
Lock out and tag out the electrical power supply.
2)
Remove panels and guards to gain access to belt
drive area.
3)
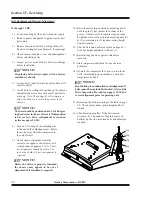
Release tension on belts by backing off nut (2).
Remove existing belts (and discard, if replacing).
4)
Check sheaves for nicks, wear, and misalignment
before reinstalling belts.
5)
Inspect new (or used) belts for defects or damage
before installation.
NOTICE!
If replacing belts, always replace with a factory
matched set of belts.
6)
Loosen nut (2) and lower motor plate until nut (2)
contacts nut (3).
7)
Install belts by rolling into position on the sheaves
and adjust the motor base with nut (2) until belts
are snug.
Note: The spring (4) will compress to
allow the belts to cross into the grooves in the
sheaves.
NOTICE!
The base should be positioned at a 5 to 10 degree
top dead center in the arc of travel. If this position
is not correct, drive realignment is required
(reference pages 29-30).
8)
Turn nut (1) on top of the adjusting arm
to the end of the adjusting screw. Rotate
the motor away from the compressor to
the end of travel.
9)
Check sheave alignment, rotate the
motor to the opposite end of travel, and
recheck sheave alignment.
Note: These
two alignments should be within 1/16
inch of each other, if not, realignment is
required.
NOTICE!
Before the belts are properly tensioned,
the sheaves may appear to be out of
alignment, this condition is expected.
10) Raise the motor into position by adjusting nut (2)
until the pin (5) just reaches the bottom of the
groove. Adjust nut (3) to compress spring to the
height shown in table. Alternate adjusting nuts (2)
& (3) to maintain pin (5) location, spring height
and belt tension.
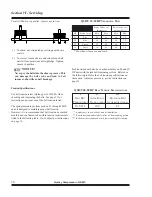
11) Check belt tension (reference table on page 30) -
Lock the height adjustment with nut (1).
12) Reinstall any panels or guards which were
removed.
13) Start compressor and check for any obvious
problems.
14) Operate the compressor for 2 hours to run-in the
belts. Immediately upon shutdown, check belt
temperature by hand.
NOTICE!
Heat buildup is an indication of misalignment. If
belts cannot be comfortably touched, refer to Belt
Drive Inspection Procedure on pages 29-30 and
correct alignment prior to operating unit.
15) Retension the belts according to the table on page
30. Check pin location, spring height and belt
tension.
16) Check tension monthly. If the belt tension
decreases by 1.5 pounds or the pin has moved
halfway up the slot, retension belts and adjust pin
location.
(1)
(2)
(3)
(4)
(5)
Summary of Contents for QSB Series
Page 2: ......
Page 9: ...Section I General Quincy Compressor QSB T 5 MODEL IDENTIFICATION...
Page 21: ...Quincy Compressor QSB T 17 THIS PAGE INTENTIONALLY LEFT BLANK...
Page 27: ...Quincy Compressor QSB T 23 THIS PAGE INTENTIONALLY LEFT BLANK...
Page 71: ...Quincy Compressor QSB T 67 THIS PAGE INTENTIONALLY LEFT BLANK...
Page 72: ...Appendix A Dimensional Drawings 68 Quincy Compressor QSB T QSB 15 50 HP air cooled...
Page 73: ...Appendix A Dimensional Drawings Quincy Compressor QSB T 69 QSB 15 50 HP water cooled...

