background image

FR

EN

DE

NL

12

ES

IT

PT

KO

PL

EL

RU

CS


WARNING

•  

NEVER LEAVE CHILD UNATTENDED. ALWAYS 

keep 

child in view when in stroller.

•  

AVOID SERIOUS INJURY

 from falling or sliding out. 

ALWAYS

 use seat belt. Check frequently to make sure it is 

secure. Belts must be threaded exactly as shown (Fig. 7a).

•  Failure to follow these instructions could result in the 

serious injury or death of your child.

7


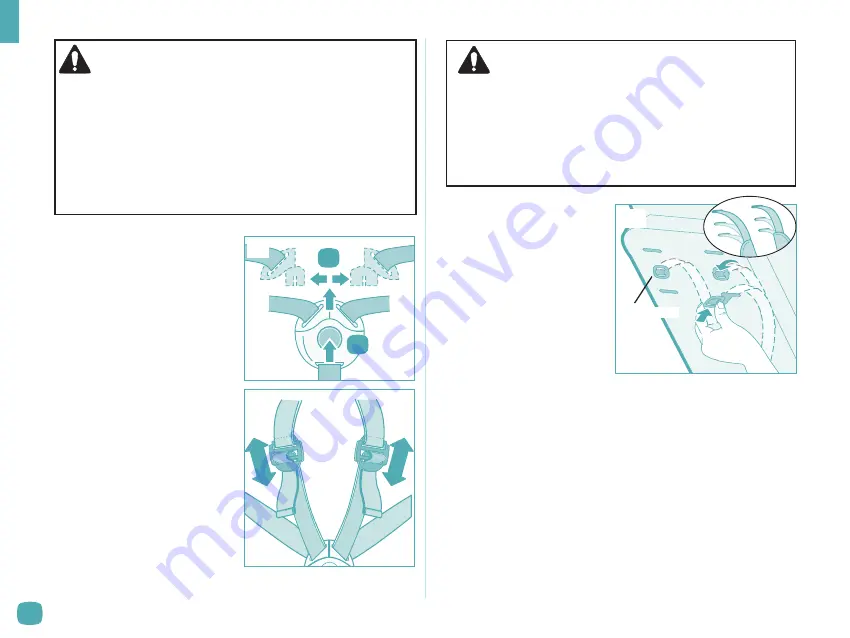
To Use Restraint 

System 


Unbuckle restraint system by 

pressing center button. Place 

your child in the stroller, with the 

crotch strap between the child’s 

legs and arms through shoulder 

harness straps. Fit clips together. 

Slide clips into buckle until you 

hear a “click” 

(Figure 7)

.


Tighten straps snugly around your 

child.


 To tighten strap,

 pull strap down 

(Figure 7a)

.


To loosen strap, 

pull strap up 

(Figure 7a)

.

2

1

7

•   For proper installation of the restraint sys-

tem, make sure both anchors lay flat against 

the seat back.

•  NEVER use stroller without BOTH restraint 

and crotch straps.

WARNING

8


Adjust Restraint 

Height


The shoulder straps have 

three height positions for 

your growing child. Push 

each anchor through the 

seat back and into the 

desired slot 

(Figure 8)

Be sure the anchor lays flat 

against the seat back.

Anchors

8

7a

Summary of Contents for Yezz CV298

Page 1: ... and THAILAND Fabriqué en PAYS BAS et THAÏLANDE Styles and colors may vary Les styles et les couleurs peuvent varier Distributed by distribué par Dorel Juvenile Group Inc 2525 State St Columbus IN 47201 7494 Dorel Juvenile Canada 873 Hodge St Laurent QC H4N 2B1 10 17 14 4358 6697 ...

Page 2: ...Instructions for use Warranty Around every corner A bit of wonder CV298 CV300 User Guide Mode d emploi Yezz ...

Page 3: ......

Page 4: ...ltérieure Lay out and identify all parts Do not return this product to the place of purchase If any parts are missing call Consumer Relations at 800 951 4113 Or visit our website at www quinny com Include the model number serial number and manufacture date found under the carrying strap and a brief description of the part Keep these instructions for future use J K I H F D E C B A G A B C E F I J G...

Page 5: ...ly 9 To Use 10 13 Stroller Care and Maintenance 14 Replaceable Parts 14 English User Guide Liste des pièces 3 Mise en garde 17 Distributeur Agréé Garantie 18 Assemblage 19 Utilisation 20 23 Soin et entretien 24 Pièces de remplacement 24 Guide d utilisation français ...

Page 6: ... to climb into the stroller unassisted Stroller may tip over and injure child NEVER place or hang parcels bags or accessories on the handle or canopy The stroller may tip over or the canopy may collapse This product will become unstable if a parcel bag or rack is used when there is no provision for one This product may become unstable if a parcel bag other than the one recommended by the manufactu...

Page 7: ... warranties including implied warranties of the merchantability and fitness for a particular purpose shall be limited to the duration and terms of the express written warranty Some states do not allow limitations as to how long an implied warranty lasts or the exclusion or limitation of incidental or consequential damages so the above limitations may not apply to you This warranty gives you specif...

Page 8: ...osts associated with the return Dorel Juvenile Group will bear the cost of shipping the repaired or replaced product to the purchaser Product should be returned in its original package accompanied by a proof of purchase either a sales receipt or other proof that the product is within the warranty period This warranty is void if the owner repairs or modifies the product or the product has been dama...

Page 9: ...8 ...

Page 10: ... handlebars until partially opened Do not fully open frame until seat is attached Figure 1a Locate 8 clips on seat While frame is partially opened attach clips on seat to stroller frame as shown Figure 1b While pulling handlebars upward use foot to push down on unfold pedal until you hear a click Figure 1c 9 5 8 6 7 2x 2x 2x 2x 4 1 3 2 5 8 6 7 2x 2x 1a 4 1 3 2 5 8 6 7 2x 2x 2x 2x 1 2 3 1c 6 7 8 9 ...

Page 11: ...2c 2f Push down until you hear a click and stroller locks into place Figure 2c Note Be sure lock is engaged before transporting Turn handlebars inward as shown Figure 2b Push canopy down Stretch transport strap over the canopy Figure 2d Slide ring onto post located on Yezz chassis Figure 2e Lift frame using strap and carry over shoulder as shown Figure 2f Push frame down using handlebars Figure 2a...

Page 12: ... Pocket Use Use back pocket to hold weights up to 5 lbs 5 Parking Brake To engage parking brake push down firmly on brake pedal To release parking brake push down on opposite pedal max 5 lb 2 27 kg 4 5 Use foot to push down firmly on unfold pedal until you hear a click Figure 3c 6 Canopy The canopy can be adjusted to three different positions folded back folded out and extended Figure 6 NOTE The c...

Page 13: ...the crotch strap between the child s legs and arms through shoulder harness straps Fit clips together Slide clips into buckle until you hear a click Figure 7 Tighten straps snugly around your child To tighten strap pull strap down Figure 7a To loosen strap pull strap up Figure 7a 2 1 7 For proper installation of the restraint sys tem make sure both anchors lay flat against the seat back NEVER use ...

Page 14: ...FR 13 CS RU EL PL KO PT IT ES NL DE EN 5 2x 2x 8 2x 6 2x 7 9 9 To Remove Seat Partially fold stroller Detach 8 clips on stroller seat from stroller frame as shown Figure 9 1 2 3 4 ...

Page 15: ...cally check for loose screws worn parts torn material or loose stitching Tighten or replace parts as needed Seat Frame To order parts call 800 951 4113 Include the model number and manufacture date found under the carrying strap and a brief description of the part Weathershield Replaceable Parts Available Accessories sold separately ...

Page 16: ...Feel free to walk your way 15 ...

Page 17: ...16 ...

Page 18: ...MAIS permettre aux enfants de jouer ou de se suspendre à la poussette MISE EN GARDE NE JAMAIS permettre aux enfants de s asseoir dans la poussette sans aide Celle ci peut se renverser et blesser l enfant NE JAMAIS placer de sacs à main de sacs ou des accessoires sur la poignée ou l auvent La poussette peut se renverser ou l auvent s effondrer Ce produit deviendra instable si un sac à colis ou un s...

Page 19: ...ment lorsqu il est acheté d un distributeur agréé Quinny L origine des produits qui ne sont pas achetés par ces détaillants agréés est inconnue et pourrait être une contrefaçon Nous ne pouvons pas soutenir les produits d origine inconnue car nous ne pouvons pas vérifier la manipulation ou l état de telle marchandise Nous devons maintenir un réseau solide de détaillants agréés pour vous assurer que...

Page 20: ...tte soit partiellement ouverte Ne pas ouvrir complètement le cadre jusqu à ce que le siège soit fixé Figure 1a Repérez les 8 pinces du siège Alors que le cadre est ouvert partiellement attachez les pinces du siège au cadre de la poussette comme montré Figure 1b Tout en tirant le guidon vers le haut utilisez votre pied pour pousser la pédale de dépliage jusqu à ce que vous entendiez un clic Figure ...

Page 21: ...a poussette se verrouille en place Figure 2c Note Assurez vous que le verrou est engagé avant de transporter Tournez le guidon vers l intérieur comme montré Figure 2b Abaissez l auvent Étirez la courroie de transport par dessus l auvent Figure 2d Glissez l anneau autour de la tige située sur le châssis de la poussette Yezz Figure 2e Soulevez le cadre avec la courroie et transportez la poussette su...

Page 22: ...re pour transporter des poids jusqu à 2 27 kg 5 lb 5 Frein de stationnement Pour actionner le frein de stationnement fermement poussez la pédale de frein vers le bas Pour dégager le frein de stationnement poussez sur la pédale opposée max 5 lb 2 27 kg 4 5 Utilisez votre pied pour fermement pousser la pédale de dépliage vers le bas jusqu à ce que vous entendiez un clic Figure 3c 6 Auvent L auvent p...

Page 23: ...fant et les bras à travers les sangles du harnais Attachez les boucles ensemble Glissez les attaches dans la boucle jusqu à ce que vous entendiez un clic Figure 7 Serrez les sangles étroitement autour de votre enfant Pour serrer la sangle tirez la sangle vers le bas Figure 7a Pour desserrer la sangle tirez la sangle vers le haut Figure 7a 2 1 7 Pour une installation adéquate du système de retenue ...

Page 24: ...CS RU EL PL KO PT IT ES NL DE EN 5 2x 2x 8 2x 6 2x 7 9 9 Enlever le siège Pliez la poussette partiellement Détachez les 8 pinces du siège de la poussette du cadre de la poussette comme montré Figure 9 1 2 3 4 ...

Page 25: ...z pour des vis desserrées des pièces usées du matériel déchiré ou décousu Serrez ou remplacez les pièces au besoin Siège Cadre Pour commander des pièces appelez 800 951 4113 Inclure le numéro de modèle et la date de fabrication trouvés sous la courroie de transport et une brève description de la pièce Habillage Pluie Pièces de remplacement Accessoires vendus séparément ...

Page 26: ......

Reviews: