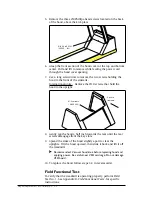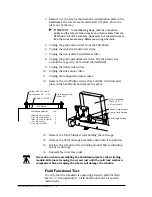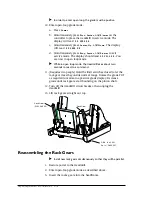
5. Remove the three #8 Phillips-head screws located on the back
of the hood, above the kick plate
6. Grasp the front section of the hood cover at the top and bottom
center. Pull and lift to remove while feeding the power cord
through the hood cover opening.
7. Use a long screwdriver to remove the two screws holding the
hood to the front of the siderails.
International units: Remove the #10 screws that hold the
hood to the upright.
8. Gently tap the hood a half inch towards the rear until the rear
screws disengage from the key slots.
9. Spread the sides of the hood slightly apart to clear the
uprights. Tilt the hood upward, then slide it back and lift it off
the treadmill.
A
Recommended: Vacuum hood area before replacing hood and
applying power. Be careful near VSD card cage. Do not damage
VSD board.
10. To replace the hood, follow steps 3-9 in reverse order.
Field Functional Test
To verify that the treadmill is operating properly, perform Field
Test No. 1. See Appendix D,
Field Functional Tests,
for specific
instructions.
#8-32 x 0.375L
(35239-183)
#10 screws
(10835-325)
Push to
remove.
Repair/Replacement and Calibration 4-4
Summary of Contents for ClubTrack
Page 3: ......
Page 102: ......
Page 103: ......
Page 104: ......
Page 105: ......
Page 106: ......
Page 107: ......
Page 108: ......
Page 109: ......
Page 110: ......
Page 111: ......
Page 112: ......
Page 113: ......
Page 114: ......
Page 115: ......
Page 116: ......
Page 117: ......
Page 118: ......
Page 119: ......
Page 120: ......
Page 121: ......
Page 122: ......
Page 123: ......
Page 124: ......
Page 125: ......
Page 126: ......
Page 127: ......
Page 128: ......
Page 129: ......
Page 130: ......
Page 131: ......
Page 132: ......
Page 133: ......
Page 134: ......
Page 135: ......
Page 136: ......
Page 137: ......
Page 138: ......
Page 139: ......
Page 140: ......
Page 141: ......
Page 142: ......
Page 143: ......
Page 144: ......
Page 145: ......
Page 146: ......

