INSTALLATION INSTRUCTIONS
Ascend should be installed by a qualified electrician and used in accordance with appropriate electrical codes and regulations.
Before installation, make sure garage door is operating properly. Make sure your garage door is closed/down, then UNPLUG
garage door opener from power source. NEVER connect garage door opener to power source until instructed to do so.
1 Connect Ascend to your Wi-Fi network (instructions on other side).
Trust us, it’s much easier to do this now before mounting Ascend on
your ceiling!
2 Find an area of the ceiling near the AC outlet of the existing garage door
opener to mount Ascend.
Requirements for this area:
•
Less than 2 feet from the power outlet
•
Less than 6 feet or length of garage opener motor cord, whichever
is shorter, from the garage door motor
•
Within wireless range of your Wi-Fi network
•
Unobstructed view of the top of the garage door (when closed) at all times
•
The laser aperture on Ascend should not be exposed to direct light
(e.g., a ceiling light aimed directly at it)
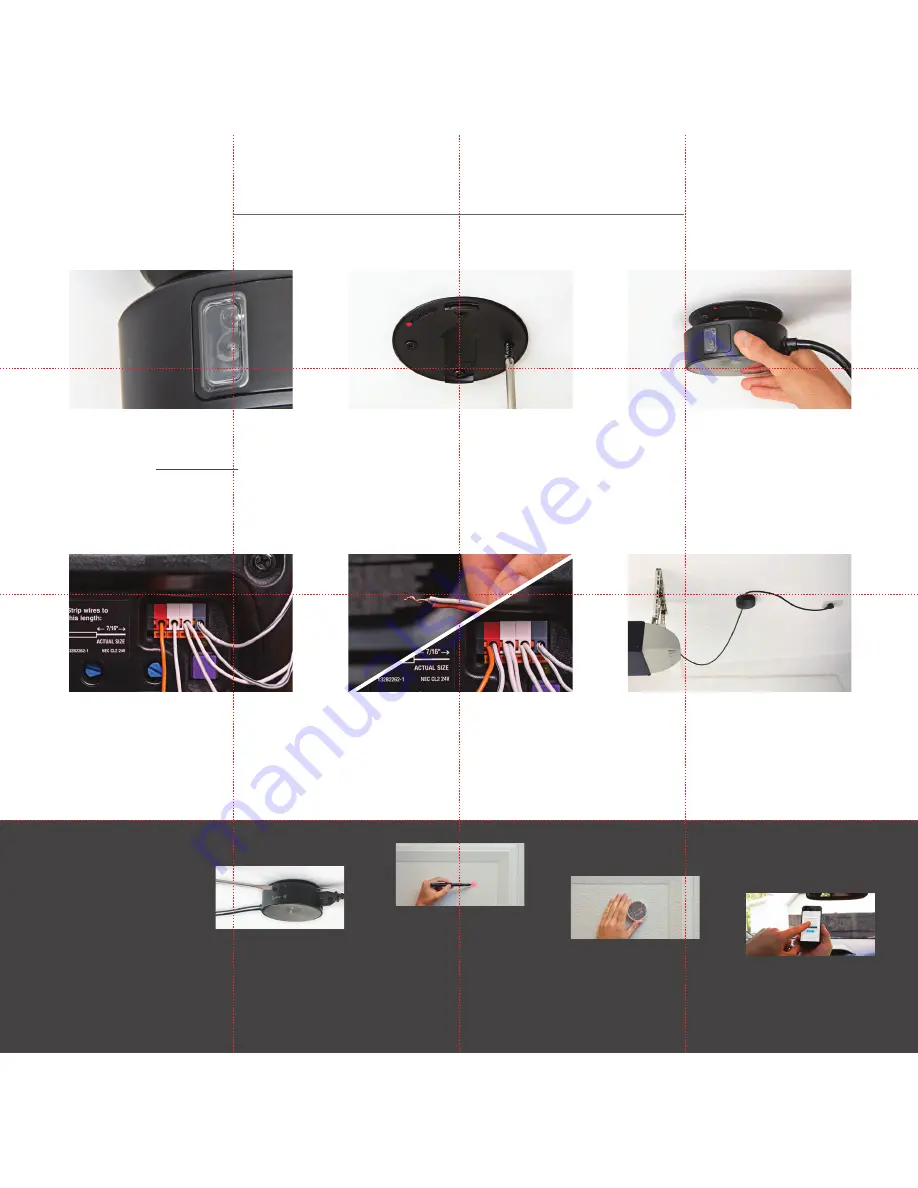
3 Remove the mounting bracket from Ascend.
4 Use the 4 included screws to install the mounting bracket in the stud or
joist of the installation area, making sure the big arrow on the mounting
bracket is oriented towards the garage door. It may be necessary
to drill pilot holes for ease of mounting.
NOTE: If the installation area is drywall, drop ceiling, or another composite
material, first screw in the 4 included drywall anchors, then use the 4 screws
to secure the mounting bracket. Be careful not to over-tighten the drywall
anchors as a bigger hole will be created if the screwing action continues.
5 Align the red dots on housing bottom and mounting bracket.
Twist the housing bottom clockwise onto the mounting bracket until
it locks into place.
6 Make sure the existing garage door opener is unplugged.
Ascend should also be unplugged.
7 There are 2 white trigger wires from Ascend. These will be twisted with
the 2 wires that lead from your existing garage door WALL BUTTON.
NOTE: These general wiring instructions apply to most models of garage
door openers. If your garage door wiring is different, please consult an
electrician. 2 spade terminals (U-shaped wire connectors)
are included if needed.
8 Detach the 2 wires from the existing wall button terminal. You may need
to push a release button on the terminal or unscrew the terminal to
remove the wire.
9 Twist one of Ascend’s trigger wires with one wall button wire. If you have screw
terminals on your garage door opener, crimp one of the included spade terminals
(U-shaped wire connectors) onto the twisted wires using pliers.
Twist the remaining Ascend wire with the other wall button wire, and crimp a
spade terminal on with pliers if needed.
10 Insert the wires back into the terminal. You may need to push a release button on
each terminal or screw in the terminal to secure the wire.
11 Plug the garage door opener power cord into Ascend via
the available socket.
12 Plug Ascend into the AC outlet where the garage door was originally
plugged. Ascend will rejoin your Wi-Fi network.
13 Included in the box is a sticker with the following warning: “This operator
system is equipped with an unattended operation feature. The door
could move unexpectedly.” Affix this sticker on a surface near Ascend.
CALIBRATING
AND USING ASCEND
Ascend uses a laser and reflector to detect
if the door is opened or closed.
CAUTION: The following steps involve use
of a Class 3R laser. Please read important
safety information regarding lasers before
continuing with calibration.
1 Make sure no one is standing between
Ascend and the garage door. Make sure the
garage door is closed/down.
2 Open the Wink app on your mobile device.
Tap “Garage Door,”and from the Settings
menu (the 3 dots in the top right corner,) tap
“Calibration Mode.”
3 Tap “Turn laser on” then “Next” to start
calibrating your Ascend.
4 Find the slotted screw on Ascend and use
a slotted screwdriver to adjust the laser.
Adjust the laser so the dot is aimed at the
unobstructed area on the upper panel of the
garage door. This area should be flat, as this
spot is where the reflector will be mounted.
Tap “Next” on the Wink app.
5 Mark the laser dot for reflector mounting.
Tap “Next” on the Wink app.
6 Tap “Turn laser off.”
NOTE: The laser calibration cycle will
automatically end after 5 minutes. If you
need additional time to measure,
turn on the laser again.
7 Wipe the area marked with a clean, wet
towel and pat dry.
8 Using the adhesive backing, mount the
reflector on the spot marked by the laser.
The adhesive is very strong – make sure the
spot has been measured correctly before
mounting. Tap “Next” on the Wink app.
9 The next step in the Wink app will have you
check the laser sensor connection. Tap “Turn
laser on.” Ascend will emit a confirmation
sound if the laser and reflector are properly
aligned. Tap “Next.” If the app reports a
failed calibration, choose from the available
options to retry.
10 To test the garage door, the Wink app will
prompt you with an image of a garage door.
Swipe up on the door to open, then swipe
down on the door to close. Your Ascend is
now calibrated and ready for use.
11 To operate the garage door from the Wink
app, tap “Garage Door.” Swipe up on the
image of the door to open. Swipe down on
the door to close.
12 From the Settings menu, you can add users,
check activity and set schedules.


