Network installation |
EN
4 Network installation
1. Press the key
MODE
for at least 2 seconds.
P
The device switches to the installation mode.
P
The display shows: [ InSt ]
P
The LED on the front of the device flashes.
All network nodes that are added later and are in installation mode are automatically configured by the network node
to form a wireless network.
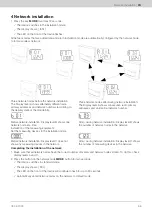
Three network nodes before the network installation:
The Display level A shows alternately different radio
primary addresses and network numbers (according to
the delivery state of the Q
node
5.5).
Three network nodes after/during network installation:
The Display level A shows consecutive radio primary
addresses and an identical network number.
Before network installation: Display level B shows one
network node at a time.
After / during network installation: Display level B shows
the number of network nodes in the network.
Installation of the measuring equipment:
Set the measuring devices to the installation mode.
Before network installation: Display level C does not
show any measuring devices in the network.
After / during network installation: Display level C shows
the number of measuring devices in the network.
Completing the installation of the network
1. Make sure that all network nodes have the correct number of meters and network nodes stored. To do this, check
display levels b and C.
2. Press the button on the network node
MODE
button for two seconds.
P
The device switches to standard mode.
P
The display shows: [ Std ]
P
The LED on the front of the device will continue to flash for up to 30 seconds.
P
Automatically set all network nodes on the network to default mode.
09.03.2023
66


