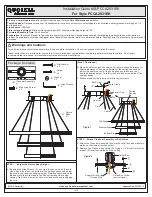
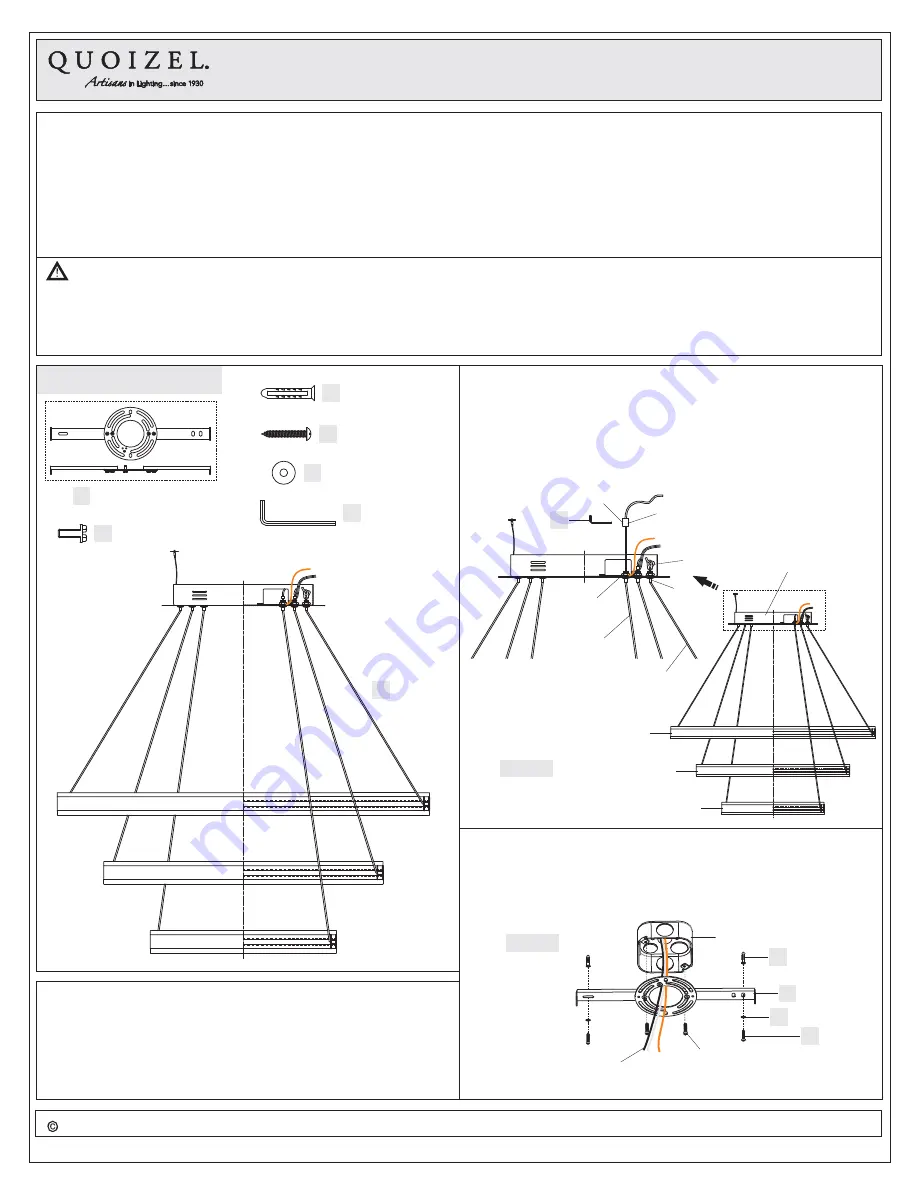
Package Contents
Please go to
for product cleaning tips. Go to the
selection.
Flathead screwdriver, Phillips screwdriver, pliers, wire cutters, wire strippers, electrical tape, safety glasses, marking pen, 1/4”
drill bit and drill.
LED 70W
Minimum Hanging Height is 20”, Maximum Hanging Height is 100”.
Missing Parts? Contact your original place of
purchase.
www.quoizel.com
Care + Maintenance
Tools Required:
Light Source:
Fixture Hanging Height:
Estimated Assembly Time:
Preparation:
30-45 minutes
Identify and inspect all parts before beginning installation. Check package content list and diagrams below to be sure all parts are
present. If any parts are missing or damaged, do not attempt to assemble, install, or operate the fixture.
Warnings and Cautions
1of2
For Style PCCA2831EK
Turn off electricity at circuit breaker or main fuse box before installation. Consult a licensed electrician if in doubt.
These instructions are provided for your safety. It is very important you read them completely before installing the fixture. We strongly
recommend that a licensed, professional electrician perform the installation.
B
Crossbar
x 1
Assembly
A
Mounting Screw
x 2
F
Fixture
Body
x 1
G
Allen Wrench
x 1
E
C
Wall Anchor
x 2
D
Screw
x 2
Washer
x 2
G
N
D
2.4mm
13 Ga
13 Ga
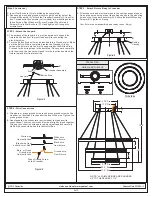
STEP 1
Adjust the Fixture Body Height
-
A. By using the Allen Wrench (F), unscrew the set screw on the cord
clasp. Push the pin on the bottom of the ceiling canopy and adjust
the cord to your desired hanging height. Release your hand on the
pin and move the cord clasp to the hex nut inside of the ceiling
canopy. Tight the set screw on the cord clasp until snug to engage
the cord.
(Step 1 Continued)
B. Move the safety clip on the cable until there is enough distance for
cable adjustment. Push pin underside of the ceiling canopy and
adjust the cable in or out of the ceiling canopy to achieve your
desired hanging height. Carefully tuck all slack wires inside of the
ceiling canopy.
C. Make sure each ring is horizontal after adjustments.
F
Set Screw
Cord Clasp
Safety Clip
Pin
Hex Nut
Cord
Cable
Figure 1
Top Ring
Medium Ring
Bottom Ring
Ceiling
Canopy
STEP 2
Attach Crossbar Assembly to Outlet Box
-
A. Attach the Crossbar Assembly (A) onto the outlet box and make two
marks on the ceiling from keyholes.
B. Remove the Crossbar Assembly (A). Using a 1/4” drill bit, drill holes
at each (2) locations marked on the ceiling.
Supply Wires with
Ground Wire
Outlet Box Screw
(not included)
Outlet Box
A
C
D
E
Figure 2
Installation Guide IS-PCCA2831EK
#
2018 QuoizelInc.
ReleasedDate:2018-04-13
visit us on-line at www.quoizel.com


