background image

1. SAFETY RULES

TOOLS REQUIRED

FOR INSTALLAITON

Phillips Screwdriver
Wire Cutters
Electrical Tape
Step Ladder

Models #67210-xx: 48.28 lbs

69210-xx: 56.88 lbs

1.

   To avoid possible electric shock, 

turn 

off the electricity

 at the main fuse box or 

circuit panel before you begin the fan 
installation or before servicing the fan or 
installing accessories.

2.

   Read all instructions and safety 

information carefully before installing 
your fan and 

save these instructions.

3.

   Make sure all electrical connections 

comply with local codes or ordinances as   
well as the National Electrical Code.  If 
you are unfamiliar with electric wiring, 
please use a qualified and licensed 
electrician.

4.

   Make sure you have a location 

selected for your fan which allows clear 
space for the blades to rotate, and at lease 
seven (7) feet of clearance between the 
floor and the fan blade tips.

5.   

The support structure must be 

securely mounted and capable of reliably 
supporting a minimum of 70 pounds (31.8 
kg).

6.


WARNING

Support Directly from 

the Building Structure.

7.

   To reduce the risk of personal injury 

use only approved hanging brackets and 
screws supplied with the outlet box for 
mounting to the outlet box.

8.

   After installation is complete, check 

that all connections are absolutely secure.

9.

   Do not insert anything into the fan 

blades while they are rotating.

10.

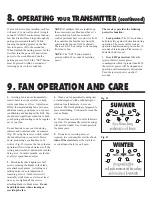
   To operate the reverse function on 

the fan, press the reverse button on the 
wall transmitter while the fan is running.

11.

   Do not attempt to control the 

operation of the fan (or an optional light 
kit) from any wall control that is not 
approved by Quorum for use with its fans.  
Do not use solid state wall controls.  The 
use of any unapproved control voids the 
fan's warranty.

Summary of Contents for Mykonos 72"

Page 1: ...and save these instructions These instructions are to be used in the installation of the following QUORUM INTERNATIONAL fans The Mykonos 72 92 P O Box 961008 Fort Worth TX 76161 817 626 5483 FAX 817...

Page 2: ...stions regarding the warranty or the procedures for obtaining service please call us at 817 626 5483 Monday thru Friday 8 00 a m 5 00 p m CST technical skill competence or experience of the user 8 Lig...

Page 3: ...for the blades to rotate and at lease seven 7 feet of clearance between the floor and the fan blade tips 5 The support structure must be securely mounted and capable of reliably supporting a minimum...

Page 4: ...Blade attachment hardware 21 3 16 x 24mm Screws 10 Decorative rod mounting nuts Unpack your fan and check the contents Do not discard the carton If warranty replacement or repair is ever necessary the...

Page 5: ...ructure Use appropriate fasteners and building materials 4 Figures 1 2 and 3 are examples of different ways to mount the outlet box in different situations A longer downrod may be required in sloped c...

Page 6: ...screws on the hanger bracket to apart the hanger plate and neck of the hanger bracket mounting neck Fig 7 7 Remove stop valve from the neck of the hanger bracket by loosening the two stop valve screws...

Page 7: ...will lower down to conceal the yoke Feed the safety cable and wires through the downrod assembly 3 Fig 11 Lift the fan motor and place into the hanger bracket rotating the ball until the groove engag...

Page 8: ...onnect the wiring from the wall switch receptacle to wall transmitter unit Remove the existing wall plate and switch from the wall junction box Connect the BLACK switch leg wire from wall receptacle t...

Page 9: ...other screw hole in the rod aligns with the inside hole in the decorative rod holder as it will be used later Repeat process for all other rods Once completed tighten the decorative rod nuts on end of...

Page 10: ...revent damage to transmitter remove the battery if not use for long periods of time Fig 20 A I II III IV V and VI buttons These six buttons are used to set the fan speed as follows I minimum speed II...

Page 11: ...peration for many years 5 If repairs or servicing are ever required to avoid possible electric shock turn off the electricity at the main fuse or circuit panel before you begin 9 FAN OPERATION AND CAR...

Page 12: ...ut connectors are not resting against the canopy possibly vibrating while the fan is on 3 Use of a standard light rheostat or an unapproved fan wall control to control the fan speed will always cause...

Reviews: