

1.
To avoid possible electric shock,
turn
off the electricity
at the main fuse box or
circuit panel before you begin the fan
installation or before servicing the fan or
installing accessories.
2.
Read all instructions and safety
information carefully before installing
your fan and
save these instructions.
3.
Make sure all electrical connections
comply with local codes or ordinances as
well as the National Electrical Code. If you
are unfamiliar with electric wiring, please
use a qualified and licensed electrician.
4.
Make sure you have a location selected
for your fan which allows clear space for
the blades to rotate, and at lease seven (7)
feet of clearance between the floor and the
fan blade tips.
5.
The outlet box and ceiling support
joist used must be securely mounted, and
capable of supporting at least 35 pounds.
To reduce the risk of fire, electric shock,
or personal injury, use only an outlet box
clearly labeled
"Acceptable For Fan
Support".
6.
To reduce the risk of personal injury
use only approved hanging brackets and
screws supplied with the outlet box for
mounting to the outlet box.
7.
After installation is complete, check
that all connections are absolutely secure.
8.
Do not insert anything into the fan
blades while they are rotating.
9.
Do not operate the reverse switch until
the fan has come to a complete stop.
1. SAFETY RULES
TOOLS REQUIRED
FOR INSTALLAITON
Phillips Screwdriver
Wire Cutters
Electrical Tape
Step Ladder
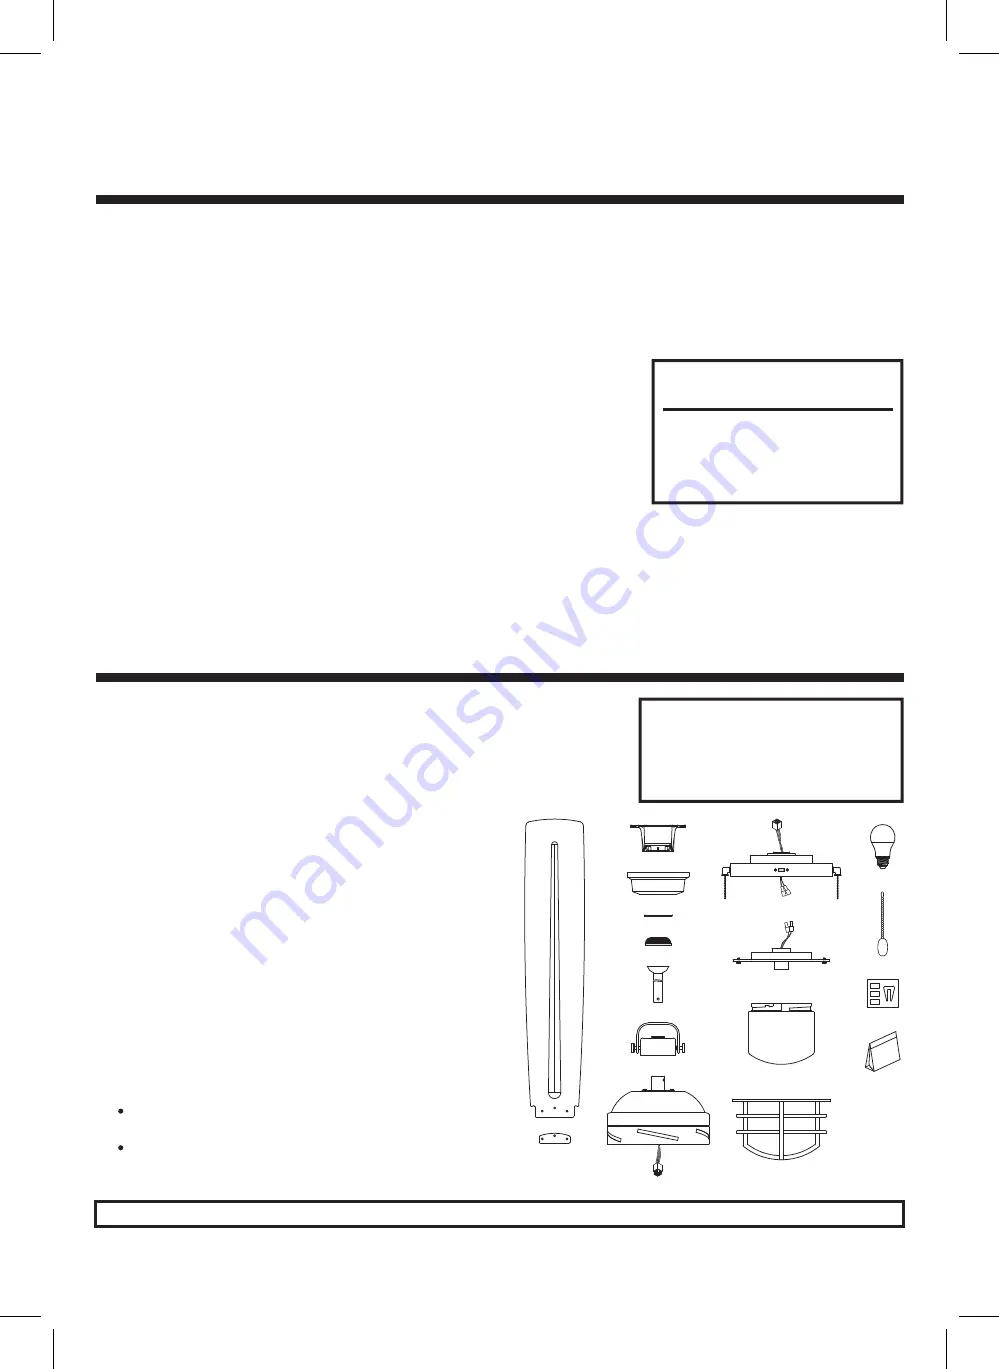
IF YOU FIND THAT PARTS ARE MISSING. CONTACT YOUR DEALER FOR REPLACEMENT, OR CALL QUORUM DIRECTLY AND WE WILL MAIL REPLACEMENTS TO YOU IMMEDIATELY.
2. UNPACKING YOUR FAN
10.
Do not attempt to control the operation
of the fan (or an optional light kit) from
any wall control that is not approved by
Quorum for use with its fans. Do not use
solid state wall controls. The use of any
unapproved control voids the fan's warranty.
Model #133645-59: 28.88 lbs
c.
j.
n.
o.
p.
q.
k.
l.
m.
d.
e.
f.
g.
h.
i.
a.
b.
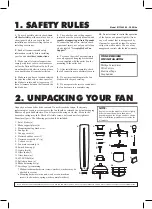
Unpack your fan and check the contents. Do not discard the carton. If warranty
replacement or repair is ever necessary the fan should be returned in original packaging.
Remove all parts and hardware. Do not lay motor housing on its side - because the
decorative casing may shift. Check all visible screws, bolts and nuts for tightness.
Examine all parts. The following parts should be included:
1. Set of blades (a)
2. Blade support plates (b)
3. Hanger/mounting bracket (c)
4. Canopy (d)
5. Canopy cover (e)
6. Downrod rubber cover (f)
7. Downrod assembly (6") (g)
8. Yoke cover (h)
9. Fan motor assembly (i)
10. Switch housing (j)
11. Light plate (k)
12. Glass shade (l)
13. Glass frame (m)
14. 9W LED bulb (n)
15. Pull chain knob (o)
16. Blade balancing kit (p)
17. Parts bags (q) containing:
Blade attachment hardware (screws/washers, washers may be
attached to screws)
Mounting hardware (wire nuts, wood screws, machine
screws, lock washers, spring washers, metal washers.)
NOTE:
Some Quorum fan models will have slightly
different parts than what is shown here
depending upon the design you have chosen.
Basic installation procedures are similar for
all models.


