background image

Q150T Sample Preparation System

10473 - Issue 5

18

Q150T - Instruction Manual

3.2

Running a Profile

Before you can run a profile, ensure you have:

Completed the installation as described on page 10.

Switched on the instrument (see section 17).

Loaded a sputter/coating target or loaded an evaporation source (see page 54).

To run a profile:

1.

Load your sample onto the center of the sample stage.

2.

Close the top cover assembly and press it firmly down to secure the latch.

3.

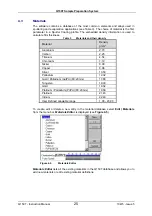
Tap  on  the  down  arrow  button  to  open  the  dropdown  list  of  profiles  (see 

Figure 

3-2

). 

Figure 3-2.

Selecting a profile

4.

The  Q150T  has several  default  profiles  for  common  tasks  as  shown  in  Table  1. 
Tap on the name of the profile you want to run.

Table 1

Q150T Default Profiles

PROFILE NAME

PURPOSE

QT Time Chromium

Sputter coating run using Chromium target (see page 28)

QT Chromium 5nm*

Sputter coating run using Chromium target terminated by FTM at a 
coating thickness of 5nm (see page 28)

QT Metal evaporation

Coating using metal evaporator (see page 31)

QT Aperture cleaning

Default profile for aperture cleaning (see page 40)

QT Pulse rod evap

Evaporation using carbon rods (see page 32)

QT Pulse cord evap

Evaporation using carbon cord (see page 32)

QT Controlled pulse

Evaporation using FTM termination of carbon cord (see page 32)

QT Vent chamber

Vent sample chamber

QT Vacuum shutdown

Pumps chamber to 1mBar to allow shutdown under vacuum

* Profile only present on systems equipped with FTM.

5.

Tap  on  the 

Run  Profile

button. The Q150T starts pumping the sample chamber. 

The progress of the run is shown through a series of on-screen messages (Figure 
3-3).

Summary of Contents for Q150T S

Page 1: ...Q150T S E ES Sample Preparation System Instruction Manual 10473 Issue 5 For technical and applications advice plus our on line shop for spares and consumable parts visit www quorumtech com...

Page 2: ...SRM 4 04 02 13 Gas supply rod shaping instructions outgassing SRM 5 16 07 14 Addition of controlled pulse carbon and other corrections SRM Disclaimer The components and packages described in this doc...

Page 3: ...s 26 4 3 3 Deleting a Material 27 5 Application Guidelines 28 5 1 QT Timed Sputter 28 5 1 1 Tungsten SEM work 28 5 1 2 High resolution SEM coatings for field emission SEM 28 5 1 3 Aluminium thin film...

Page 4: ...bon Fibre Insert 58 7 4 Metal Evaporation Insert 59 7 4 1 Installing a Wire Basket 59 7 4 2 Installing a Molybdenum Boat for Aperture Cleaning 59 7 4 3 Adapting the Insert for Upwards Evaporation 60 7...

Page 5: ...k properties 44 Figure 6 3 Active ftp address 44 Figure 6 4 Generic sputter parameters 45 Figure 6 5 Vacuum parameters 46 Figure 6 6 Maintenance settings 47 Figure 6 7 Hardware settings single target...

Page 6: ...50T Menus 42 Table 13 Generic Sputter parameters 45 Table 14 Vacuum parameters 46 Table 15 Maintenance settings 47 Table 16 Hardware settings 48 Table 17 Spare Parts for the Q150T 72 Table 18 Replacem...

Page 7: ...orm Without this declaration Quorum reserves the right not to handle the substance item Also in accordance with EC regulations we will supply on request hazard data sheets for substances used in our i...

Page 8: ...for sputter coating or carbon metal evaporation The instrument is fully adaptable to a wide range of specimens and offers easy loading and unloading of samples The changeover between sputtering and ev...

Page 9: ...general there is a need for all these films to be fine grain even coating with uniform and reproducible film thickness The most common form of deposition is from resistance heated carbon rods The rod...

Page 10: ...r cycle plus up to 4 litres if argon is also used for purging and venting If bottle supply is adjacent it can be isolated locally if not or plant supply local isolation valves should be fitted Nitroge...

Page 11: ...Unlatch the grey top cover and remove the 2 transit screws retaining the top plate assembly The set screw and the transit plate should be retained with the instrument accessories in case further trans...

Page 12: ...rt unless you have specifically requested another configuration Figure 2 1 shows the location of connectors and switches on the rear panel of the Q150T Figure 2 1 Q150T Rear Panel 1 S versions only 2...

Page 13: ...as inlets 2 Connect a suitable nitrogen supply at a regulated input of 0 3bar 4psi to the quick connect Nitrogen connector on the rear panel Air may be used in place of nitrogen for venting not recomm...

Page 14: ...o the Pump Output connector on the rear panel see Figure 2 3 If the rotary pump has its own switch ensure that this is set to the On position WARNING PUMP OUTPUT Check that the Power Output is suitabl...

Page 15: ...turer s instructions 3 Ensure that the vacuum pump is filled with the correct oil 4 If the vacuum pump is fitted with an on off switch ensure that it is set to the on position to allow the instrument...

Page 16: ...above the base plate by moving the collar up or down the shaft Unfasten the M3 screw with a hexagonal key slide the collar to the required position and retighten the M3 screw For maximum distance betw...

Page 17: ...ld illuminate and show the initialising message 3 Once the instrument hardware and software has initialised the standby screen is displayed see Figure 3 1 Figure 3 1 Standby screen 3 1 1 The Standby s...

Page 18: ...Table 1 Q150T Default Profiles PROFILE NAME PURPOSE QT Time Chromium Sputter coating run using Chromium target see page 28 QT Chromium 5nm Sputter coating run using Chromium target terminated by FTM...

Page 19: ...hickness control or current information make a note of it now When the chamber has been vented the display reverts to the standby screen see Figure 3 1 Future versions of the Q150T software will allow...

Page 20: ...2 Tap on the sign to the left of the currently active profile see Figure 3 5 left Figure 3 5 Listing system properties for a profile 3 Tap on System System Property Editor is displayed see Figure 3 5...

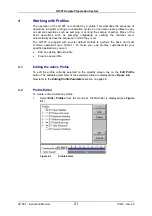
Page 21: ...ccur The Q150T is supplied with several default profiles to perform the basic and most common operations see Table 1 To make your own profiles customised for your specific applications you can Edit an...

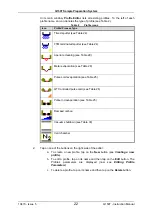
Page 22: ...ble 29 Metal evaporation see Table 28 Pulse cord evaporation see Table 25 QT Controlled pulse cord see Table 26 Pulse rod evaporation see Table 25 Ramped carbon Vacuum shutdown see Table 30 Vent chamb...

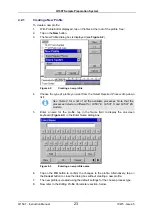
Page 23: ...t See Table 2 for a list of all the available processes Note that the processes listed are different for Q150T E Q150T S and Q150T ES models 5 Enter a name for the profile tap in the Name field to dis...

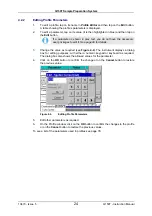
Page 24: ...to edit it See page 49 for details 3 Change the value as required see Figure 4 4 The instrument displays a dialog box for editing purposes with either a numeric keypad or keyboard as required The dia...

Page 25: ...ity g cm 3 Aluminium 2 70 Carbon 2 25 Titanium 4 54 Chromium 7 19 Nickel 8 90 Copper 8 96 Silver 10 50 Palladium 12 02 Gold Palladium Au Pd 80 20 mix 17 86 Tungsten 19 30 Gold 19 32 Platinum Palladium...

Page 26: ...section 4 3 2 Editing Material Parameters Each material is defined by the parameters shown in Table 4 Table 4 Material parameters Name Default Value Minimum Value Maximum Value Comment Density 10 1 3...

Page 27: ...with either a numeric keypad or keyboard as required The dialog box also shows the allowed values for the parameter 4 When you edit a value tap on the OK button to confirm the change or on the Cancel...

Page 28: ...m is 1x10 2 mBar To achieve a gold coating of 10nm create a new profile based on QT Timed Sputter The default Material setting is Au Edit the current to 25 mA Set the time to 30 seconds If necessary a...

Page 29: ...e OK button to close the Editor The clean time in the System properties should be between 10 and 30 seconds However leave at the default value of 30 seconds for this setup The Q150T applies the optimu...

Page 30: ...jective is to generate a coating thickness of 5 10nm To achieve a Cr coating of 5nm create a new profile based on QT FTM Terminated Sputter Set the material to Cr When prompted select use material def...

Page 31: ...ate a new profile based on Metal evaporation 2 Edit the new profile Change the material from Carbon to Gold Change outgas time to a minimum of 2 seconds Set the outgas current to 0 out gassing is not...

Page 32: ...n the sample and allows the FTM to be used to terminate the coating 5 5 1 Using Controlled Pulse to create a 15nm coat or 2 3nm for EBSD 6 Install the carbon cord insert as described on page 58 ensuri...

Page 33: ...e parameters see Table 26 10 Run the new profile The reliability of this process depends on the operation of the FTM The stability of the FTM is affected by the quality of the crystal A crystal will n...

Page 34: ...to give the maximum source to stage distance 3 Create a new profile based on QT Pulsed rod evaporation 4 Edit the newly created profile setting the parameters as shown in Table 7 5 Run the new profile...

Page 35: ...wedge using the wedge tool Part No 12097 This tool can be used to shape 3mm or 6mm rods Use the end which has the grove closest to the plate to shape 3mm rods see Figure 5 3 detail B 3 Hold the tool...

Page 36: ...at the Current Ramp Rate until the Evaporation Current value is reached or the Evaporation Time has expired 4 The evaporation current is held constant until the Evaporation Time has expired If you ob...

Page 37: ...ging the property Evaporation current This property is the final current achieved during the ramped profile see Figure 5 5 The default current is 46A and this is the maximum that should be used for a...

Page 38: ...a height of 75mm above the base plate 3 Ensure the extended height cylinder 10429 is fitted as described on page 69 4 Create a new profile based on QT Ramped Carbon 5 Edit the newly created profile s...

Page 39: ...ng and to decide to continue or repeat the outgas cycle It applies the outgas current and outgas recovery as above After a cycle is completed you are prompted to a carry out further out gas cycles b s...

Page 40: ...eatment with air the carbon film is made hydrophilic and negatively charged thus allowing easy spreading of aqueous suspensions With subsequent Magnesium Acetate treatment the surface is made hydrophi...

Page 41: ...ocess 7 Create a new profile based on the QT aperture cleaning profile and save with a new file name 8 Change the current to a value approximately 5 10 A below the point where the boat was glowing che...

Page 42: ...menu to set the system clock monitor FTM usage and connect the Q150T to a network The Help menu displays version information about the Q150T software Table 12 Q150T Menus Menu Sub menu Command Purpos...

Page 43: ...mined by the settings of the active profile Default sputter settings and general hardware settings are configured through System Editor To view the System Editor select Edit System from the menu bar s...

Page 44: ...d by your DHCP server ensure that the Automatic IP DHCP parameter is set to Yes If your network does not have a configured DHCP server you will need to set the IP address manually To set the IP addres...

Page 45: ...00 150 Current at which the target is cleaned at Clean Time Seconds 30 0 60 Time for which the target is cleaned for Clean Discharge time Seconds 20 15 90 Only used during pulse cleaning of target Tim...

Page 46: ...extend the vent time to 120 seconds Flush Time Seconds 70 10 240 Flush Vac Threshold mBar 8 0 1 100 Vacuum the system will pump down to before venting with nitrogen during a flush Extra Pump time 120...

Page 47: ...display of service reminders Service interval Days 365 1 730 Set the number of days between services Service reminder sleep time 7 1 180 Set the number of days before a service reminder message is rep...

Page 48: ...aterial if installed Target B Target material if installed Target C Target material if installed Vacuum Gauge Type Read only displays gauge type Use Turbo Pumping Yes No Yes If No the turbo pump will...

Page 49: ...create further user groups with customised privileges for instrument use 6 3 1 Changing User Group When first switched on the Q150T starts in User group mode If you want to change to Administration le...

Page 50: ...yed keyboard dialog box 3 Select the required privilege level form the Level dropdown box 4 Tap on the OK button to confirm the change or on the Cancel button to exit without creating the new group 6...

Page 51: ...al used and will help you decide when to replace it see page 68 Figure 6 10 FTM Status 6 5 Setting the Date and Time To adjust the Q150T s clock select Service Set Time from the menu bar The Set Date...

Page 52: ...Click on the Change Scope button 6 In the dialog select the My network subnet only option 7 Confirm your selections by clicking on the OK buttons in the open dialog boxes 6 6 2 Connecting the Q150 To...

Page 53: ...tap on Process Log 3 The process log is displayed see Figure 6 13 Process events are listed in order with the most recent at the top of the list 4 The log displays five events on each page To browse...

Page 54: ...of a wire basket or molybdenum boat Glow discharge insert 10262 Rotacota stage 10360 Slide stage 10358 Four wafer stage and gear box 10458 Specimen stage with adjustable tilt 10357 Film thickness moni...

Page 55: ...fit a target we recommend you wear latex gloves to do so a Unscrew the target clamp ring see Figure 7 2 b Place a new target centrally on the holder Hold it in place with one finger through the clamp...

Page 56: ...mbly carefully locating the M3 screw head in the rim of the insert in the slot to the right of the outer ring Lock the insert in position by turning the securing buttons until their flanges overlap th...

Page 57: ...the collet out Figure 7 5 Carbon Rod Shaper S8650 S8651 To shape a carbon rod 12 Cut a 50mm length of rod Use only Quorum rods due to the varying diameter and quality of other manufacturer s rods Quor...

Page 58: ...from any packaging plastic bags etc Check the O ring in the outer ring of the lid assembly for damage or debris and clean or replace as required 6 Place the insert in position in the outer ring of th...

Page 59: ...lap the insert Figure 7 7 Fitting the metal evaporation insert for downwards evaporation 7 4 1 Installing a Wire Basket To install a wire basket or molybdenum boat 1 Open the lid assembly and lay back...

Page 60: ...e They must have a flat top face and that the contacts in the underside of the top cover assembly are also clean and flat 7 Close the top cover assembly and press firmly down to secure the latch 7 4 3...

Page 61: ...Sample Preparation System Q150T Instruction Manual 61 10473 Issue 5 Figure 7 8 Metal evaporation insert adapted for upwards evaporation Outer ring O ring FTM Electrode extension Sample holder Wire ba...

Page 62: ...ons are restraining the insert and open the lid assembly and rest it against the top cover assembly Then using a 2 5mm hex key release the rod clamping screws and withdraw the rods Close the lid assem...

Page 63: ...Sample Preparation System Q150T Instruction Manual 63 10473 Issue 5 Figure 7 10 Removing the shutter To ensure the correct operation of the glow discharge accessory install the restrictor plate see b...

Page 64: ...talled sample stage by lifting carefully upwards 4 Fit the RotaCota stage a Locate its shaft in the top of the stage rotation drive spigot protruding from the baseplate b With a twisting motion push i...

Page 65: ...erefore resting on the top of the drive spigot An alternative shaft is supplied with the stage 10214 to further increase the range of stage height adjustment available To fit hold the stage firmly and...

Page 66: ...ation drive spigot 5 Fit the gearbox a Locate its shaft into the top of the stage rotation drive spigot b With a twisting motion push it gently down until it sits down on the turbo mesh c Secure in pl...

Page 67: ...own until the collar around the shaft rests on top of the drive spigot 5 Adjust the tilt angle a Slacken the M3 screw below the stage with a hexagonal key b Tilt the stage to the desired angle and ret...

Page 68: ...e latch The crystal cover see Figure 7 15 may be removed completely for cleaning or if the FTM is in continual use Figure 7 15 FTM left replacing the FTM crystal centre FTM lead right 7 10 1 Replacing...

Page 69: ...xtended height cylinder Figure 7 16 The extended height cylinder in position 7 12 Full Range Vacuum Gauge Assembly The instrument must be returned to the factory for fitting this option as the covers...

Page 70: ...the instrument 2 Remove the lower screw below the protruding vacuum spigot 3 Apply a little vacuum grease to the spigot protruding from the rear of the instrument 4 Take the Rotating Vacuum Spigot ass...

Page 71: ...the rear panel 3 Position the main stop box as shown in Figure 7 18 making sure the plug and cable do not scratch the instrument case 4 Secure the main stop box to the rear panel using the two M4 x 10...

Page 72: ...0 2mm Chromium Target TK8845 57mm x 0 5mm Tungsten Target TK8846 57mm Dia x 0 1mm Gold Target SC502 314A 57mm Dia x 0 1mm Au Pd Target SC502 314B 57mm Dia x 0 1mm Platinum Target SC502 314C 54mm x 1 5...

Page 73: ...ires spacer A4117193 under shield see page 54 and Figure 7 2 Quorum can supply a wider range of target materials and thickness Please enquire for details 7 16 Other Accessories The following are avail...

Page 74: ...ularly Check and clean the glass chamber and the L gaskets as required using a lint free tissue and foam cleanser or similar Do not use vacuum grease on L gaskets Monthly QT150T S and QT150T ES only C...

Page 75: ...not run process An unrecoverable undefined error has occurred in starting a process This instrument does not support this process The process run is not able to be run on this instrument Evaporation P...

Page 76: ...d A profile has been run that using the Carbon String insert and it is not fitted in the chamber lid Evaporation insert not found A profile has been run that using the Evaporation insert and it is not...

Page 77: ...detected that the next pulse is likely to fuse the cord Also fusing the cord is likely take the deposition excessively above the required thickness Table 23 Information Messages Information messages D...

Page 78: ...Target Material required for this process Sputter Current mA 20 1 50 Coating current Updated from material list Sputter Time seconds 120 1 3600 Timed Sputter only Stops sputtering at set time Termina...

Page 79: ...between the start of consecutive pulse cycles Must exceed pulse length Outgas time s 10 2 60 Time cord or rod is outgassed before pulse cycle s Outgas current A 30 cord 20 rod 0 40 Current applied at...

Page 80: ...ness is not being achieved Pulse Interval 10 5 30 Set the length of time between the pulses in seconds Note reducing this time will reduce the time the FTM has to settle and reduce accuracy Out Gas Ti...

Page 81: ...te at which the current is increase after the outgas time PreEvap End current A 32 0 60 The output current at which the above ramp rate is stopped The evaporation time is started at this point Current...

Page 82: ...tosource at the start of outgas step Thus allowing automated out outgassing Note the current during the out gas may be adjusted Max Out Gas Current A 40 0 50 Maximum current that can be set during out...

Page 83: ...able 30 Vacuum shutdown properties Name Default Value Minimum Value Maximum Value Comment Shut down Vacuum mBar 1 1x10 2 1x10 2 Set the Vacuum that the system will pump down to Note the final vacuum m...

Page 84: ...ty Shield PET Ultimate vacuum 5x10 5 mbar Turbomolecular Pump 60 litres sec Vacuum Gauge Range 1000 5x10 4 mbar Fuse T 10A ceramic 5x20mm fuse standard IEC60127 2 Weight 33 4 kg Sputter Coater Q150T S...

Page 85: ...Rate These graphs are provided for guidance only and are not to be taken for absolute reference 0 0 10 0 20 0 30 0 40 0 50 0 60 0 70 0 80 0 90 0 10 20 30 40 50 60 70 80 Deposition Current mA Depositio...

Page 86: ...6 Q150T Instruction Manual 0 0 5 0 10 0 15 0 20 0 25 0 30 0 35 0 40 0 60 70 80 90 100 110 120 130 140 150 Deposition Current mA Deposition Rate nm min 7 10 3 1 10 2 Figure 9 2 Sputtering Deposition Ra...

Page 87: ...10473 Issue 5 0 0 20 0 40 0 60 0 80 0 100 0 120 0 140 0 160 0 180 0 200 0 20 30 40 50 60 70 80 90 100 110 120 130 140 150 Deposition Current mA Deposition Rate nm min 7 10 3 1 10 2 Figure 9 3 Sputter...

Page 88: ...aration form completed Appendix 9 5 5 for the form 9 5 2 Health and Safety Declaration Those persons carrying out repair or service have to be informed of the condition of the components This is the p...

Page 89: ...rom potentially harmful substances Yes No If Yes go to Section 5 If No go to Section 4 4 Process related contamination of Equipment Accessories Toxic Yes No Corrosive Yes No Explosive Yes No Microbiol...

Page 90: ...box 50 Edit User Level dialog box 49 electrical connections 14 emergency stop module 71 Enter Name dialog box 23 26 error messages 75 evaporation 9 extended height cylinder 69 F Fail Safe 7 film thick...

Page 91: ...urity 49 SEM 28 service 74 Service FTM command 51 Set Time command 51 service reminder 47 services 10 Set Date Time dialog box 51 shaping carbon rods 57 spares 72 specification 84 sputter coating 9 sp...

Page 92: ......

Reviews: